.png)
Overview
Acumin. Web is a web-based tool available for licensed firms where members can enter time and view pertinent member and client-matter statistics from a webpage accessible outside of the firm network, provided that there is a cellular or internet connection. This time entry tool facilitates the recording of time, making the time entry process more efficient. The webpage is designed to be compatible with a multitude of devices, including smartphones, tablets and PC's.
For ease of readership, this document focuses on the time entry process and the Hours Worked module. Other documentation is available for the different modules, depending on licensing and permissions.
Accessing Acumin.Web
To access Acumin.Web, enter the firm provided website into the website field of the web browser:
Example:

The user will be redirected to the Acumin.Web login page where they will be prompted to enter their Acumin username and password:
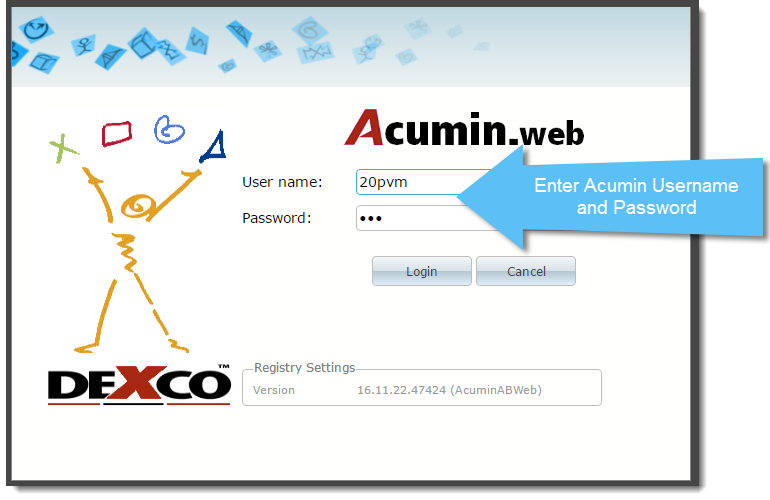
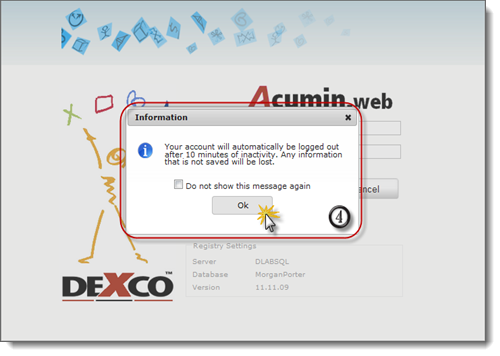
The user may receive an information message advising that the account will automatically be logged-out after a set amount of inactivity. Information not logged or submitted will be lost.
To dismiss the message, click on the "Do not show this message again" checkbox.
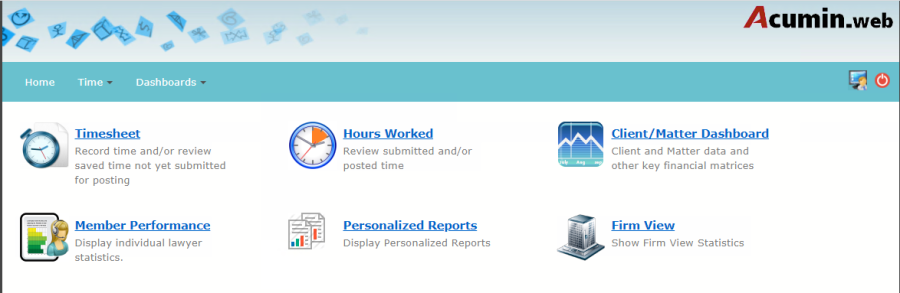
Once the login information has been verified, the user will be directed the Acumin.Web homepage:
Time Entry
Recording Time Entries in Acumin.Web
Accessing the Timesheet
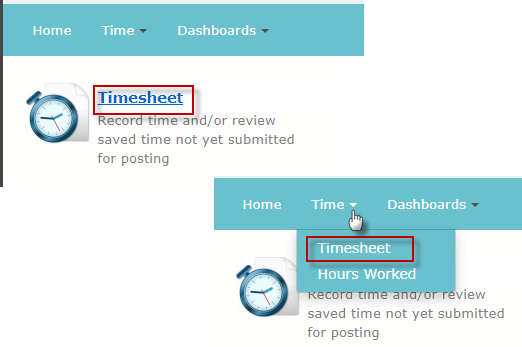
To access the timesheet in order to begin recording time, users can either click on the Timesheet button on the homepage or on the Timesheet option from the Time menu option:
Creating a New Time Entry
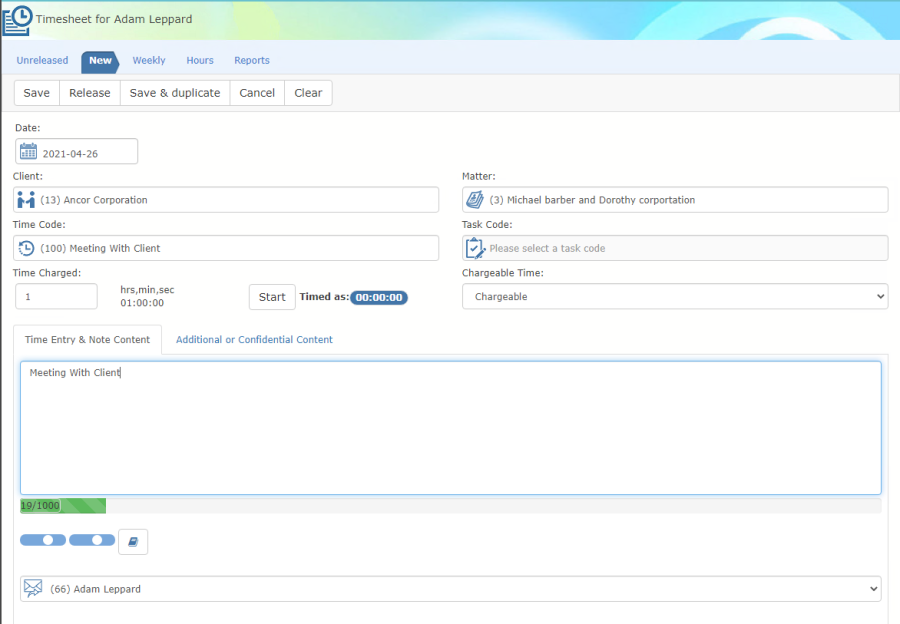
Definition of Fields:
-
Save: After the user enters the time entry, the entry is added to the Unreleased list;
-
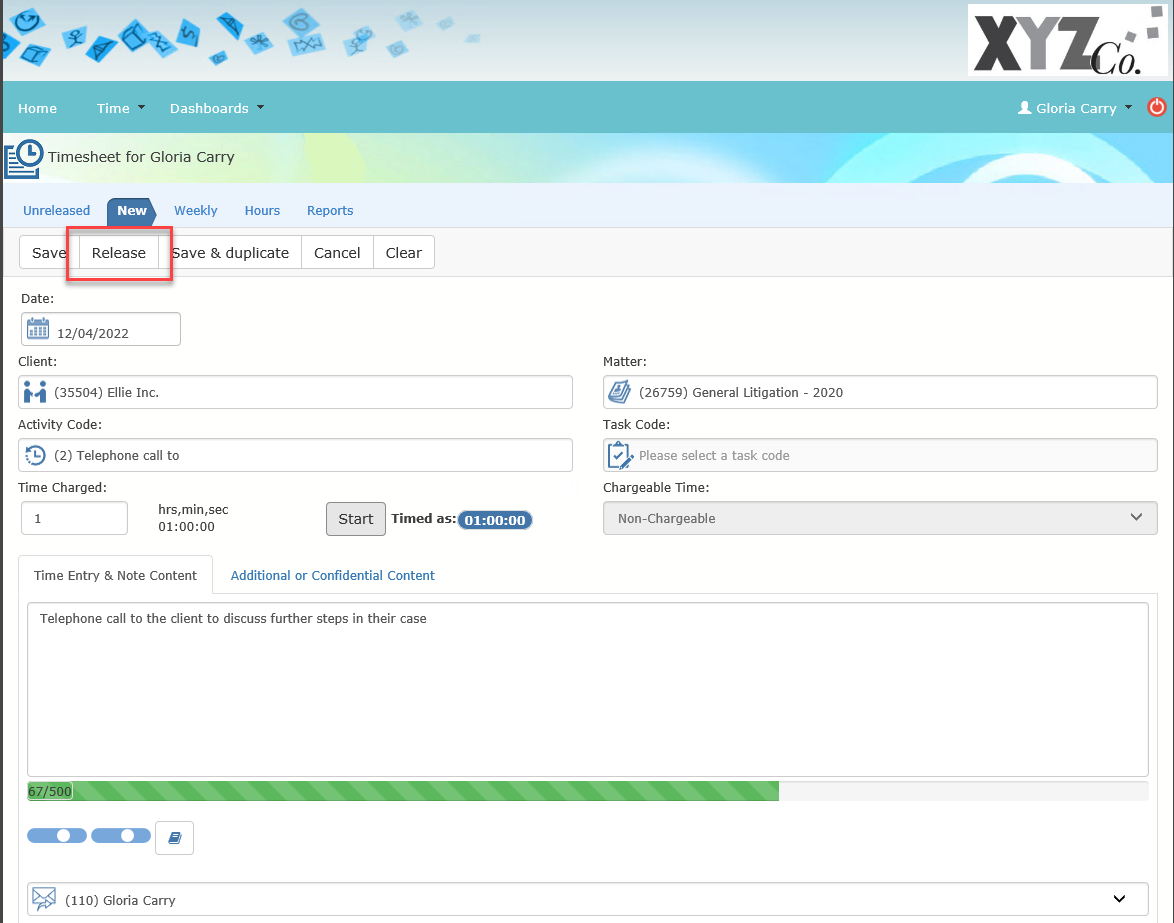
Release: Send the time entry to the specified user's Acumin timesheet;
-
Save and Duplicate: Save the entry into the Unreleased list and create a new one.
-
Cancel: The entry won't be created.
-
Clear: When using this function, all time entry fields will be cleared and deleted;
-
Date Field: The date will auto-populate to today's date;
-
Member / Working Member Field:
-
If the user is considered a timekeeper and is not setup as someone's main assistant, the member field will automatically populate with themselves;
-
If the user is setup as someone's main assistant, the member field will auto-populate with the attorney where the relationship was most recently set;
For example, if John is setup as Tony's main assistant:
-
When John logs onto Acumin.Web, the default member will be Tony;
-
If Tony logs onto Acumin.Web, the default member in the member field will be himself.
-
Client Field: If client is known, the client who owns the matter can be entered into the field in order to narrow the results when searching for a matter;
-
Matter Field: It is not mandatory for the client to be entered in order to perform a search for a matter. If the matter code is known, this can be entered;
-
Time: The amount of time spent performing the activity can be entered here via typing into directly into the field, or by clicking the arrows to scroll to the desired number;
-
Time Code: The desired Time Code can be entered here if code is known. If unknown, the user has the option to perform a search;
-
Time Entry & Note Content: The user can enter a meaningful description into this field. Note that the content of the description field will eventually be visible on an invoice;
-
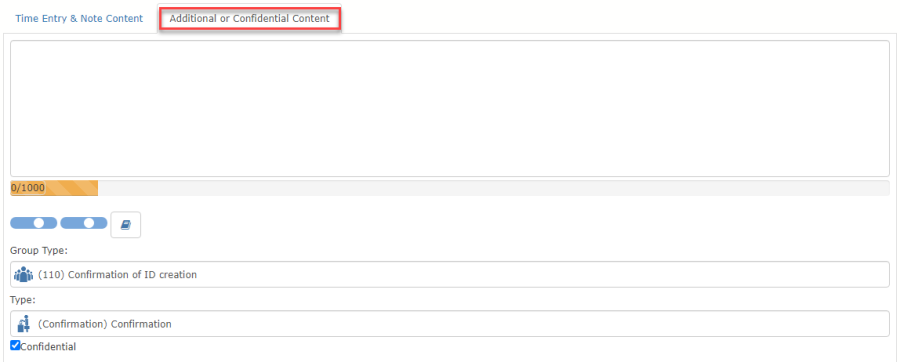
Additional or Confidential Content: In this field, the end-user can add additional relevant content and flag the additional content as confidential. When other users view the properties of the matter, the confidential content will be hidden;
Depending on licensing, the user can specify a case note group type and a case note type in order to generate a related case note when posting the time entry;
Navigating the Timesheet
Users can use the tab and the shift-tab to navigate from field to field. Where applicable, such as the client or matter fields, if the code is known it can be entered directly. If not, the user can click on the ellipsis button to perform a search.
-
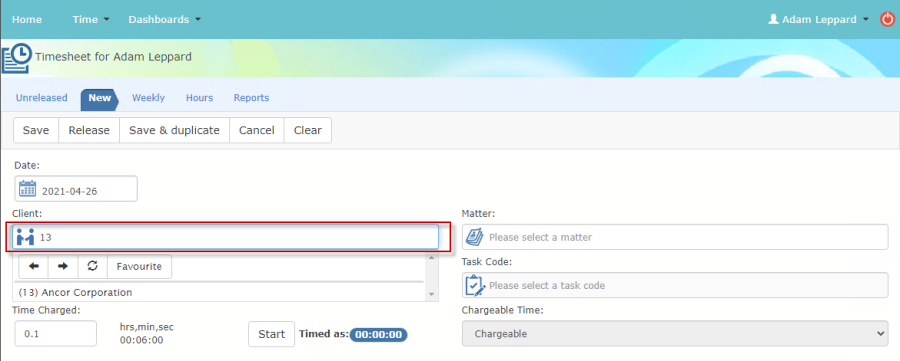
Populating a field by directly entering the applicable code:
If known, users have the option of populating the applicable code directly. In the example below, the user entered Code "13" and then hit tab to validate the field:
-
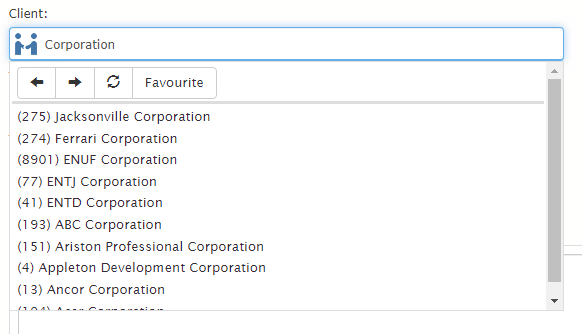
Populating a field by directly entering the client's name:
If code is unknown, users can enter a name that has key words when you need to look for the client. Once the variable is found, click to populate the corresponding field.
-
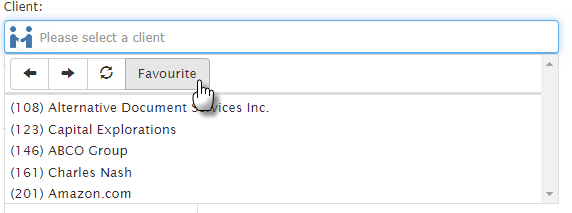
Populating a field by selecting a favourite:
All clients and matters flagged as a favourites in Acumin can be easily accessed in Acumin.Web. To launch the list, click on the Favourite button.
-
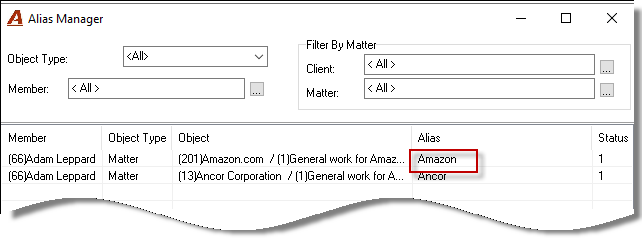
Populating the client and matter field using a matter alias:
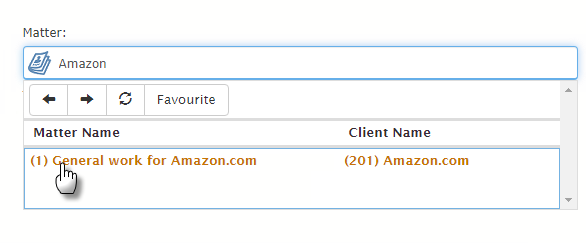
Users can populate client and matter fields by populating alias' that are setup in Acumin.
For example, Client 201 Matter 1 is setup with alias of "Amazon" for Member 66. When Member 66 populates either the client or matter field with the word "Amazon" (when member 66 is the working member), the client and matter fields auto-validate with the required client and matter.
-
Populating the time code:
-
If you are not required to use time codes, you can leave this field blank.
-
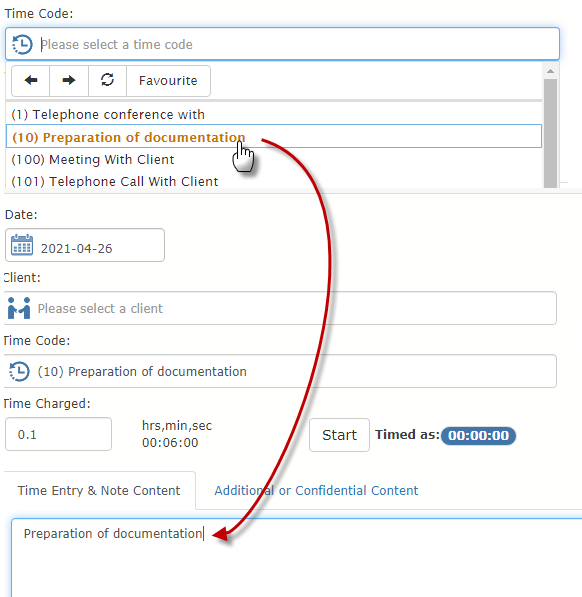
If you are required to use time codes, set the ones you use as favourites so when you search, you have immediate access to the list of favourites making the search, find and select process more efficient. The time code name will be populated in the Time Entry Content.
-
-
Chargeable Time field: the chargeability of the entry on chargeable matters can be changed by authorized users.
Saving a Time Entry
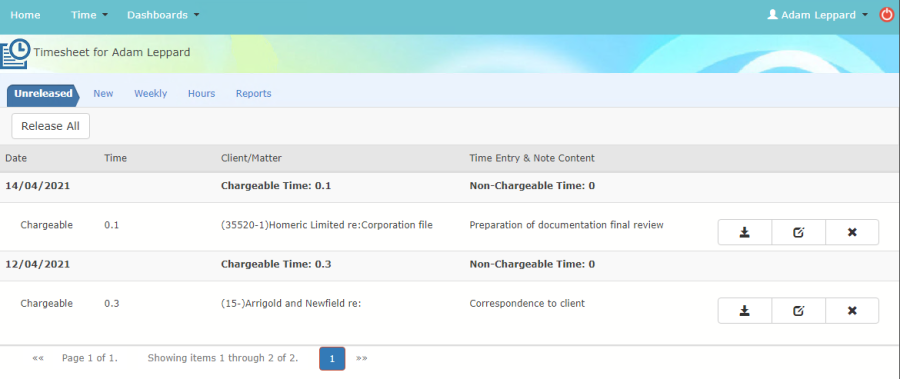
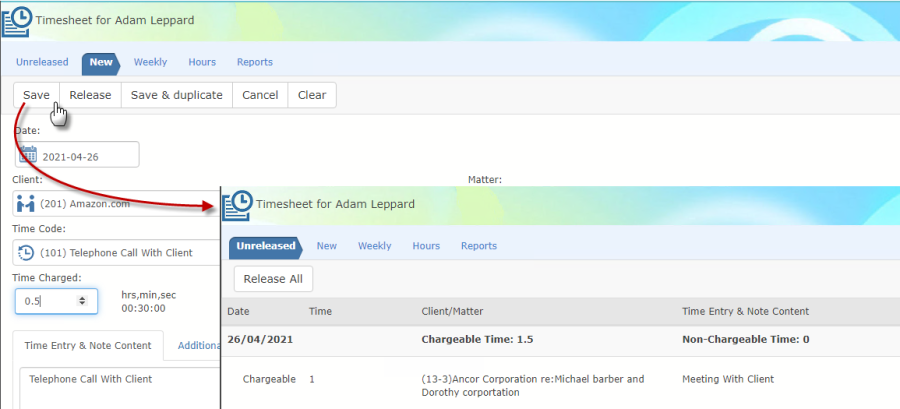
By clicking on the Save button, users can add newly completed time entries to their own personal Unreleased List. The content of this Saved List is only visible in Acumin.Web until the user decides to release the entry to the corresponding timesheet in Acumin desktop (either their own, or their assistant's timesheet).
Releasing a New Completed Time Entry
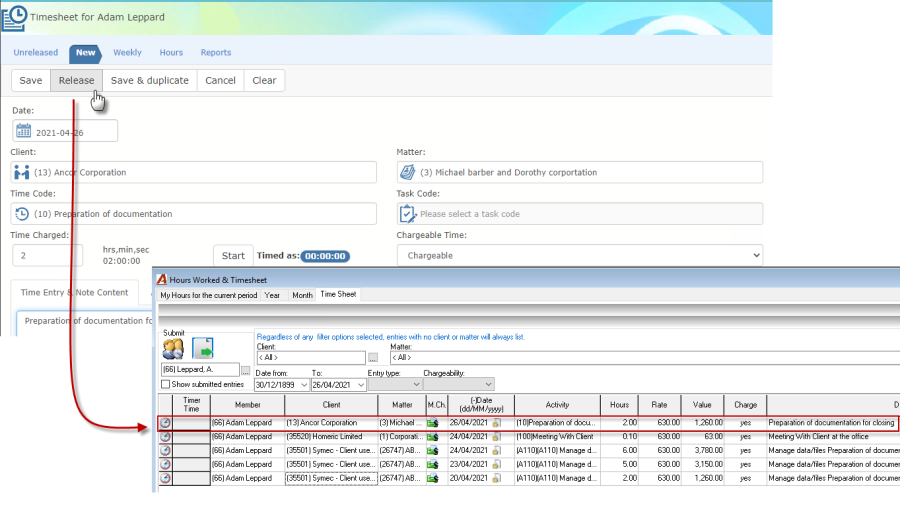
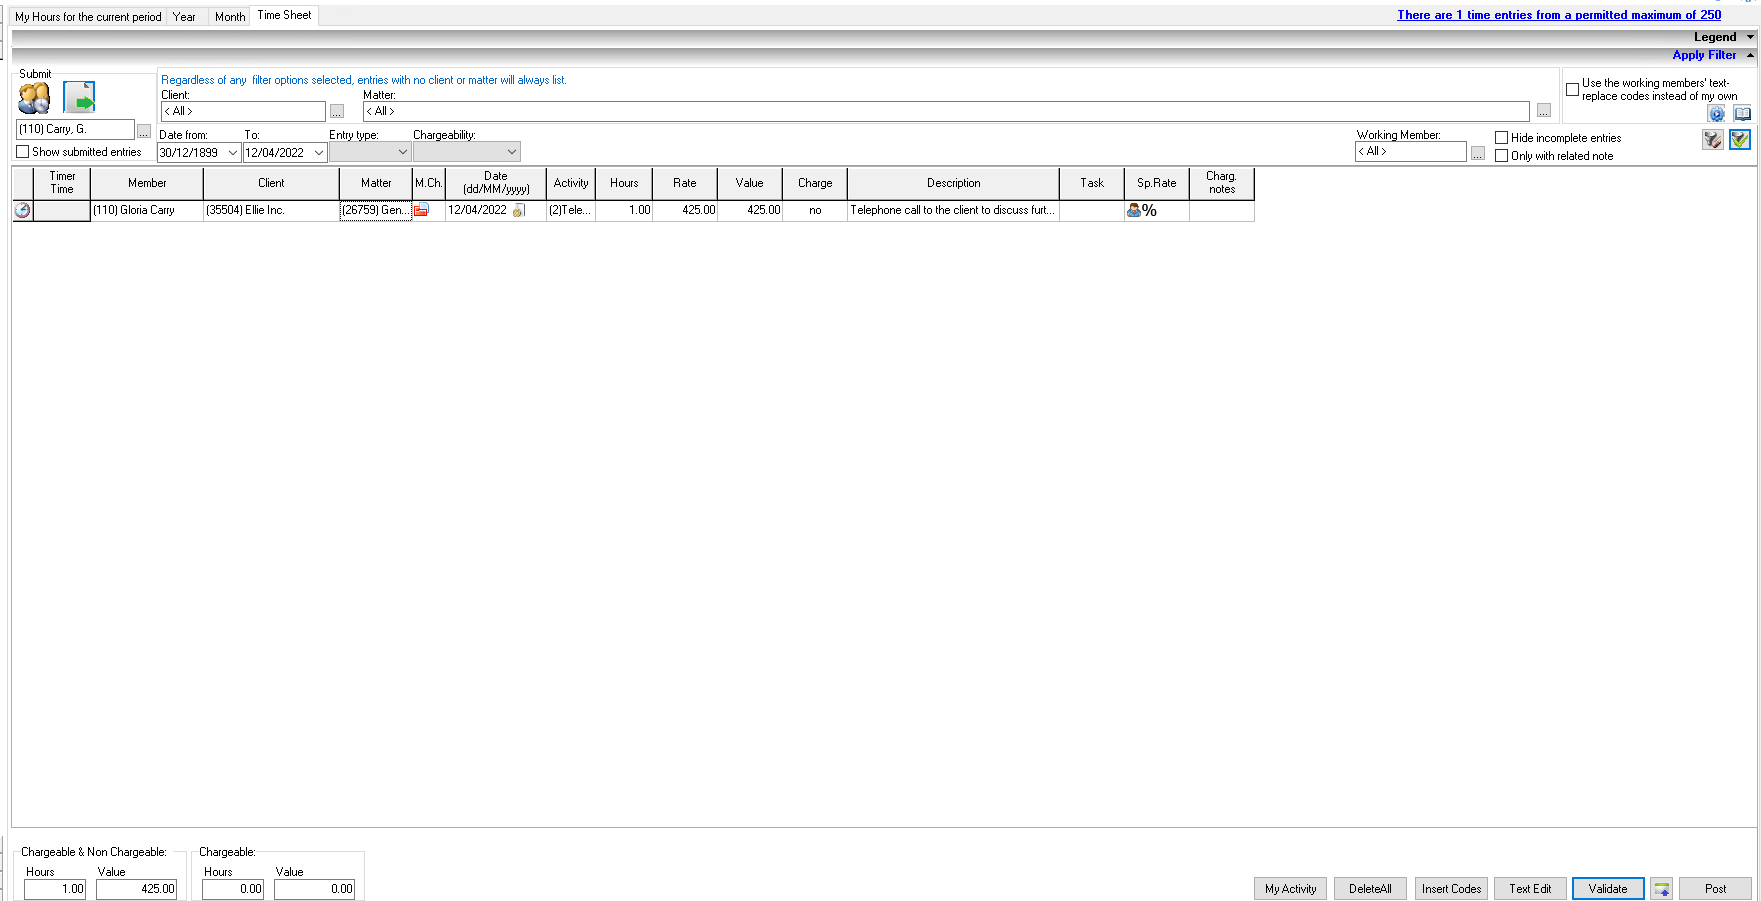
In order for time entries to become available for posting (which is done in the Acumin.Desktop version only), the entries must be released from Acumin.Web. The illustration below shows how once released, the entry becomes visible in the Acumin.Desktop application.
Releasing Saved Time Entries
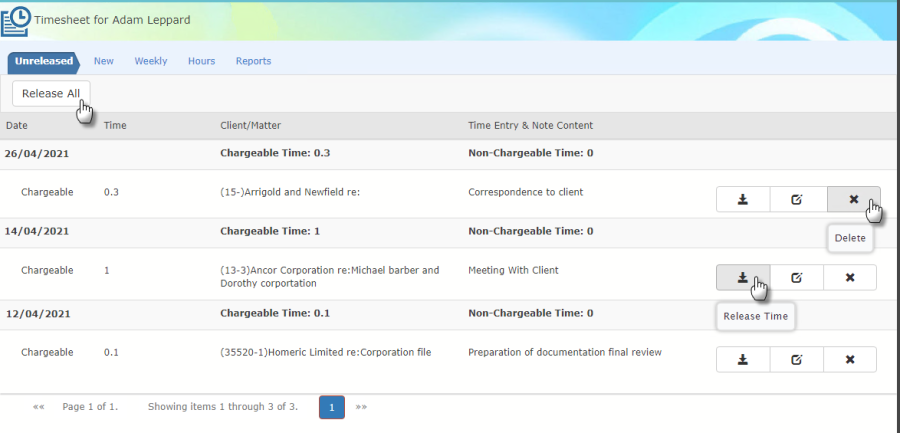
After adding a time entry to the Unreleased List, the user will eventually need to decide whether to delete or release the time entry. Users can release the entries individually or all at once.
To release all entries, the user must click on the Release All button as shown below.
Note: Once a time entry has been released to the Acumin timesheet, the entry will need to be posted in the Acumin.Desktop application in order to be considered Work-In-Progress (WIP).
Posting of entries can ONLY be done in the Acumin.Desktop application.
Posting Time Entries
Once time entries have been released from Acumin.Web they will only be available for modification in the Acumin.Desktop application.
Weekly Timesheet
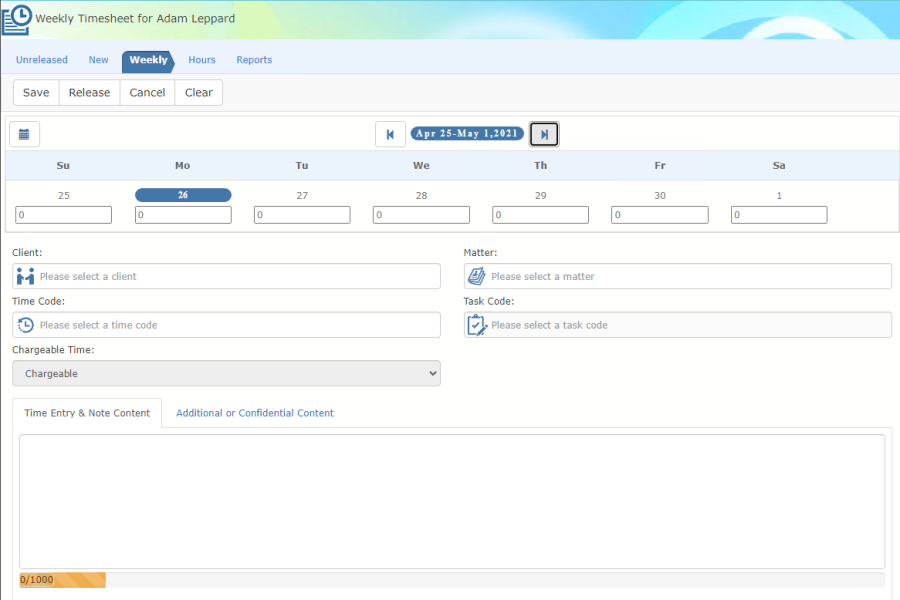
The weekly timesheet allows users to create multiple time entries at the same time within a week where a common client, matter, activity and description is used.
Accessing the Weekly Timesheet
To access the weekly timesheet, the user will need to click the Weekly tab from the Timesheet. The date range shown will be for the current week.
Creating Weekly Time Entries
The time entry section of the form provides the user with same minimum fields as the regular time entry form.
The user is required to enter a value for the corresponding date entry and then populate the common client, matter, time code and description. The page will always launch on the current week.
Similar to regular Acumin.Web time entries, the end-user has the option to Save or Release all time entries created from the weekly timesheet.
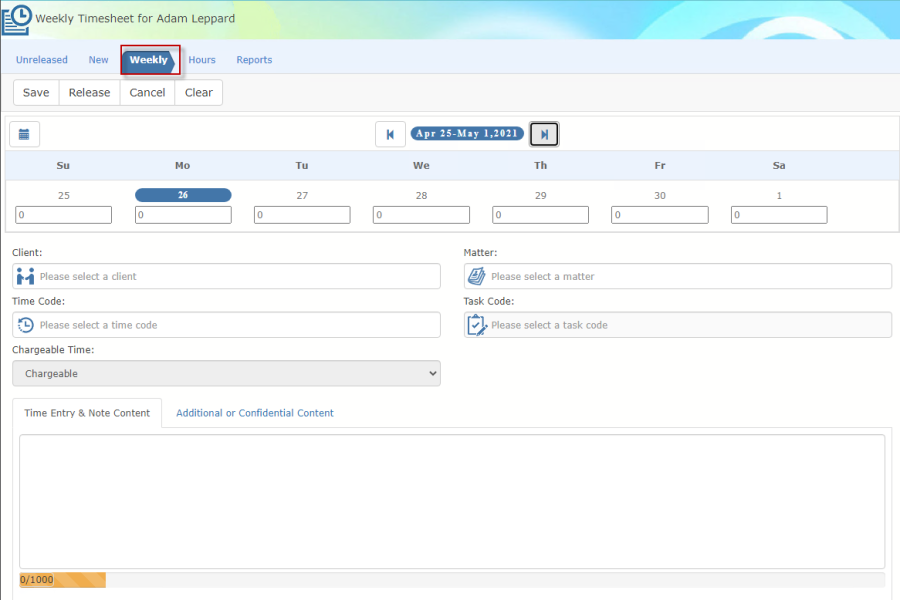
Save: After the user enters the time entries, all entries will be added to the Unreleased list;
Release: Send time entries to the specified user's Acumin timesheet. Note that time entries currently in progress will not be submitted to the Acumin timesheet when using the Release function.
The user has the option to override and set to send the entries to another member.
Clear: When using this function, all time entry fields will be cleared and deleted;
Hours Worked
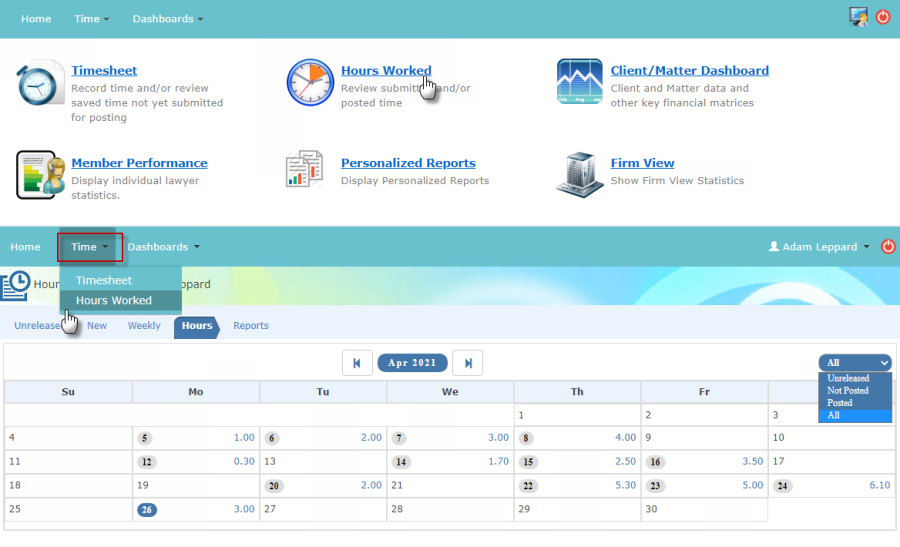
To access the Hours Worked module, users can either go to the Time menu option and select the Hours Worked option from the drop-down list or click on Hours Worked on the Home Page.
-
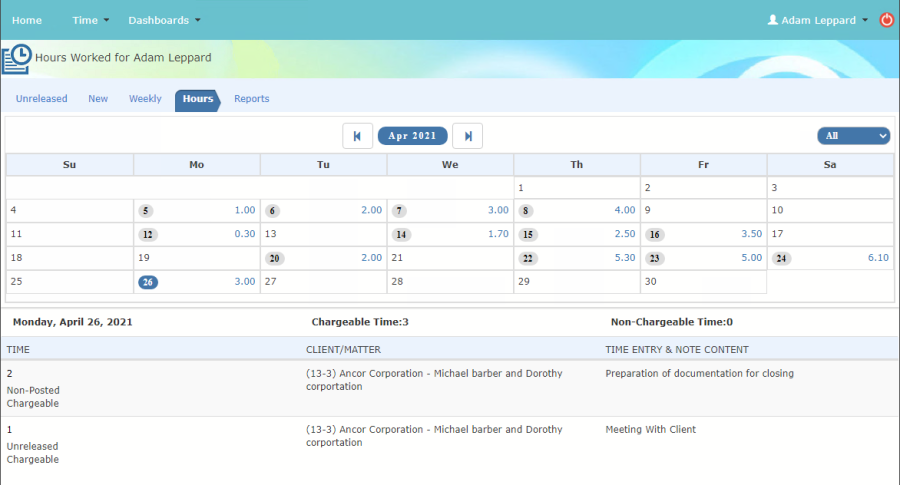
Similar to the timesheet in Acumin.Web, the hours worked calendar will list a daily summary of all time entries for the selected date;
-
The default status for all time entries shown on the Hours Worked module is "Not Posted". The users can adjust the filter option to show all time entries (posted and not-posted) or only posted;
-
The current date is highlighted in blue;
Reports
Users have access to the various personal time entry reports from directly within Acumin.Web. To access, click on the Reports tab from the Timesheet.
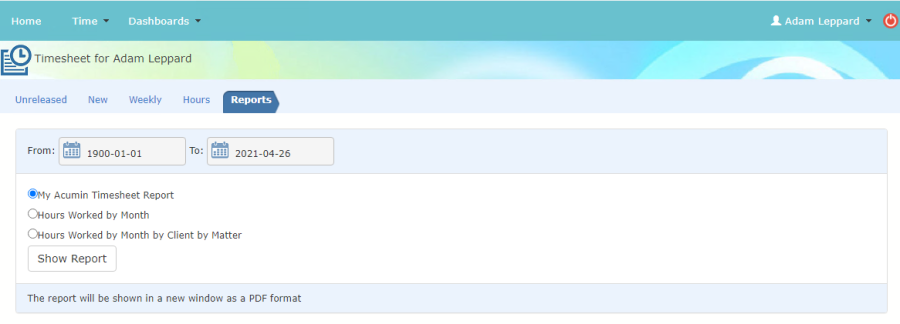
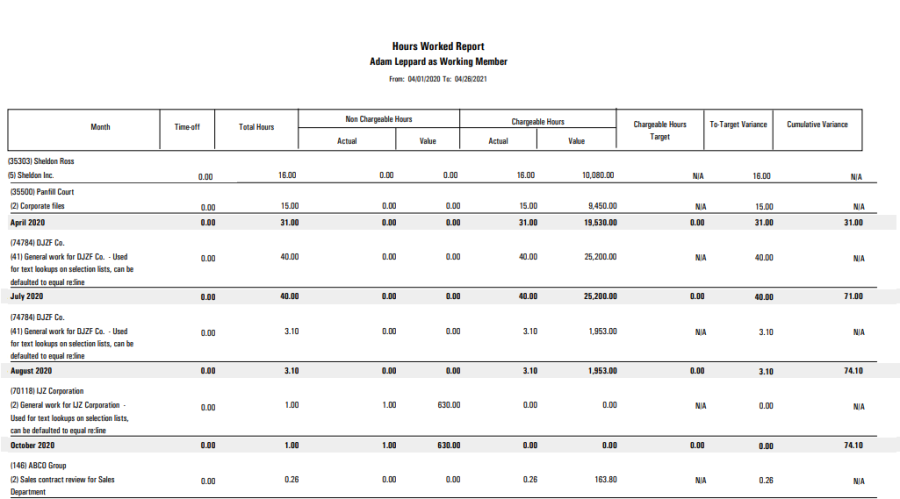
The user will have the possibility to generate three variations of the Hours Worked Report.
-
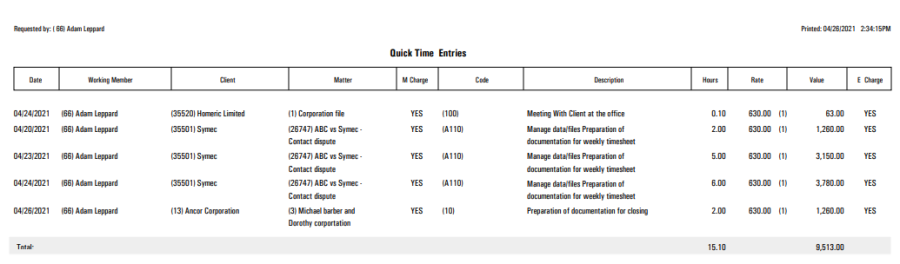
My Acumin Timesheet;
-
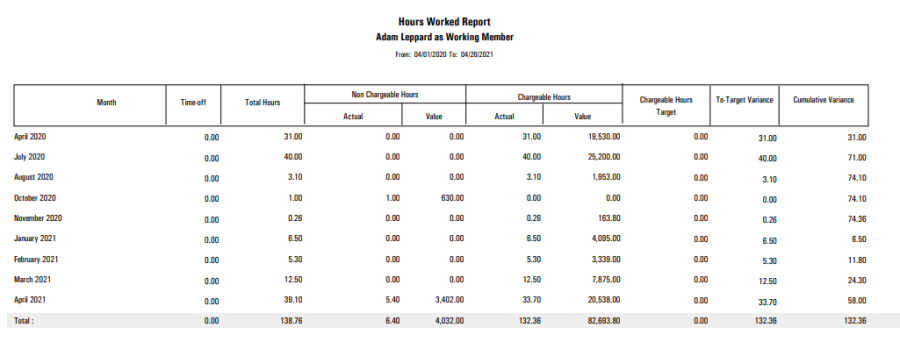
Hours Worked by Month;
-
Hours Worked by Month by Client By Matter
If adjustments need to be made to the default date, users can select a new date by clicking on the calendar icon next to the date cells. For ease of selection, the user can click on the header to be able to quickly move to different months and years, or to select Today.
My Acumin Timesheet:
Hours Worked by Month:
Hours Worked by Month by Client by Matter: