.png)
Scope and Purpose
The purpose of this document is to introduce the statement of Account process.
Its scope extends across the concepts behind functional design, the set-up requirements, and a quick start on how to use it.
Conversion Implications
The statement of account process groups outstanding balances by common statement of account contact and billing currency within the client’s structure, therefore if the source application has the same person or address created more than once, this may result in the statement of account not grouping all the invoices in what may appear to have the same statement of account contact. For this reason, after the initial go-live period and first month end which focuses on ensuring new invoices are prepared using a unique contact (the person or address is not duplicated and a different pair used), it is recommended to establish a process for cleaning up the receivable list’s statement of account contact before triggering the statement of account process in Acumin.
Highlights
The statement of account process is designed for the firm to maintain an efficient and effective methodology for a centralized approach for the confirmation of invoices issued, at the lowest possible cost and in support the firm’s collection strategy.
The process is intended to facilitate the issuance of Statement of Accounts due daily to improve the timely receipt of what remains due by the client including interest where applicable, reduce the time it takes to identify clients that did not received the invoice, and provide visibility to stakeholders of brewing collection issues as early as possible.
The invoice’s billing contact is the default statement of account contact, however, is possible to set a statement of account contact that is different, within the client, the matter, or the invoice.
Statement of accounts due are calculated based on firm-defined aging categories (30, 60, 90 days etc.). The statement of account is generated for the aging category based on the invoice date of the oldest invoice. The firm can choose wording of each level of statement of account that may differ and escalate in response to their collection communication strategy.
Once a statement of account is identified as sent by post or sent by email, another will not be generated for the recipient until the oldest with an outstanding balance under their purview reaches an aging category once again.
Statement of accounts sent by post are printed and once sent identified as “Sent”. Statement of accounts sent by email can be sent individually in which case the user has access to the email dialogue box with the PDF statement of account already attached. Statement of accounts individually sent by email must be identified as “Sent by Email” as an additional step.
It is possible to multiple select statement of account records to send by email. In this case only those with an email address will be sent directly using a firm-defined email template content. These are immediately identified as sent by email.
Statement of Account – How Invoices Are Grouped
The Statement of Account (SOA) groups outstanding invoices according to rules set in your environment. These rules determine how the SOAs are created and which invoices appear together. Below are the available grouping options:
1) One Statement of Account per client, per billing contact, per invoice currencycy
This is the recommended and most commonly used rule.
All outstanding invoices for the same client are grouped together when they share:
• the same billing/statement‑of‑account contact
• the same invoice currency
The contact receives one SOA showing everything they are responsible for paying.
Example: An insurance client has multiple adjustors. Each adjustor receives one SOA per currency, showing all invoices in that currency across all matters where they are the billing contact.
2) One Statement of Account per client, per billing contact, per invoice currency , with results displayed by firm
This rule works the same way as the one above but separates the results by firm when a client has multiple firms set in their environment.
The contact still receives one SOA, but amounts are shown in separate sections by firm.
3) Other Available Grouping Options:
a) One Statement of Account per client, per billing contact, per invoice currency, per matter-level member role.
All outstanding invoices for the same client are grouped when they share:
• the same billing contact
• the same invoice currency
• the same selected matter‑level role holder (for example, the Responsible Lawyer)
Example: A client has 50 matters. All have adjustor John Smith as the billing contact. Ten matters are assigned to lawyer Arianna Thompson and 40 to lawyer Tim Jackman. If all invoices share the same currency, John will receive two SOAs—one for amounts tied to Arianna’s matters and one for Tim’s.
Note: Switching to this rule requires additional conversion work and may require extra steps if SOAs have already been issued.
b) One Statement of Account per client, per matter, per billing contact, per invoice currency:
All outstanding invoices for a single matter are grouped together by billing contact and currency.
Example: A client has 10 matters and all have outstanding invoices with the same billing contact and currency. The billing contact will receive 10 separate SOAs—one for each matter.
Note: This rule is usually not recommended because the billing contact cannot easily see the total amount owed. It may also lead to too many SOAs being issued, making follow‑up or payment less efficient.
Statement of Account Setup
Firm Defaults
From the main menu bar View menu select Firms to launch the Show Firms list view. Highlight the first firm and right-click to access the contextual menu to select Properties. Navigate to the Options tab and press Firm Defaults. Navigate to Collection/Billing – Other Defaults sub-tab to complete required firm default content.
Set up is required for each firm (profit centre or office) included within the system
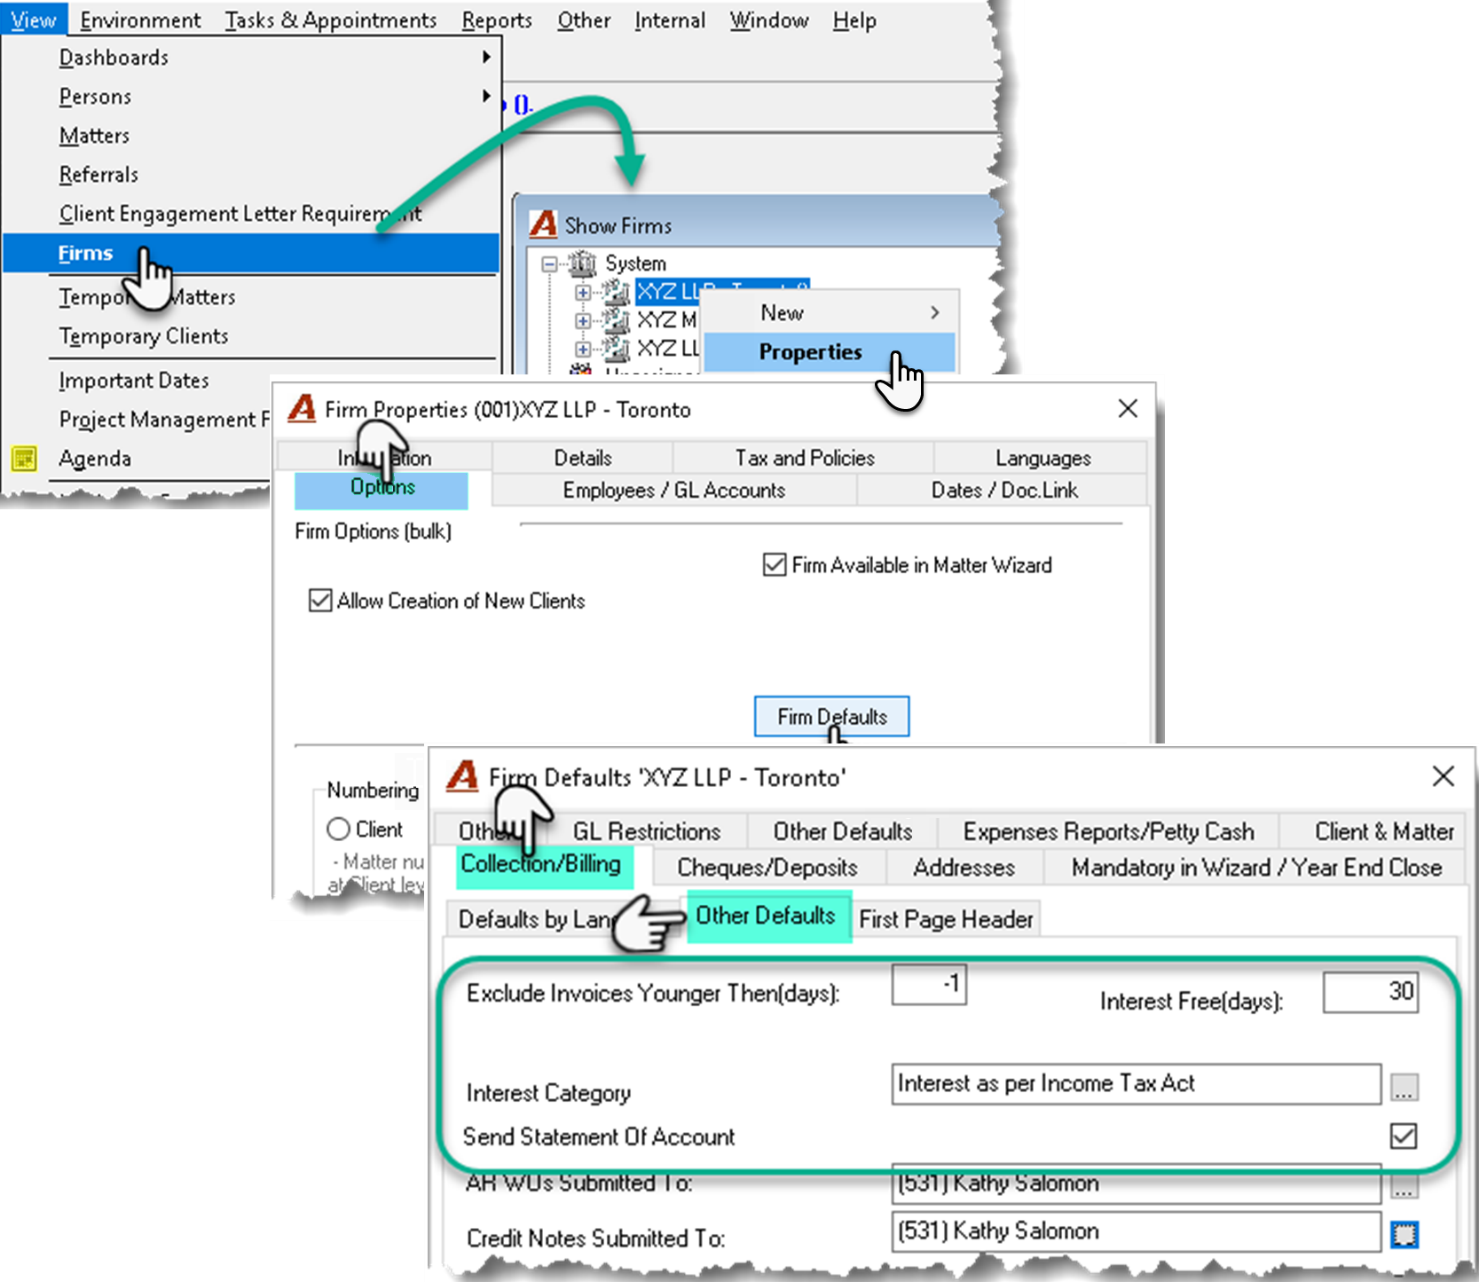
Collection/Billing – Other Defaults
Exclude Invoices Younger than (Days): Enter the number of days that an invoice would need to be outstanding for it to be included on a statement of account. A value of “-1” – considered best practice so all invoices are included in the calculation of any statement of account.
Interest Free (Days): Set the number of days on which interest would not apply. For example, use a value of 30 if the firm does only charges interest on invoices older than 30 days.
Interest Category: Set the default interest category on creation of new clients. This value is only a default and can be overridden for exceptions at the client or matter level. Send Statement of Account: Set the default position applicable on creation of new clients. This position is only a default and can be overridden for exceptions at the client or matter level.
Addresses
Navigate to the “addresses” tab to add the return address. Unless the return payment address is different for other firms, then complete these address fields in the main firm only (typically 001). If for other firms, this section is empty, the system will present the address for firm the main firm (001) unless the option “No return address required” is selected. (See section Select the Return Address to be Included in the Header:)
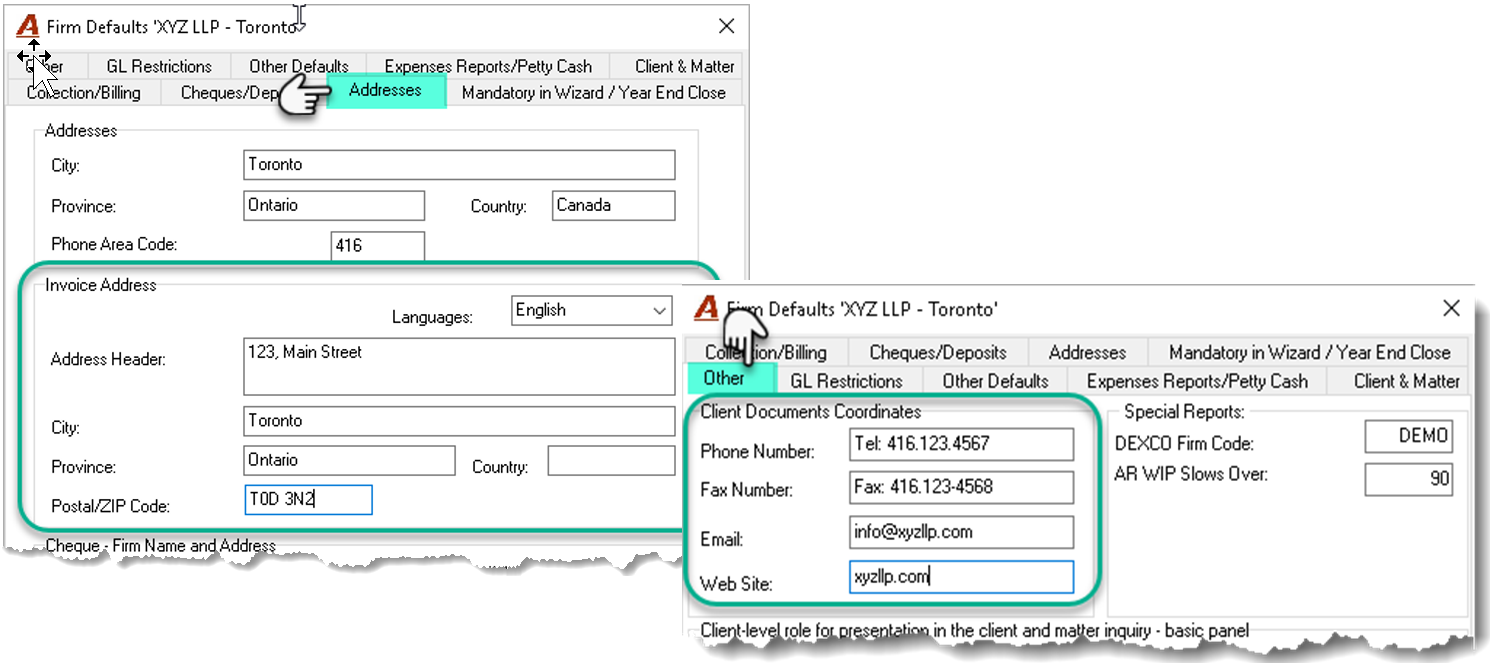
Other
Navigate to the “Other” tab to add the phone and fax number, email address, and web sites in the Client Documents Coordinates section. Complete these coordinates in the main firm only (typically 001), unless the coordinates to be presented on client documents (invoice, statement of account or statement of trust) must be different per firm.
Logos
Logos are uploaded in Acumin System Settings unless different logos are needed for specific firms. The main firm (001) and any other firm with no logo content will use the logo in Acumin System Settings. See Logo for the main firm (firm 001)
The following section is applicable only if you need to upload a different logo for a firm that is NOT the main firm (001).
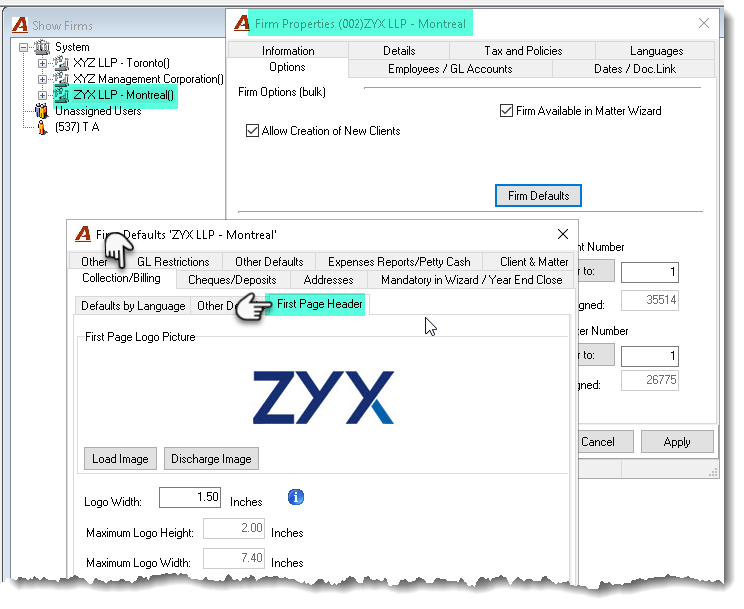
Collection/Billing – First Page Header Tab
Logo images uploaded in other firms will override the main one in context of the rule selected. See section Select the Logo to be included in the Header: Use the “Load image” button to upload the logo image in the firm properties of a firm other than the main firm (001).
For the statement of account template to be able to use the logo, it must be uploaded from the “...\Acumin\Logo folder found within Acumin’s folder structure. In other words, the logo file must first be saved in this folder so it can be uploaded from there.
The image formats allowed are JPG or BMP
In addition, the size of the physical logo file saved should be the same as the size printed on the statement of account. The measure entered in the Logo Width field represents the width of the logo when printed on a document.
Environment Settings
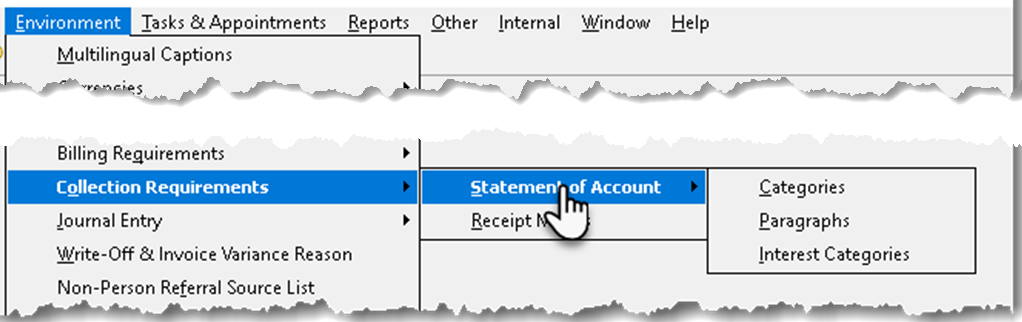
Statement of Account - Categories
From the Environment - Collection Requirements - Statement of Account submenu select Categories
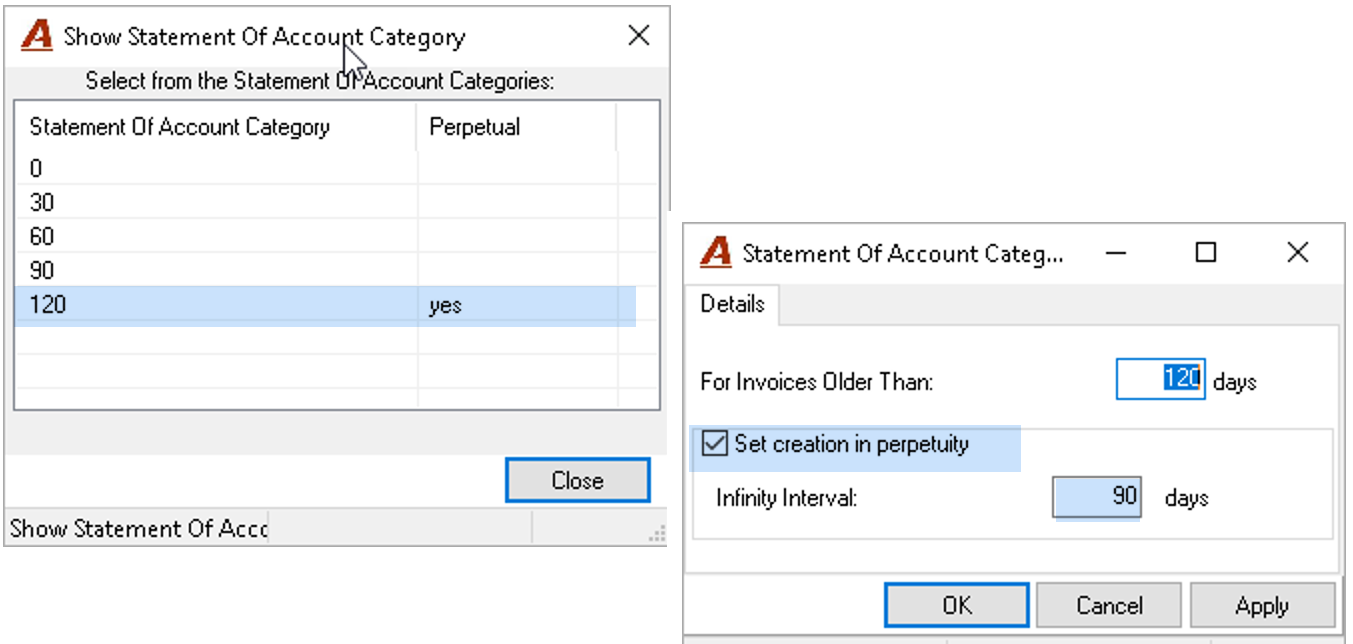
Right click to access the contextual menu and select NEW. Repeat until all the categories the firm will need are created.
For example, with the categories selected the firm intends to send statement of accounts every 30 days, each statement with escalating wording until 120 days, at which point they want to continue sending every 90 days in perpetuity with the same wording for statement of accounts with the oldest invoice 120 days or older.
As 120 days is the last category, it was set in perpetuity at an interval of 90 days. With this option unchecked, this would be the last category so additional statement of accounts would not be generated even if the balance remained unpaid.
Statement of Account - Paragraphs
From the Environment - Collection Requirements - Statement of Account submenu select Paragraphs
Right click to access the contextual menu and select New or select Properties to make modifications to existing paragraphs.
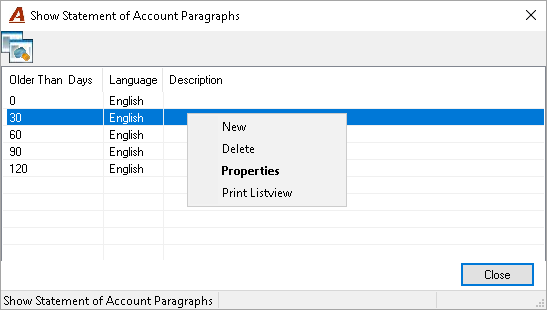
Once you are satisfied with the first paragraph, save it “as”, so you can use it as the start point when creating remaining paragraph, adjusting only what needs to be different.
Layout Options:
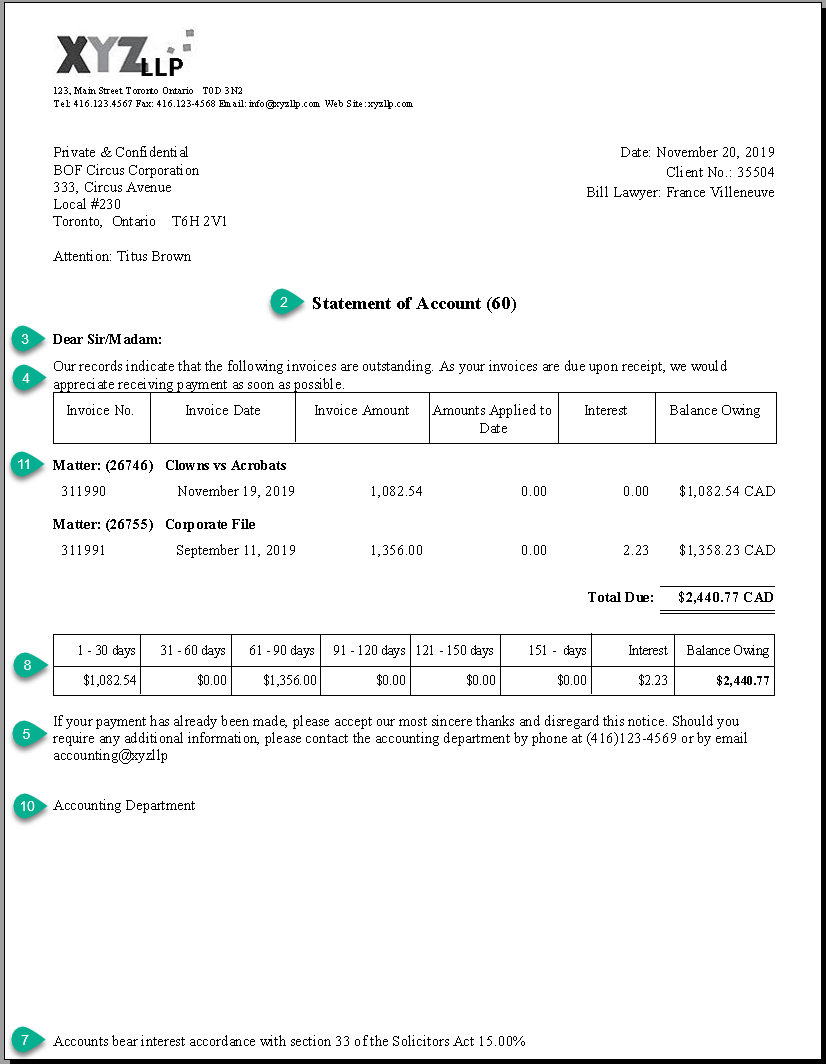
For each statement of account category, you can change the wording as well as the order of the sections and their inclusion to support the firms’ collection and escalation strategy.
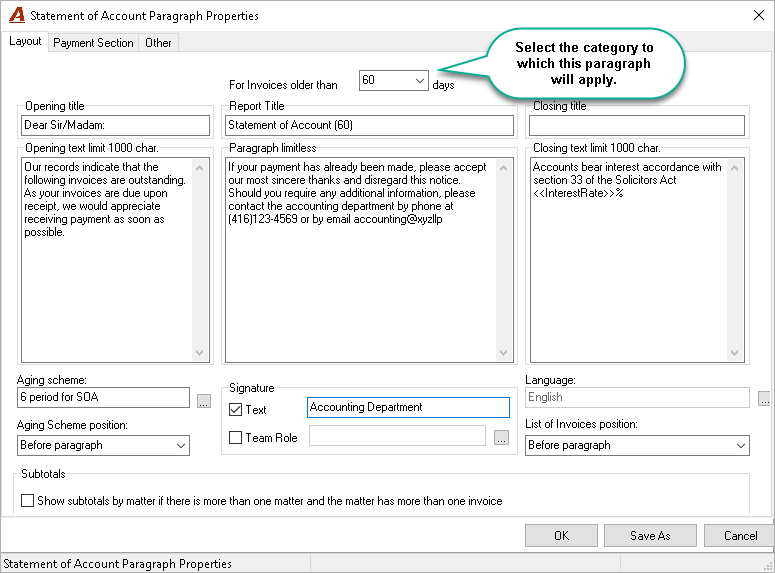
For Invoices Older than: Select the category to which the paragraph will apply.
Report Title: Enter the document title limited to 60 characters. It will appear centred in bold.
Opening Title: Enter the wording, it will appear in bold.
Opening Text: Enter wording limited to 1,000 characters, to show before the list of invoices.
Paragraph: Enter wording to show after the invoice list. There is no limit and supports empty hard returns.
Closing Title: Enter wording to show after the list of invoices and aged values if used.
Closing Text: l: Enter wording limited to 1,000 characters The content will show in the footer of all pages of the document. Use the variable {InterestRate} to show the current annual interest rate of the interest category affected.
Aging Scheme: Optional use of a 6-period aging scheme. To create an aging scheme, press on the ellipsis and right-click to select New from the contextual menu.
Aging Scheme Position: Select the aging scheme position in relation to other objects and inclusions in the statement of account.
Signature: The signature field can store wording like “Collections Manager” or someone’s name. If there is a change of rule to group by common matter level role holder, the signature can refer to the member holding the role.
List of Invoice Position: Select the position for the list of invoices in relation to other objects and inclusions in the statement of account.
Language: Select the primary language for the paragraph. If there is a second language, the statement of account paragraphs will need to be created for every language available in the system.
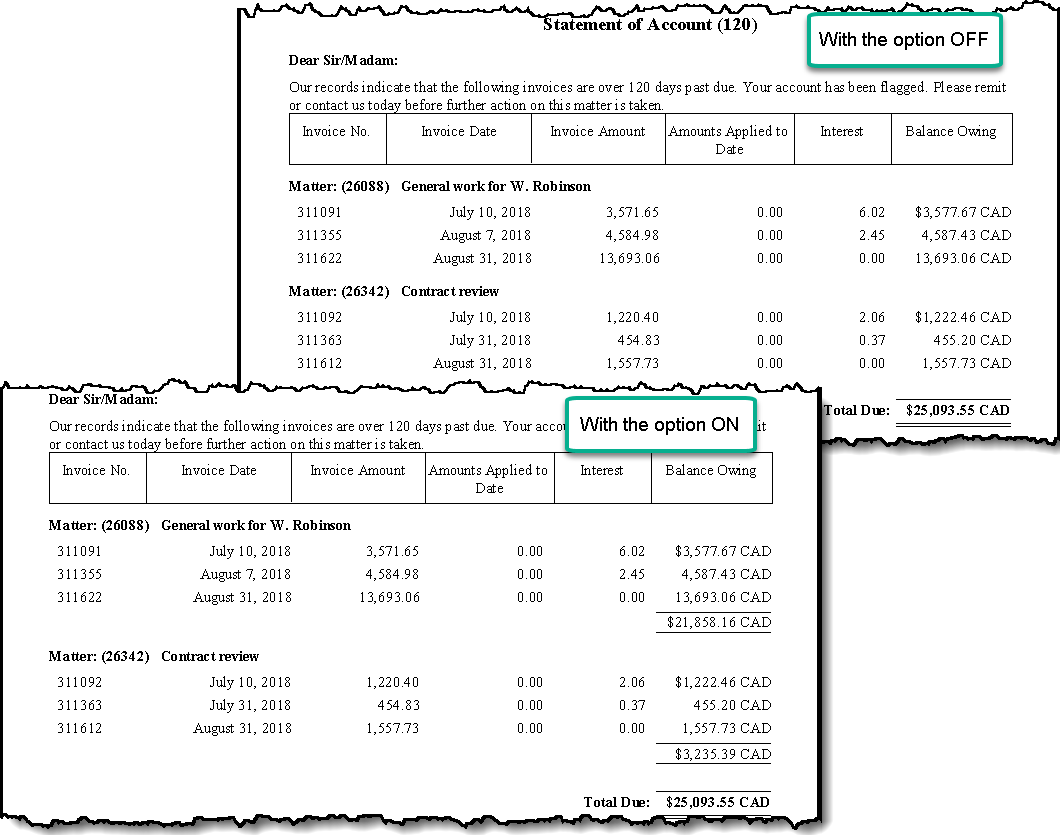
Show subtotals by matter if there is more than one matter and the matter has more than one invoice: Checkmark to show subtotals by matter when conditions apply.
Email addresses and website URLs will not appear underlined or in blue. However, they will still be clickable—users can launch their default email application or open the website by hovering over and selecting the link.
“Save As” button: Use to copy the content of an existing paragraph (all tabs included). Press on the “Save As” button, enter a different Report Title and select a different category. When the new paragraph is created, change back the Report Title to be the same as the others if this is a requirement.
Payment Section options
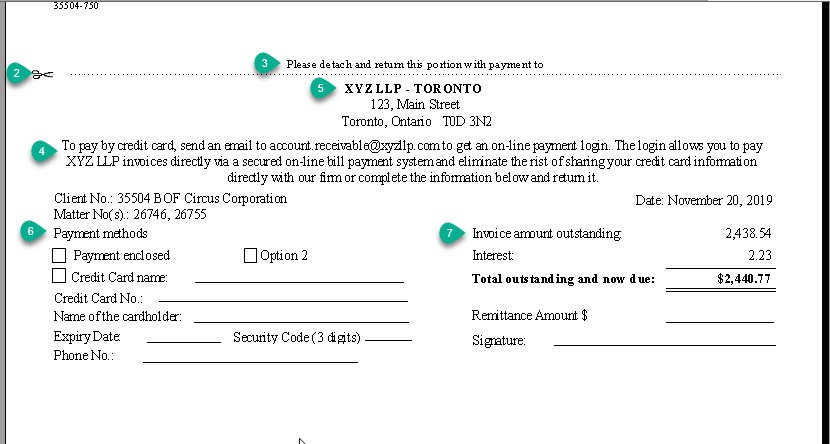
Used to capture remittance slip content as it will print on a separate page after the statement of account.
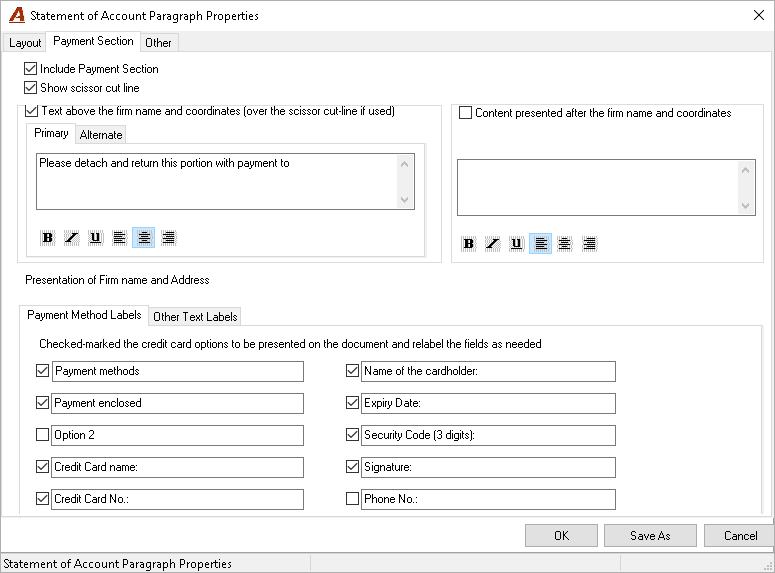
Include Payment Section: If enabled, all related options will become enabled, and check marked with the default content.
Show scissors cutline: If enabled, a dotted line will print with scissors.
Text above the firm name and coordinates (over the scissors cut line if used): If the payment section includes one bank, the content of the Primary tab will print in the remittance section. If it includes more than one bank, the content of the Alternate tab will print as its own page with some adjustment to align content to the new page and inclusion of the ‘Alternate” text box content.
Primary sub tab: The field is populated with the default string “Please detach and return this portion with payment to”. It is possible to make changes to a maximum of 3 lines. Only the bold and centred position options are available.
Alternate sub tab: The field is populated with the default string “Return with payment to.” Only the bold and centred position options are available.
Content presented after the firm name and coordinates: If enabled, the content will print after the firm name and address to a maximum 3 lines. All font options are available.
Presentation of Firm name and Address: The payment section includes the name of the firm and the firm’s address, in context of set-up, grouping decisions and content completed within the corresponding firm properties fields. The firm name is always presented in bold and the address below in regular font.
Payment Method Label tab: Selected labels are enabled with default content Changes to selections and content is possible. Each option has its own format - with/without a checkbox or with/without a line.
Payment methods: This field can be used as a title; it prints without a checkbox or line.
Payment enclosed: This field content will show with a checkbox.
Option 2: This field content will show on the same line as the “Payment enclosed” option with a checkbox.
Credit Card name: This field content will show with a checkbox and line.
Name of the cardholder: This field content will show with a checkbox and line.
Expiry Date: This field content will show with a line.
Security Code (3 digits): This field content will show on the same line as the Expiry Date with a line.
Signature: This field content will show on the second column with a line.
Phone No: This field content will show with a line.
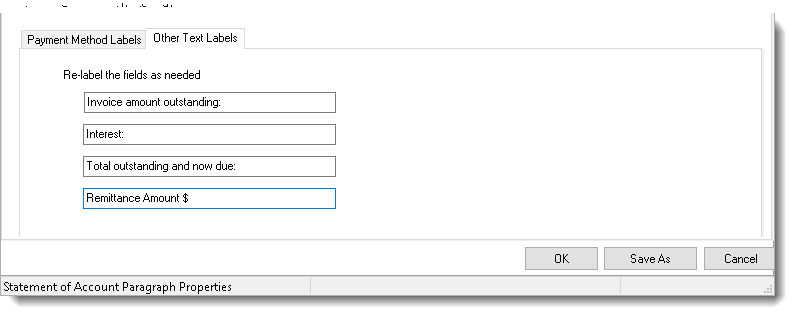
Other Text Labels tab: This field content will show as is
Invoice amount outstanding: This label and field content will show only if interest is calculated.
Interest: This label and field content will show only if interest is calculated.
Total outstanding and now due: This label and field content will show in bold.
Remittance Amount $: This field content will show with a line.
Email addresses and website URLs will not appear underlined or in blue. However, they will still be clickable—users can launch their default email application or open the website by hovering over and selecting the link.
Another tab
This is where email template will be entered with the text corresponding to the category if the firm is licensed with the "Statement of accounts send by email" functionality (separate quick start document).
Statement of Account - Interest Categories
Interest is calculated daily based on firm-defined interest rates. Interest charged is presented on the statement of account, AR dashboard, client-matter dashboard exposure tab and on the Aged AR Report (optional); however, it is not accounted for as interest income until paid.
Interest rates are historical, so the interest charged is calculated based on the effective date on the interest rate.
From the Environment - Collection Requirements - Statement of Account submenu select Interest Categories
Right click to access the contextual menu and select New to create a new interest category or select Properties to modify one.
Press on the ellipsis button besides the rate value displayed to access the Show History list view. Right click to access the contextual menu and add a “New” rate.
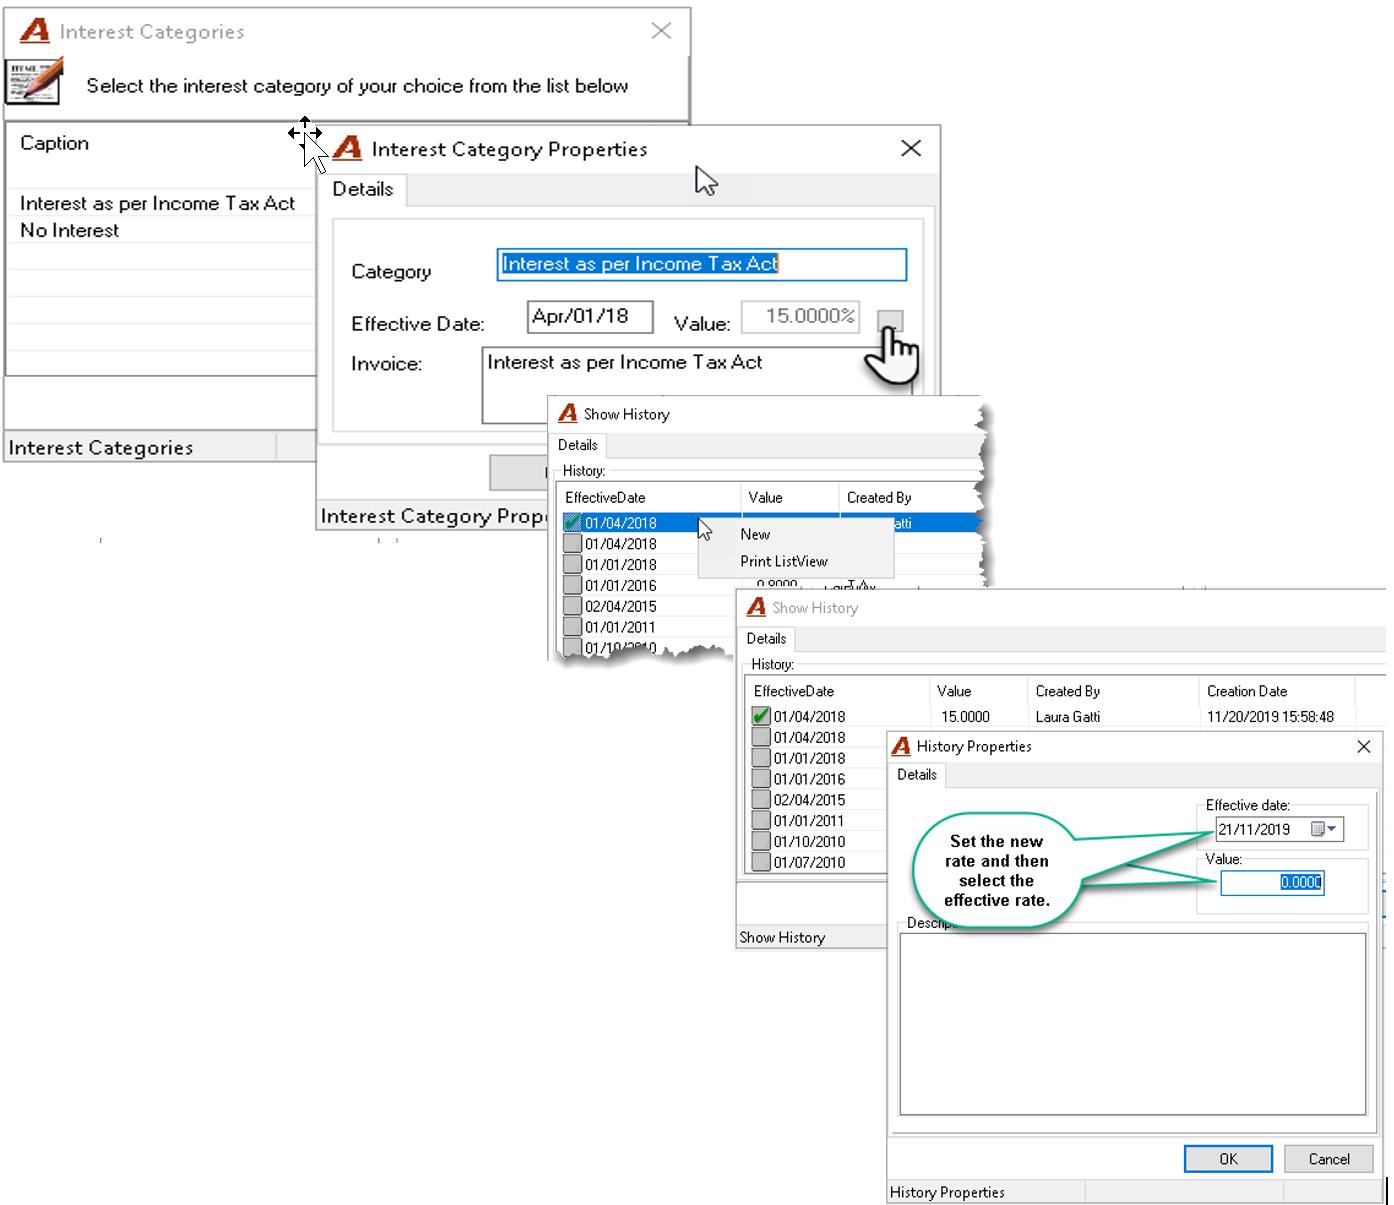
Client Documents - SOA and SOT Reports
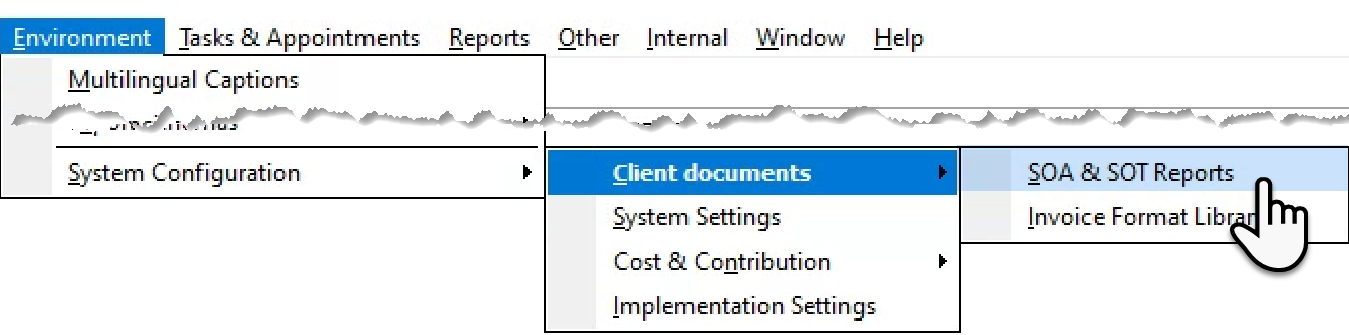
From the Environment – Client Documents submenu select SOA & SOT Reports to launch the form on the Statement of Account tab
Select the Return Address to be Included in the Header:
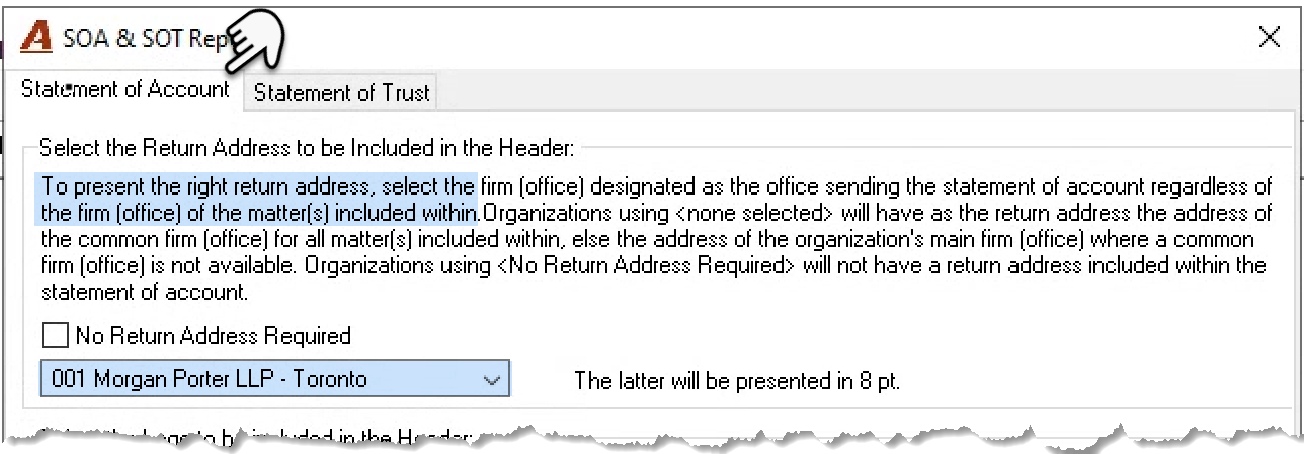
Select the main firm (001) to have the return address in context of the inclusion rule on all statements of accounts or select <None Selected> for a return address equal to the common firm for all the matter(s) included. In this case, where there is no common firm, the return address of firm 001 – the Main firm will be inserted.
Return addresses printing on the statement of account are taken from the Firm Defaults. For more information, see section Return Address in this document.
Select the Logo to be included in the Header:
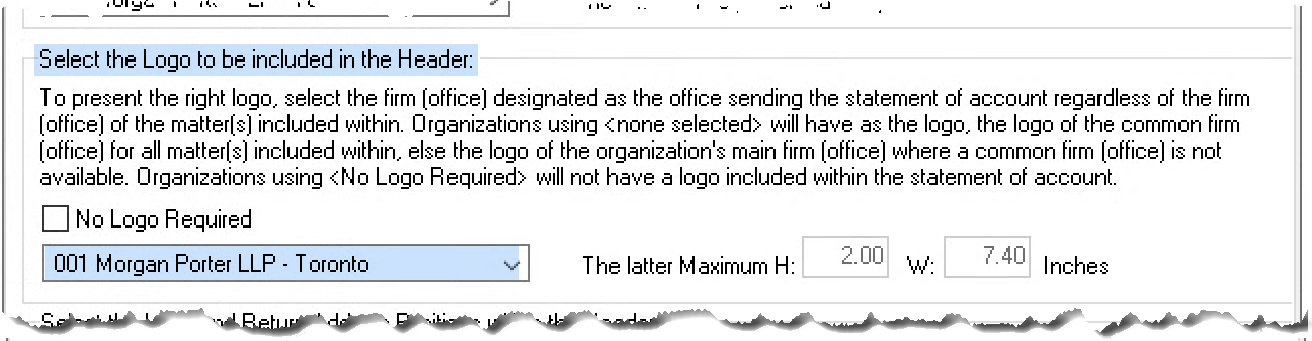
Logo images are taken from System settings – Client document unless a firm has a different logo set in firm defaults. See section Logo for firms other than the main firm (firm 001)
Select firm (001) for the logo to be calculated in context of inclusion rules and set-up decisions made, regardless of the firm of the matter(s) included within.
Select <None Selected> to have specific firm logos for the common firm for all the matter(s) included. Where a common firm cannot be determined, the logo of firm 001 – the Main firm is used.
Select <No Logo Required> to not show on the statement of accounts.
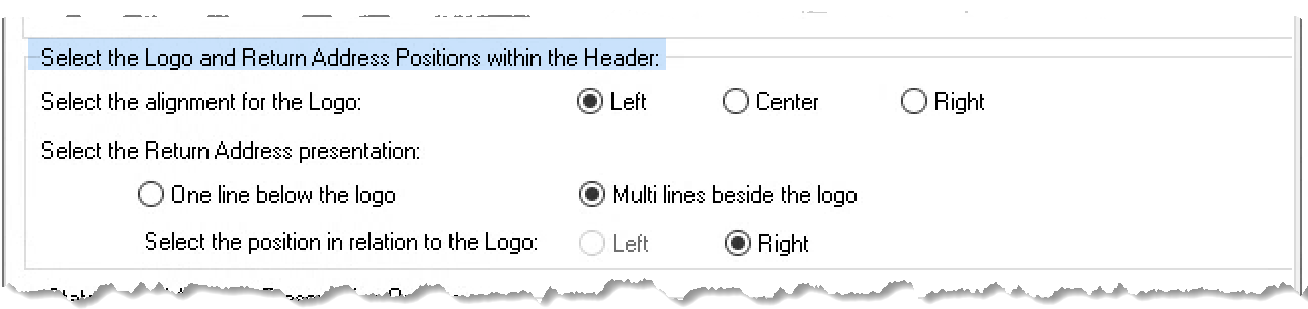
Select the Logo and Return Address positions within the Header
Select the alignment for the logo: Select the position of the logo. If the logo size reaches the maximum limit of 2.00” w X 7.40” h, we recommend the use of the “Center” option.
Select the Return Address presentation.
Statement of Account Presentation Options
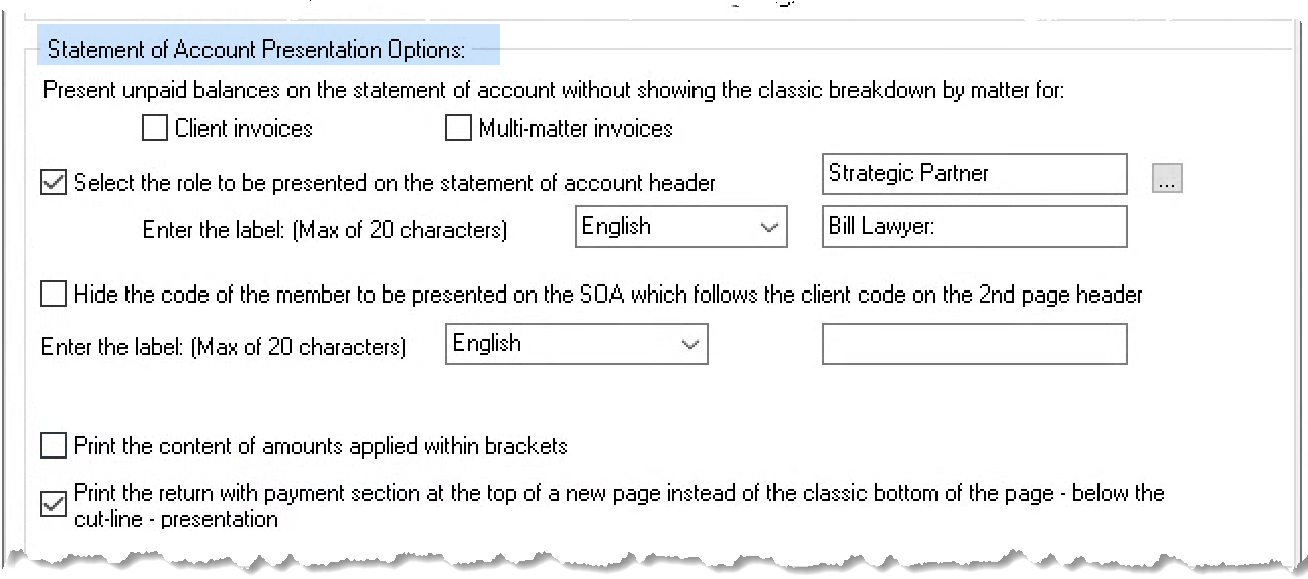
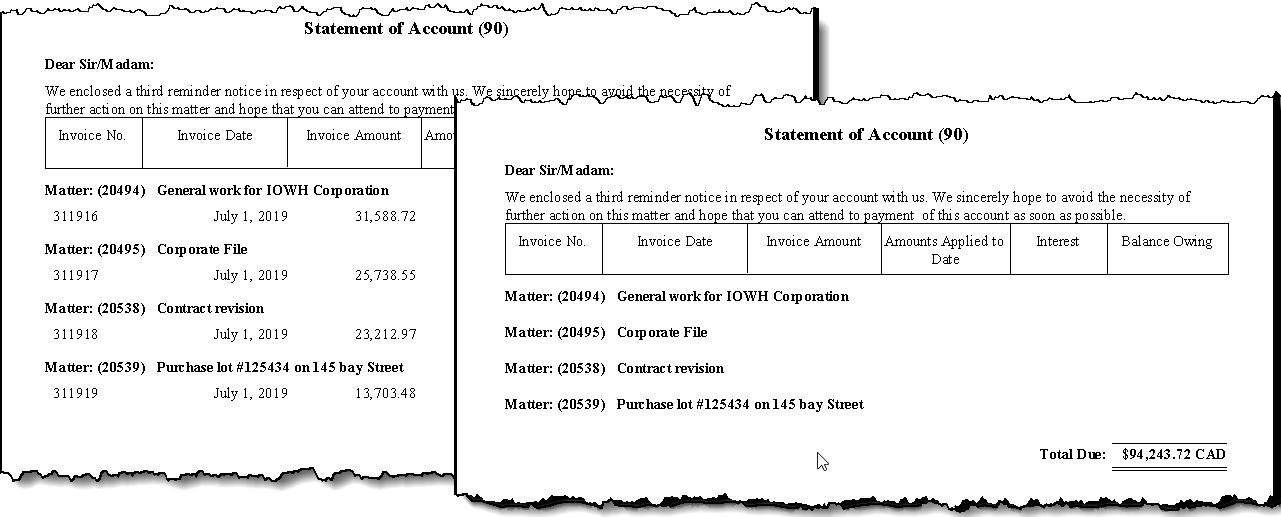
Present unpaid balances on the statement of accounts without showing the classic breakdown by matter for: Select the option if you want to present only matters included in multi-matter invoices. The option is recommended if only multi-matter invoices are included in the statement of account. (See section Filter Options – Filter Tab)
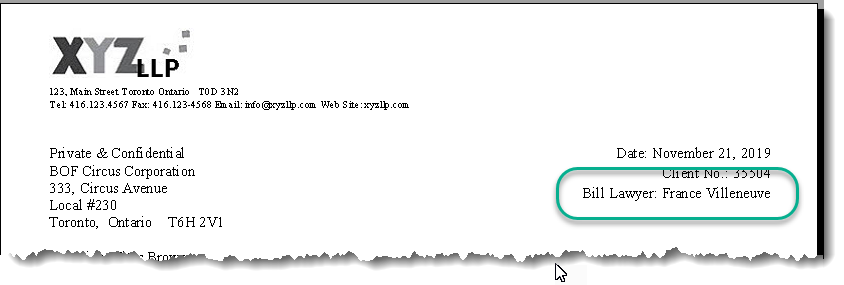
Select the role to be presented on the statement of account header: Select one of the five client roles available to match the best practice inclusion rule. Modify the label per language to match the role selected.
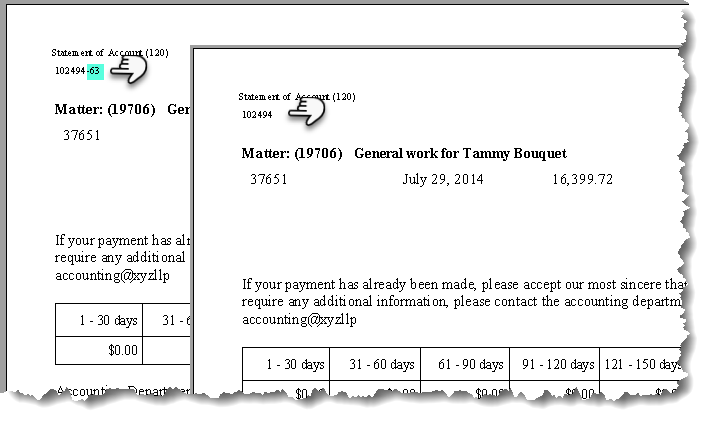
Hide the code of the member to be presented on the SOA which follows the client code on the 2nd page header: The code for the member holding the role selected for the presentation on the statement of account will show after the client code. Checkmark this option, for the member code not to show after the client code.
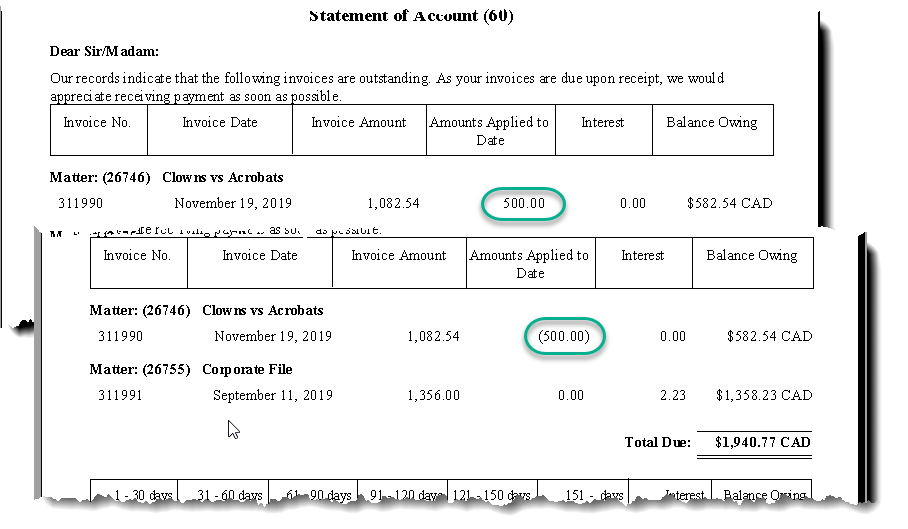
Print the content of amounts applied within brackets:
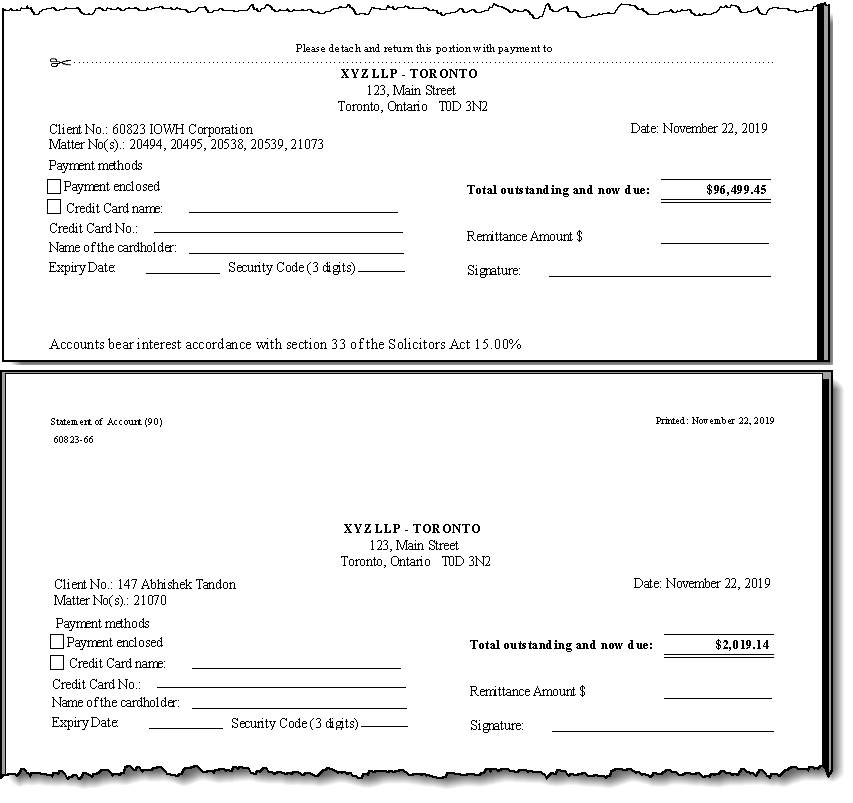
Print the return with payment section at the top of the new page instead of the classic bottom of the page – below the cut-line – presentation: Select this option to show this section at the beginning of the separate page instead of below the cutline if the latter is not used. See section Payment Section options.
Environment Settings – Client Document
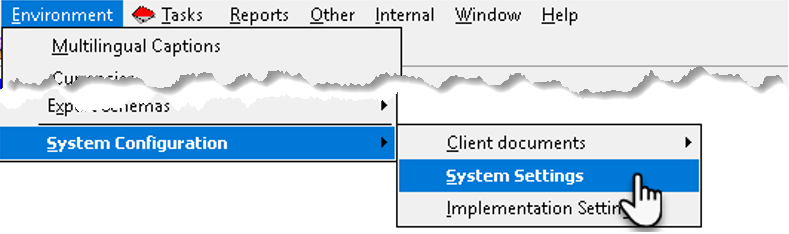
From the Environment – System Configuration submenu select System Settings and navigate to Client Documents – Layout Decisions – Invoice Package
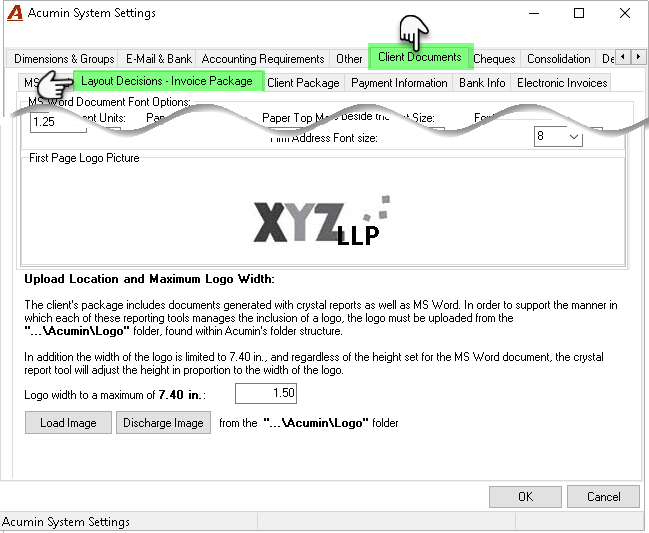
Logo for the main firm (firm 001)
Use the “Load image” button to upload the logo file for the main firm (firm 001) and any other firm that does not have its own specific logo, in which case the one uploaded in firm defaults will take precedence. For more information see sections Select the Logo to be included in the Header: and Logo for firms other than the main firm (firm 001).
The logo file must be first be saved in the “...\Acumin\Logo folder found within Acumin’s folder structure so it can be uploaded effectively. The image formats must be either JPG or BMP. The size of the logo file saved must be the same as it is printed on the statement of account.
Logo Width to a maximum of 7.40 in: This is the width of the logo when shown on a document.
Insertion of the Bank Information on the remittance slip
Navigate to the Bank Info tab. In the case where bank information should be included on the remittance section of the statement of account document, the option “Statement of account” should be check marked ON. For more information on Bank Information and how to set-it up, please send a request to support@dexco.com.
Environment Settings – Email & Bank
From the Environment – System Configuration submenu select System Settings and navigate to Email & Bank
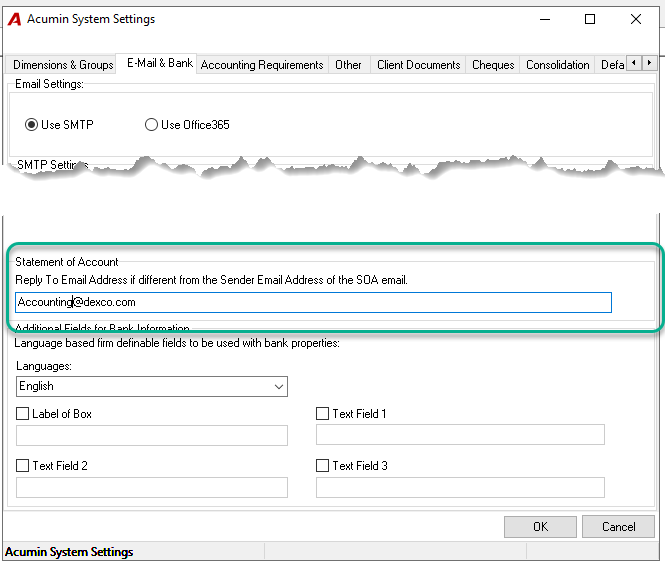
Reply To Email Address if different from the Sender Email Address of the SOA email: This option allows the specification of a different email address as the "Reply-To" address for SOA emails. When the firm's client replies to an SOA email, their response will be directed to the email address entered in this field.
If the firm prefers the "Reply-To" address to match the sender's email address, simply leave this field blank.
Client and Matter Properties
Client Properties
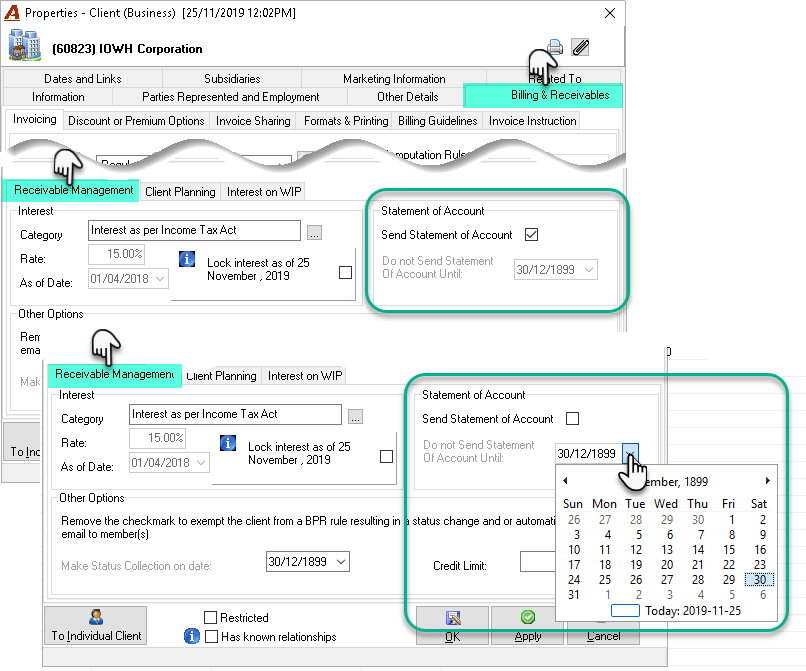
Navigate to the Billing & Receivables tab, Statement of account section
Send Statement of Account: The default position of the “Send Statement of Account” on new client creation is inherited from Firm Defaults (See section Number of days exclusion, Interest-free days, Interest category and Send statement of account defaults). If unchecked at the client level, any amounts outstanding for the client all its matters will be excluded from the statement of account process.
Do not send Statement of Account until: This option sets a date limit for the exclusion of the client from the statement of account process. Once the “as of” date is reached, the “Send Statement of Account” option is automatically re-set for the client and all its matters.
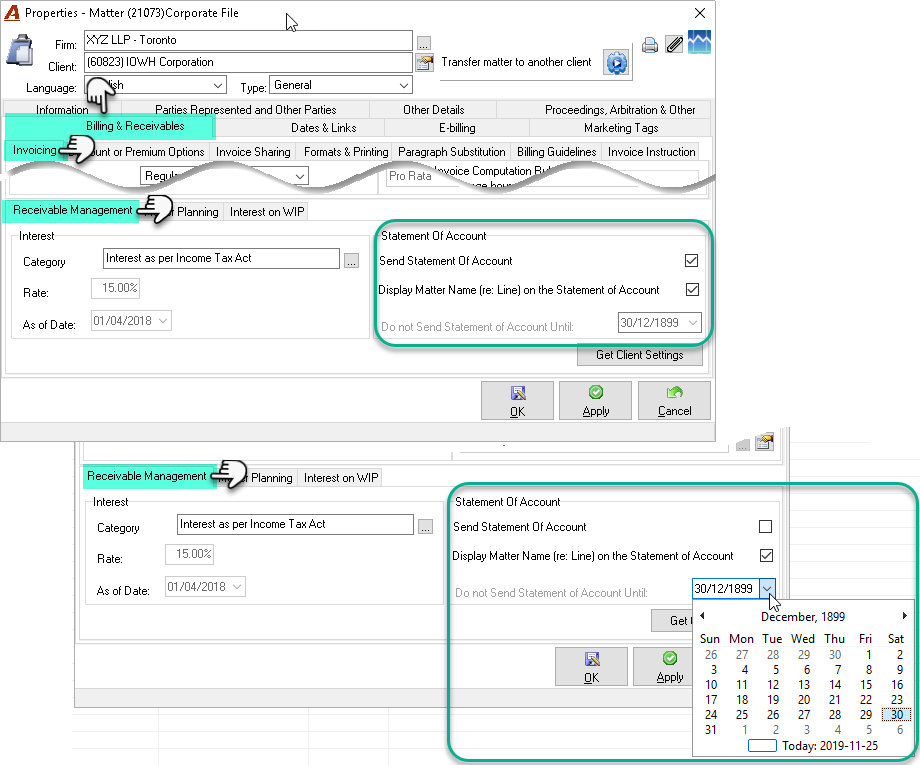
Matter Properties.
Navigate to the Billing & Receivables – Invoicing sub-tab, Statement of account section.
Send Statement of Account: The default position of the “Send Statement of Account” on new matter creation is inherited from client properties. If unchecked at the matter level, any amounts outstanding for the matter will be excluded from the statement of account process.
Display Matter Name (re: line) on Statement of Account: The default position is to show the content of the re: line on the statement of account. Ig unchecked, only the matter number will show on the statement of account.
Do not send Statement of Account until: This option sets a date limit for the exclusion of the matter from the statement of account process. Once the “as of” date is reached, the “Send Statement of Account” option is automatically re-set for the matter.
.
Statement of account contact set-up and presentation
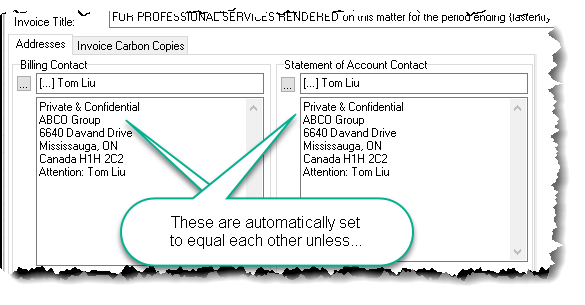
The invoice billing contact is automatically set as the statement of account contact during the invoice creation process; however, it is possible to set a statement of account contact at the client or matter level that is different than the invoice contact.
Invoice Properties - Default Statement of Account Contact
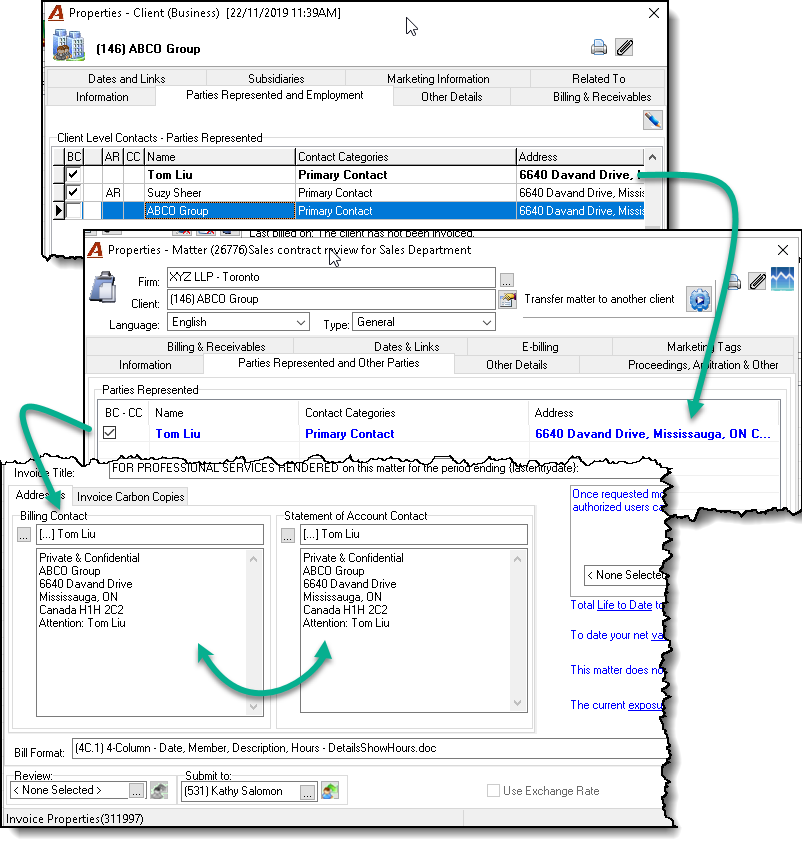
Inheritance: When a new client is created, the application combines the client and the client’s address to create the client’s billing contact for new matters. For business clients, the calculated default contact is often modified to include an individual. As it is possible for a client to have multiple billing contacts, when there is more than one a default is selected for use on matter creation. The default billing contact will display in bold black. Once associated to the matter, the contact will show in bold blue to provide a visual cue that the billing contact is a client contact.
When an invoice is created the matter’s default billing contact is associated to the invoice, as billing contact as well as statement of account contact.
Change of the Default Statement of Account Contact
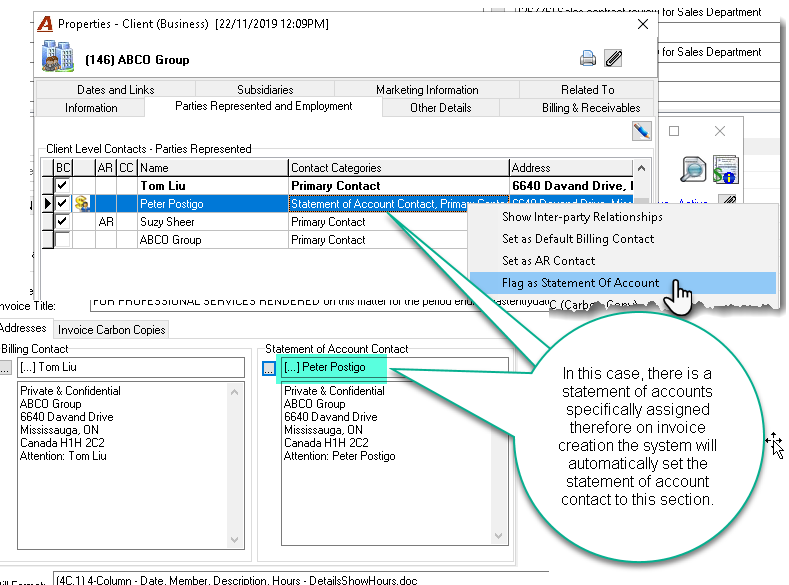
Client Level Statement of Account: If a client requires that all statement of accounts be addressed to someone other than the billing contact; set a client level statement of account contact.
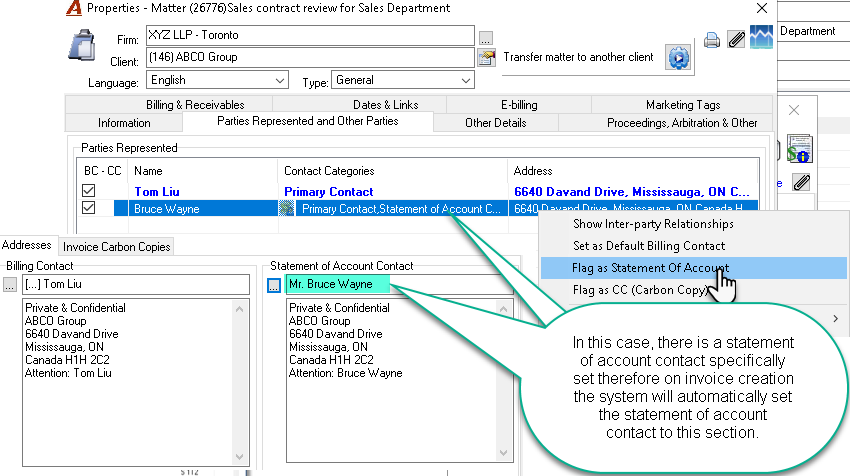
Matter Level Statement of Account: If statement of accounts for a specific matter are to be addressed to someone other than the billing contact; set a matter statement of account contact.
Invoice Level Statement of Account: If the statement of account for a specific invoice is to be addressed to someone other than the invoice billing contact, change the statement of account contact within invoice properties.
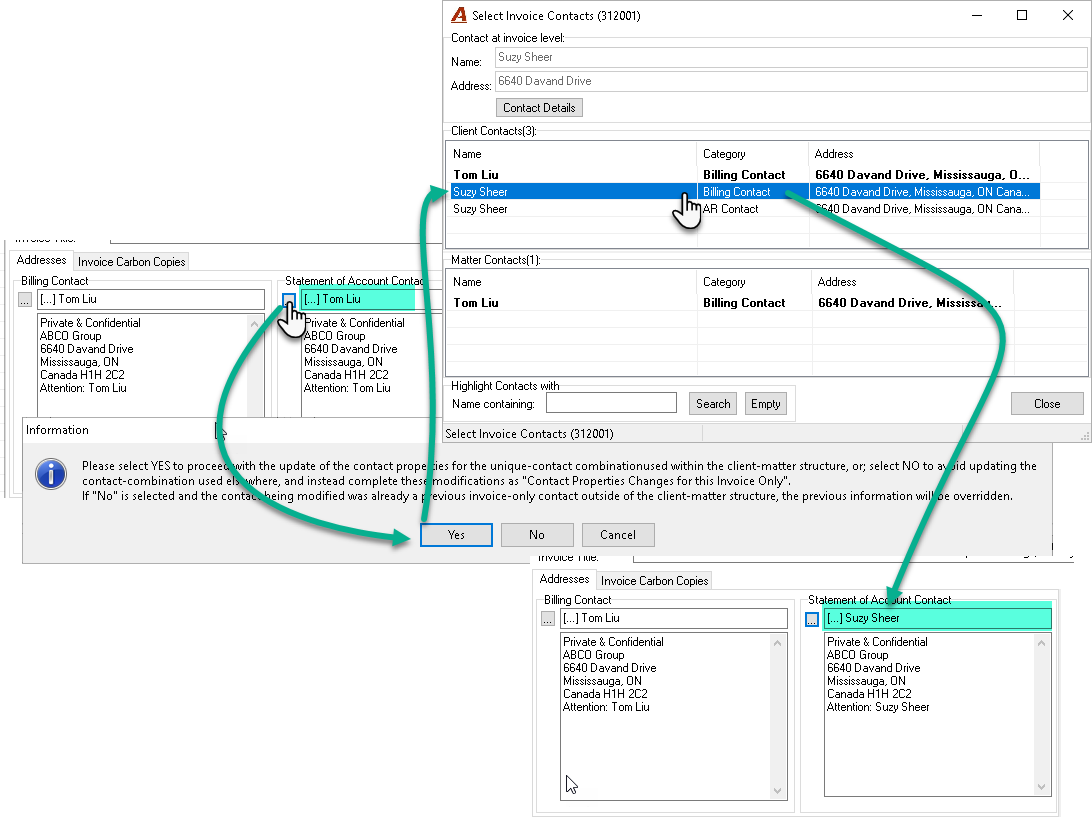
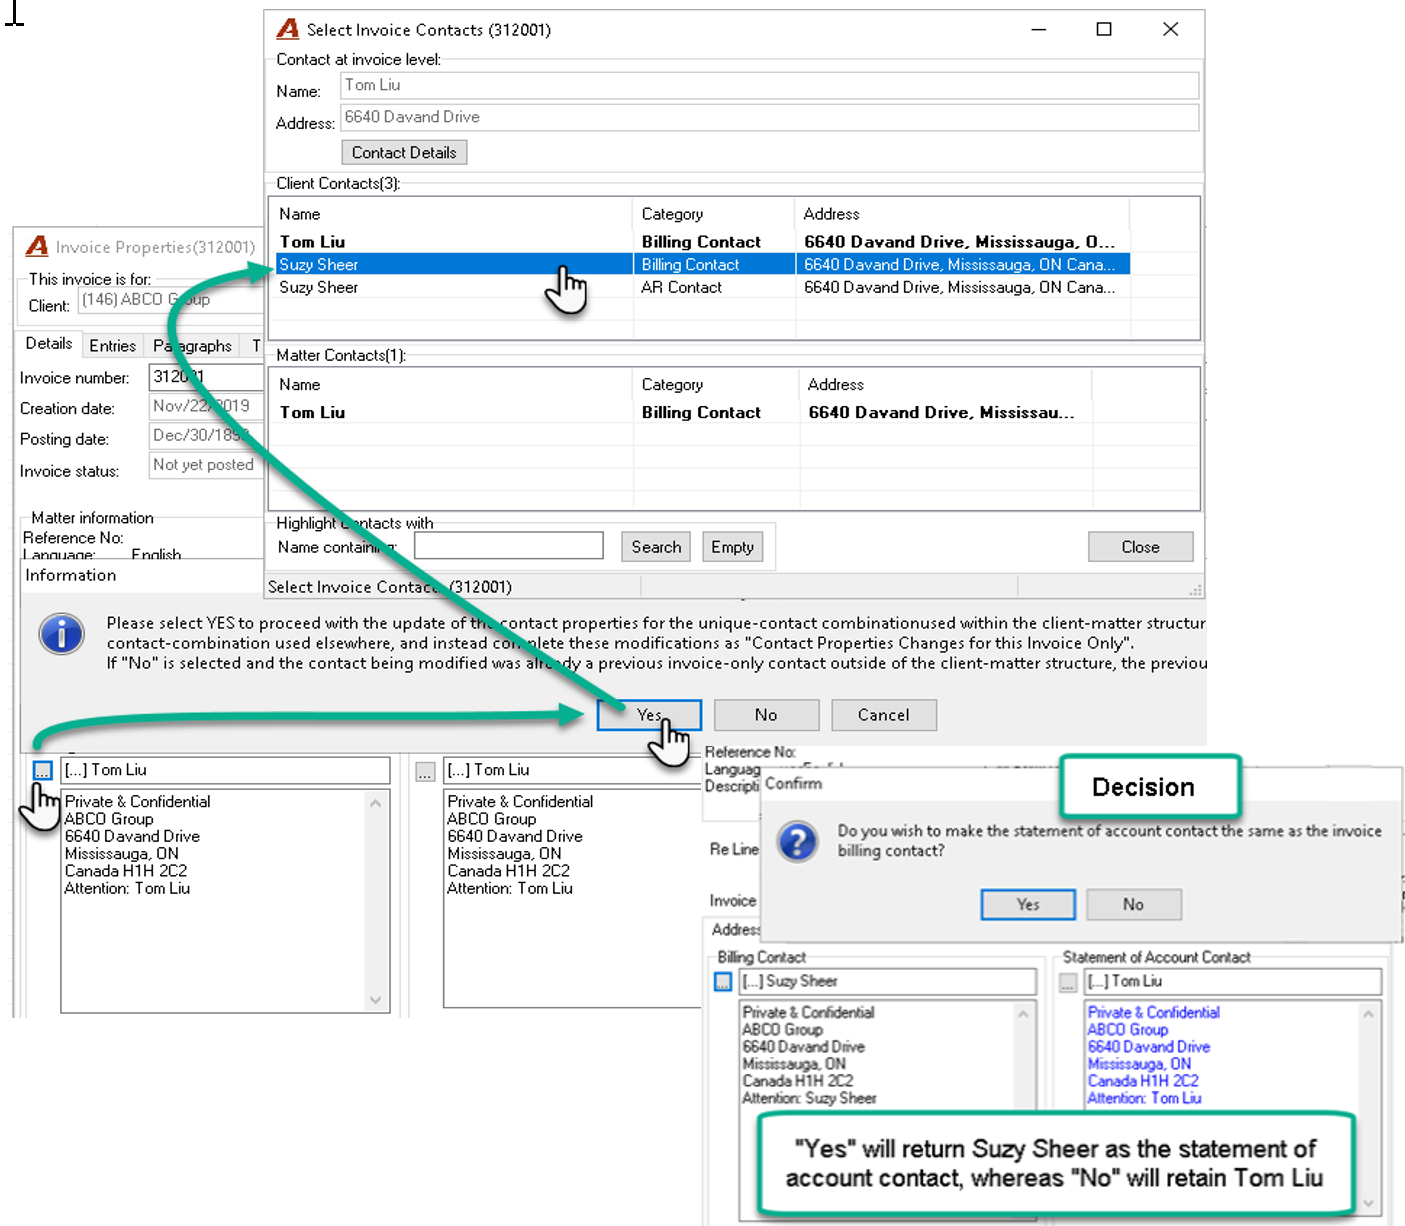
Effect of Changing the Billing Contact: If a user changes the billing contact within an un-posted invoice, he or she will be prompted to decide if the contact set as the statement of account contact for the invoice should be updated with the same change. Users that respond YES will again have the billing contact equal to the statement of account contact. Users that respond NO will have the billing contact not equal to the statement of account contact as the latter will remain as the one prior to the change.
Presentation of the Statement of Account Contact
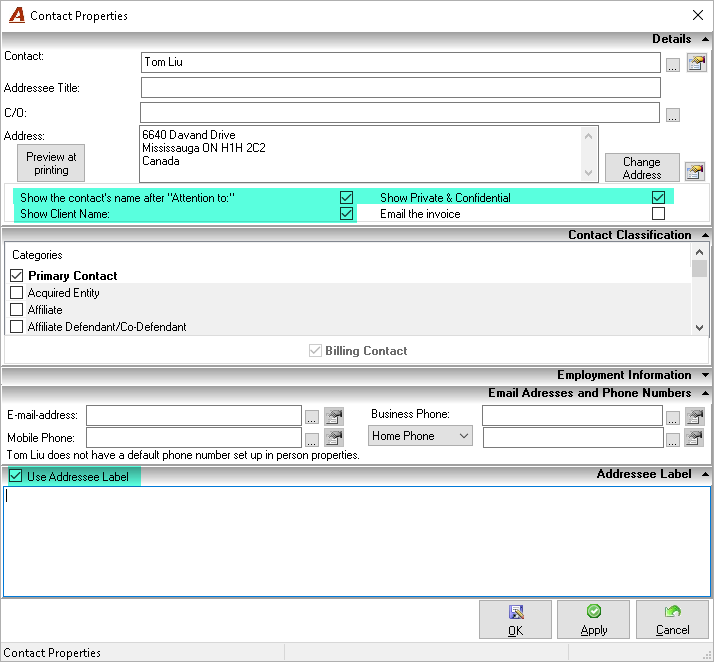
C/O field: The “c/o” content shows above the address except if the “addressee on address header” flag is ON, in which case it shows after country. The “C/O” label will always show unless the C/O shows on the first line.
Show the contact’s name after “Attention to”: If enabled, the contact’s name shows below the address section separately.
Show client name: Controls the presentation of the client’s name on the statement of account only. If disabled, the client’s name will NOT display in the statement of account document.
Show “Private and Confidential”: The label follows the billing contact unless it is set to always show at the top (see Firm Properties/Defaults options). The label itself can be modified in Environment – System Configuration – System Settings – Client Document.
Use Addressee label: Although the use of the addressee label is not a change to contact properties, it does represent a change on the presentation of the addressee label on the statement of account report output and its use will affect the ability to group in context of the inclusion list.
If a user checks ON the addressee label option, the corresponding panel will be enabled and its content – whatever that may be – will print on any reported output that uses the affected contact properties. This includes statement of accounts.
Address properties
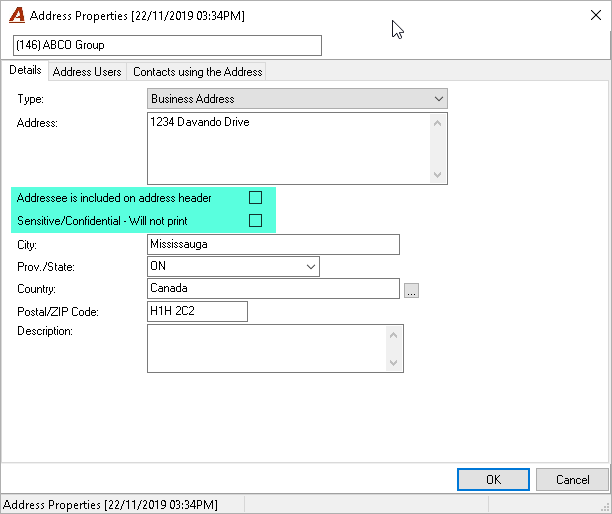
Addressee is included on the address header: This option is used when the client’s name is included in the Address field. When checked ON, the Client name will not display when printing the coordinates on the statement of account regardless of the position of the “Show Client Name” option set within the contact.
In addition, when enabled, the C/O line will show after the country on a new row instead of printing above the address.
Sensitive/Confidential – Will not print: When this option is enabled, the address will not print on any documents, statement of account or other documents.
Example Where the Client Does Not Equal the Billing Contact
Client: ABC Co A = Addressee in Address Header Flag:
Billing Contact: Peter Smith B= Attention Flag
Address: C = Don’t Show Client Name Flag
The Royal Canadian Mint
123 York Street
|
A = Addressee in Address Header |
B = Attention to Flag |
C = Don’t Show Client Name |
Result |
|
Y |
Y |
Y |
The Royal Canadian Mint 123 York Street City, Province Postal Code, Country Attention to: Peter Smith |
|
Y |
N |
Y |
Peter Smith The Royal Canadian Mint 123 York Street City, Province Postal Code, Country |
|
Y |
Y |
N |
The Royal Canadian Mint 123 York Street City, Province Postal Code, Country Attention to: Peter Smith |
|
Y |
N |
N |
Peter Smith The Royal Canadian Mint 123 York Street City, Province Postal Code, Country |
|
N |
N |
N |
Peter Smith ABC Co. The Royal Canadian Mint 123 York Street City, Province Postal Code, Country |
|
N |
Y |
Y |
The Royal Canadian Mint 123 York Street City, Province Postal Code, Country Attention to: Peter Smith |
|
N |
Y |
N |
ABC Co. The Royal Canadian Mint 123 York Street City, Province Postal Code, Country Attention to: Peter Smith |
|
N |
N |
Y |
Peter Smith The Royal Canadian Mint 123 York Street City, Province Postal Code, Country |
Example Where the Client equals the Billing Contact
Client: Peter Smith A = Addressee is Address Header Flag
Billing Contact: Peter Smith B= Attention Flag
Address Header: C = Don’t Show Client Name Flag
The Royal Canadian Mint
123 York Street
|
A = Addressee in Address Header |
B = Attention to Flag |
C = Don’t Show Client Name |
Result |
|
Y |
Y |
Y |
The Royal Canadian Mint 123 York Street City, Province Postal Code, Country Attention to: Peter Smith |
|
Y |
N |
Y |
The Royal Canadian Mint 123 York Street City, Province Postal Code, Country |
|
Y |
Y |
N |
The Royal Canadian Mint 123 York Street City, Province Postal Code, Country Attention to: Peter Smith |
|
Y |
N |
N |
The Royal Canadian Mint 123 York Street City, Province Postal Code, Country |
|
N |
N |
N |
Peter Smith The Royal Canadian Mint 123 York Street City, Province Postal Code, Country |
|
N |
Y |
Y |
The Royal Canadian Mint 123 York Street City, Province Postal Code, Country Attention to: Peter Smith |
|
N |
Y |
N |
The Royal Canadian Mint 123 York Street City, Province Postal Code, Country Attention to: Peter Smith |
|
N |
N |
Y |
Peter Smith The Royal Canadian Mint 123 York Street City, Province Postal Code, Country |
Statement of Account – Quick Start
Summary
The statement of account function is automatically triggered by the first person that logs into Acumin. It calculates the statements of account due for the contact in context of the inclusion rule and firm defined categories in use, as well as identifies what invoices are to be included, calculates related interest charges where applicable and groups results into firm-defined aging periods.
Process
On a regular basis – for example daily or twice a week – the person responsible for the collections function sends the statements of account due.
Access
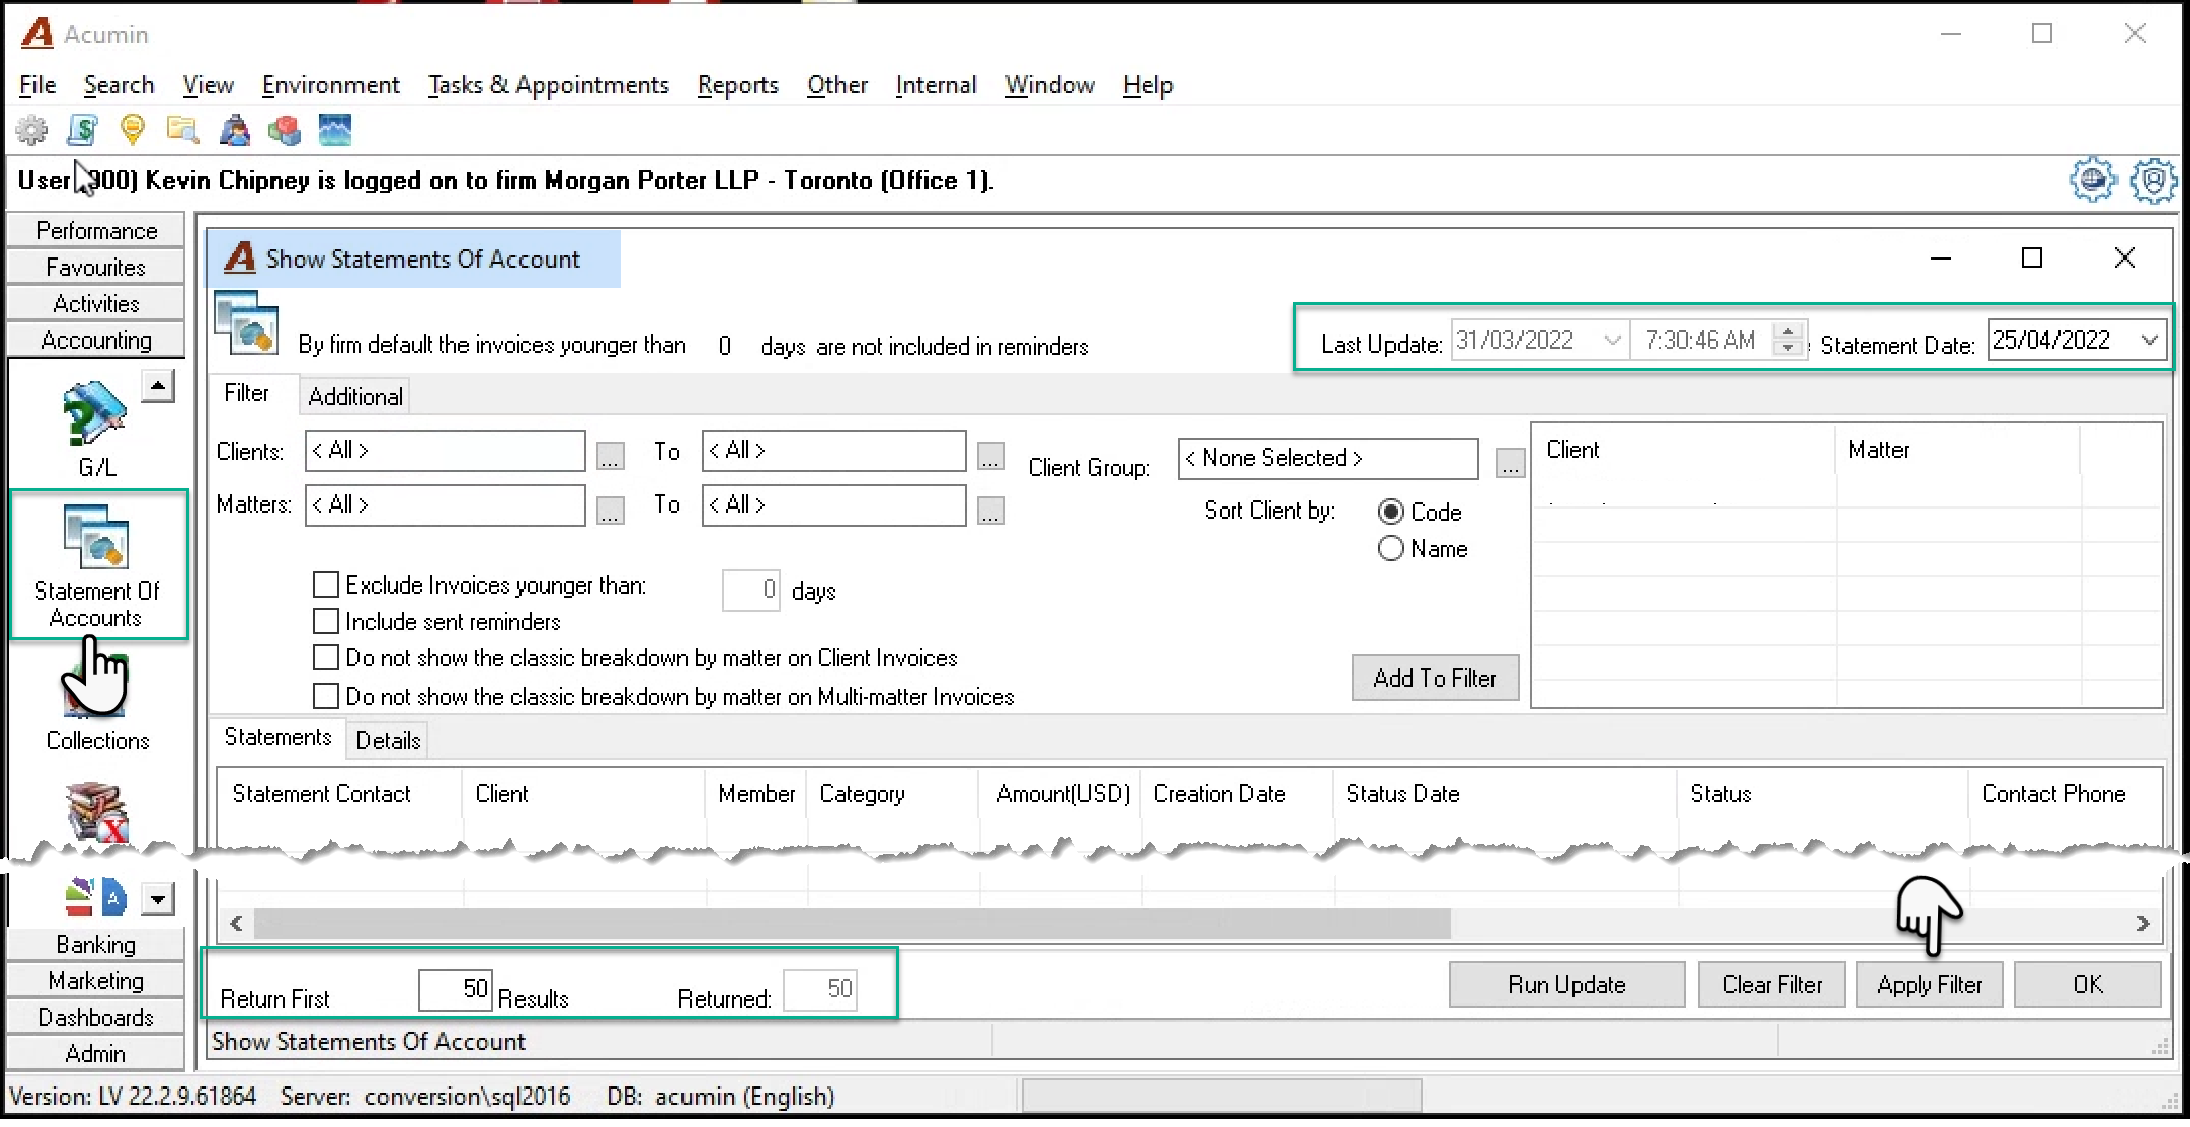
From the accounting section of the task bar, select Statement of Accounts to open the “Show Statement of Account” form. Press Apply Filter to list the calculated statement due. The form shows the date and time when the calculation last ran—either automatically or via the “Run Update” option. The statement date on the statement of account document defaults to the last calculation date but can be set to a future date.
The default number of results to show on the list view is set to 50. Until the statements of account are sent daily or a few times a week, process the first 50 and reapply the filter to see the next 50 or replace 50 by a different number. 0 on this field means show all.
Send Options
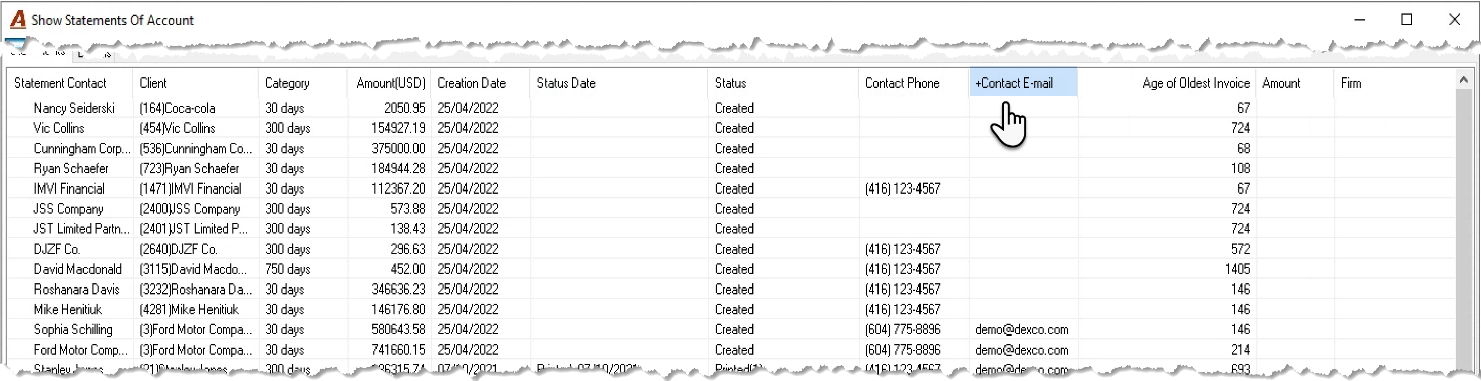
Organize the list to match the firm’s process. For example, if statements of account are sent by email unless there is no email address in which case they are sent by post, press on the “Contact Email” header so sort the content by email address. If you list in ascending order (+) the records with no email address will list first so they can be dealt with first.
Send by Post
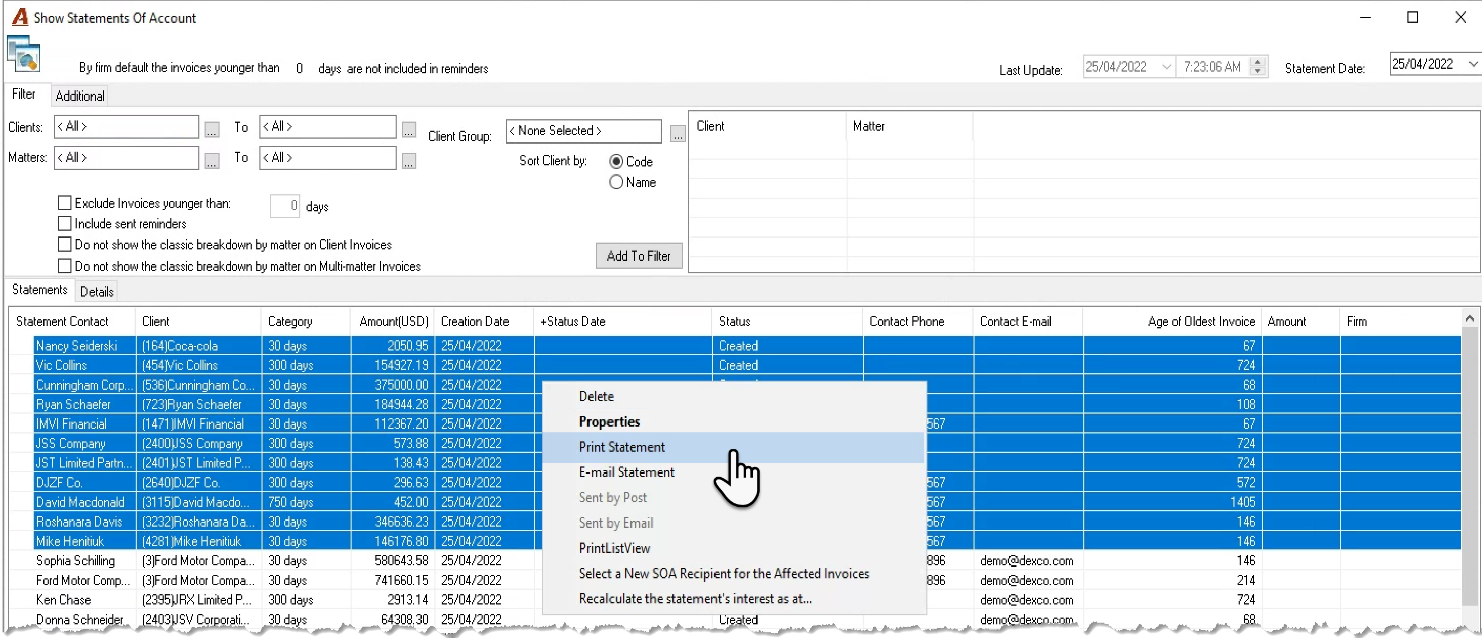
Multiple-select the contacts that will receive a printed statement of account and right-click to select “Print Statement” from the contextual menu.
The statements of account will print on the default windows printer. Individual selections will launch as print-previews with additional print options.
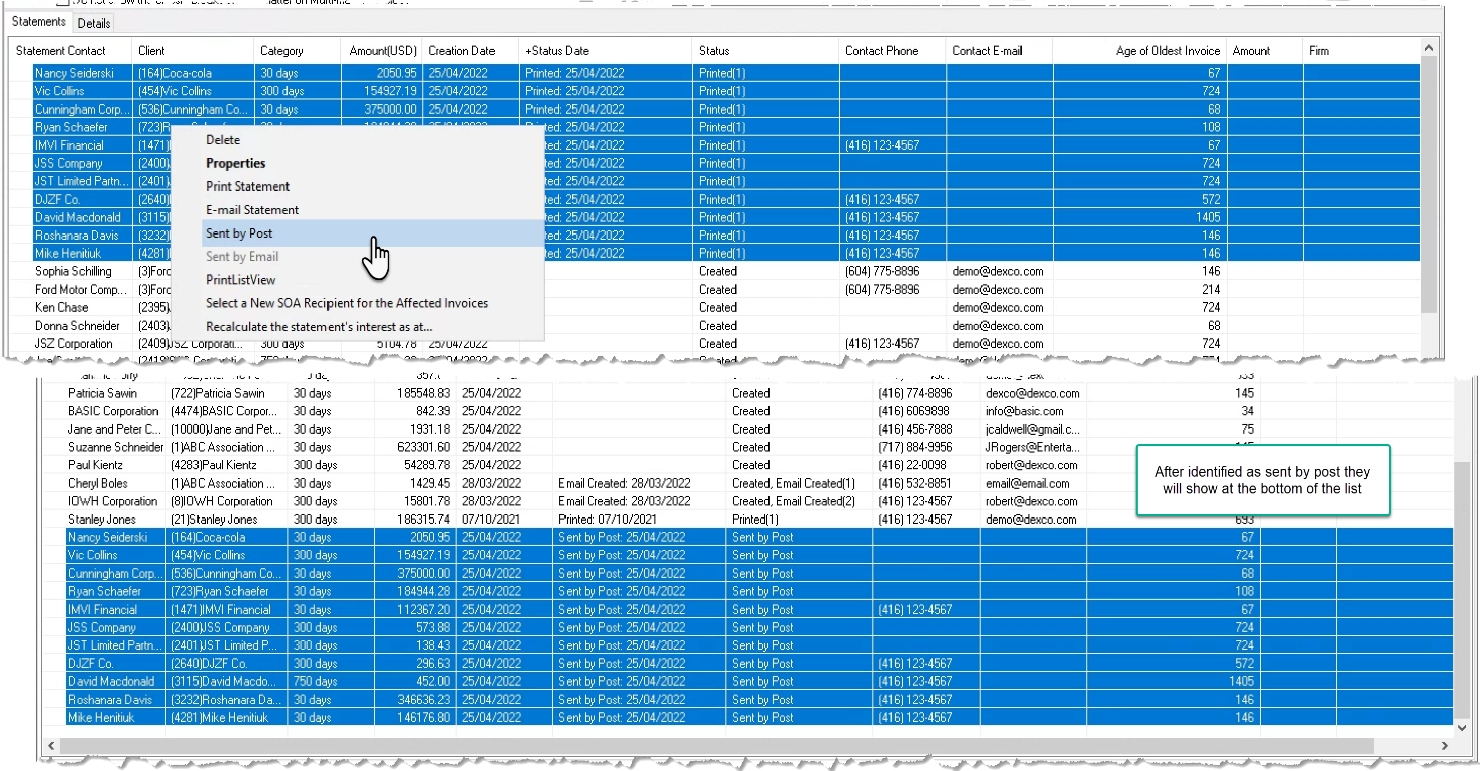
Once the statements of account are printed, their status will change to “Printed” followed by a count, and the “Sent by Post” option will be enabled.
After the statements are sent, multiple select the records with the status printed and right-click to select “Sent by Post” from the contextual menu to change their status to “Sent by Post”. If this step is not taken, the process is not considered complete, and the statements will remain on the calculated list so they can be sent on the next available workday and eliminate the potential for gaps in the workflow.
Send by Email
Single Statement Selection
Select the contact that will receive the emailed statement of account and right-click to select “Email Statement” from the contextual menu.
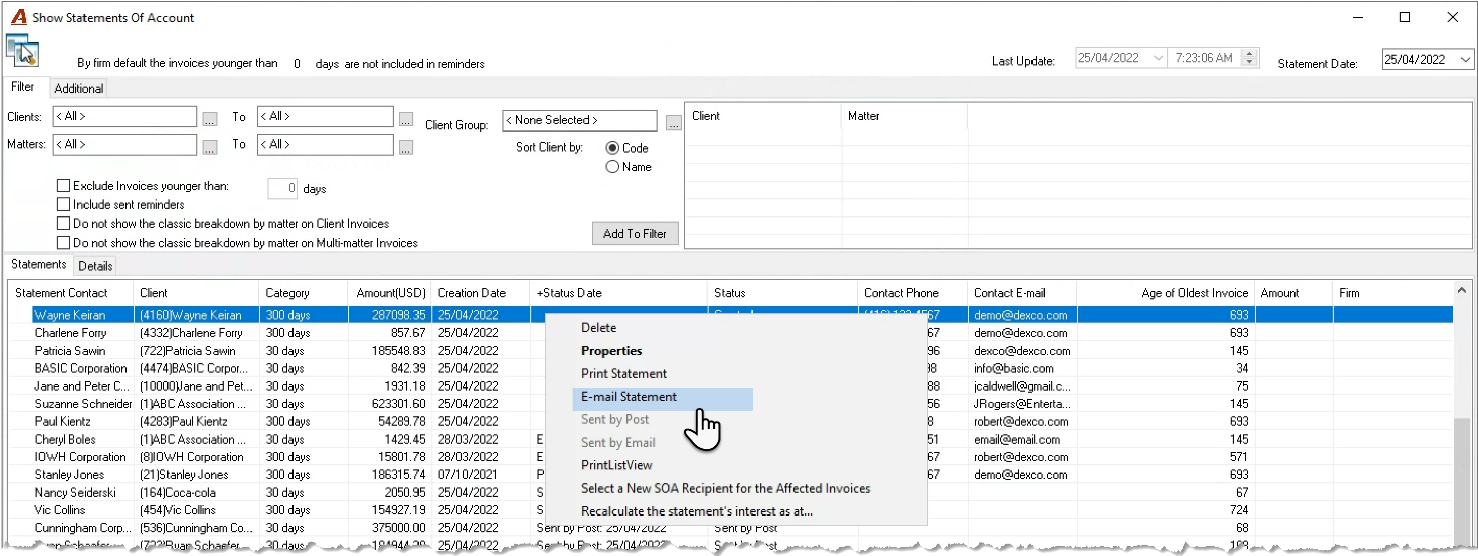
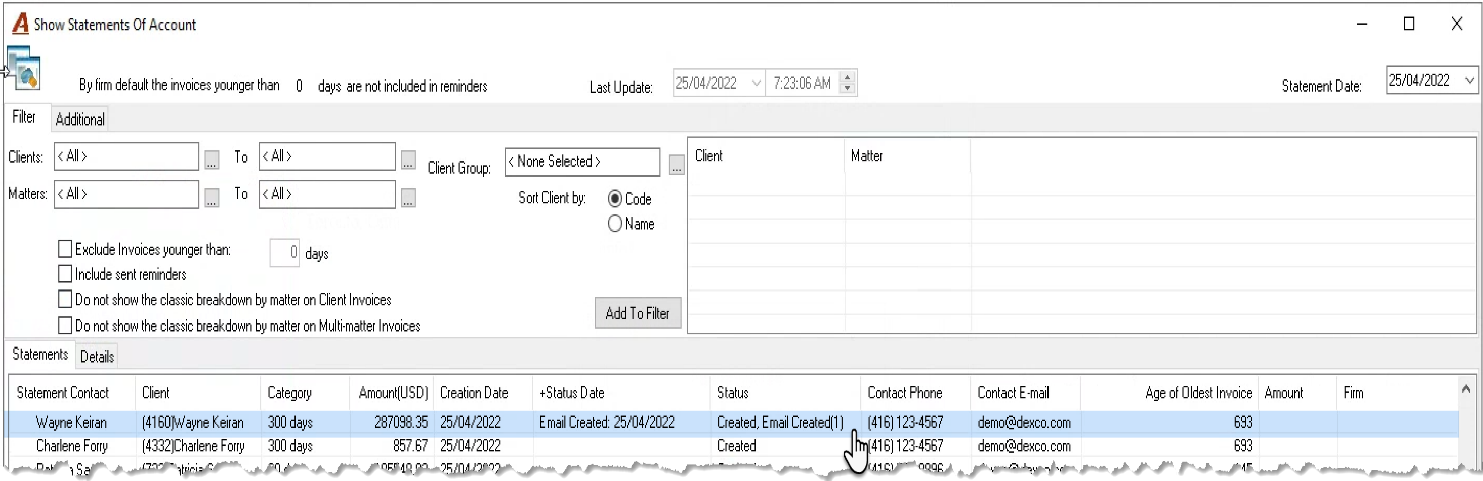
The email statement function generates the statement of account report in PDF format as an attachment to the email and sets the status to “Email Created (counter)” because individually emailed Statement of Account can be emailed again until they are identified as sent.
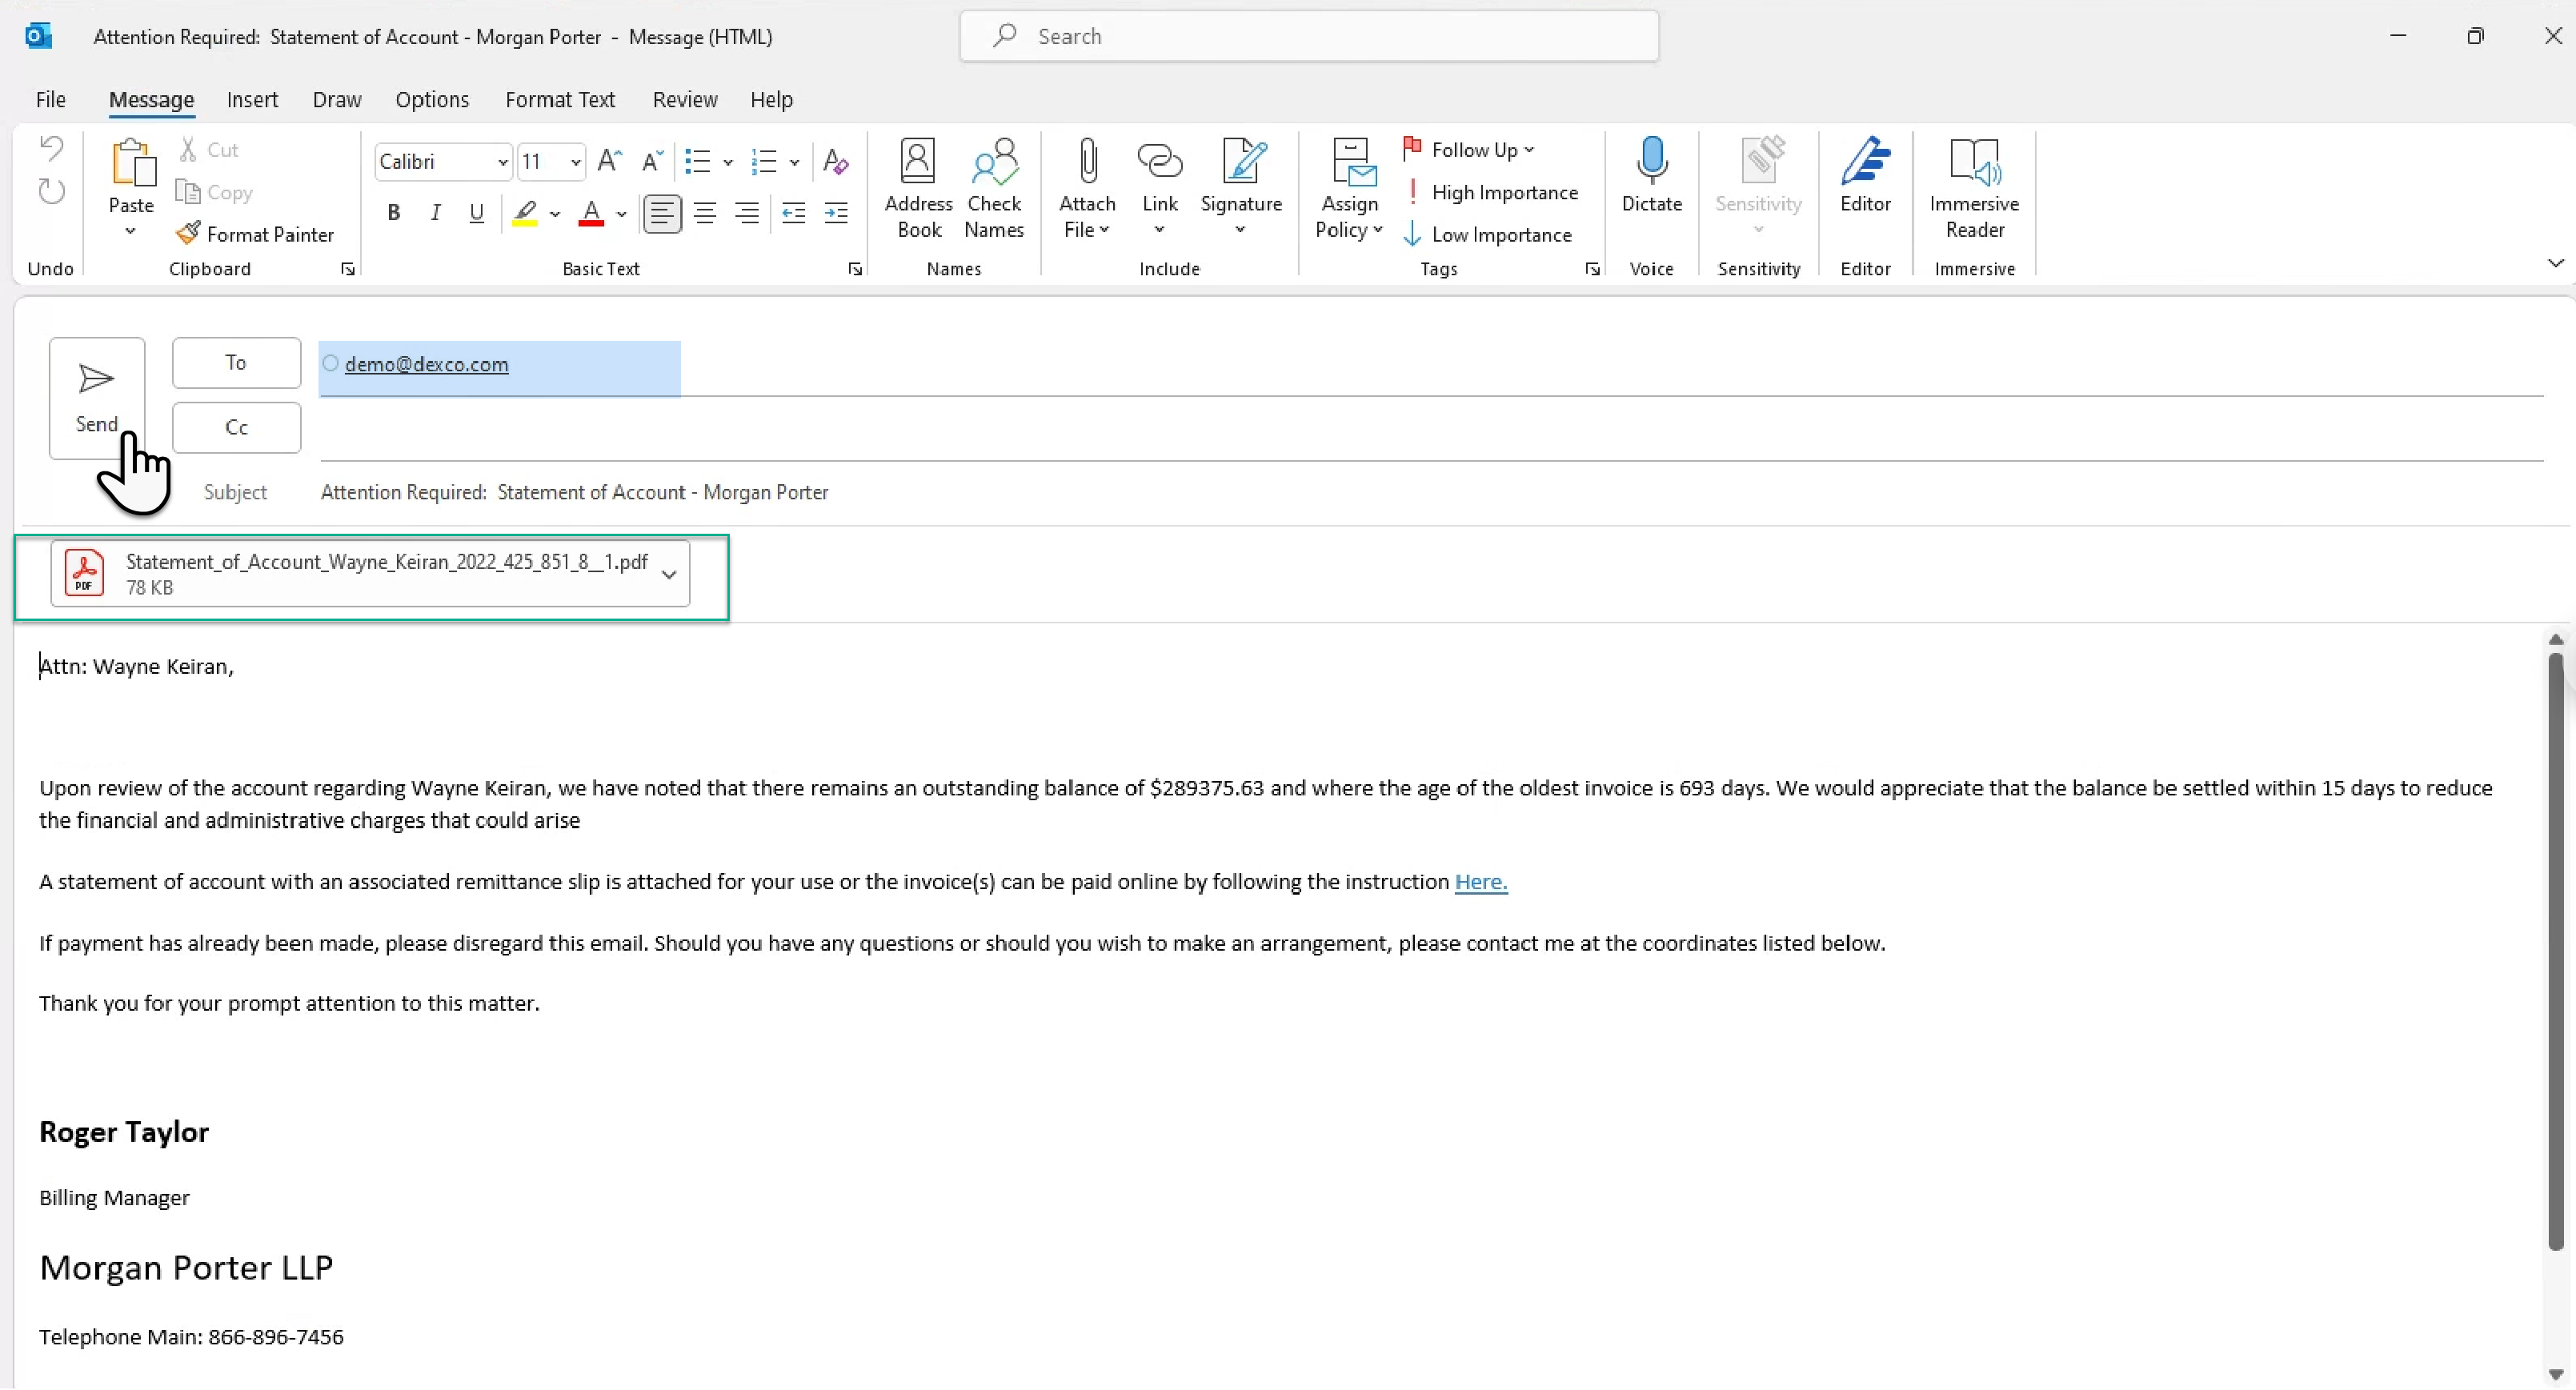
The corresponding e-mail dialogue box is pre-populated with the contact’s email address and the content of the firm-defined e-mail template associated to the age-relevant paragraph in use for the statement. Once the email has been created, the option “Sent by Email” becomes available.
Access the email dialogue box to send the email.
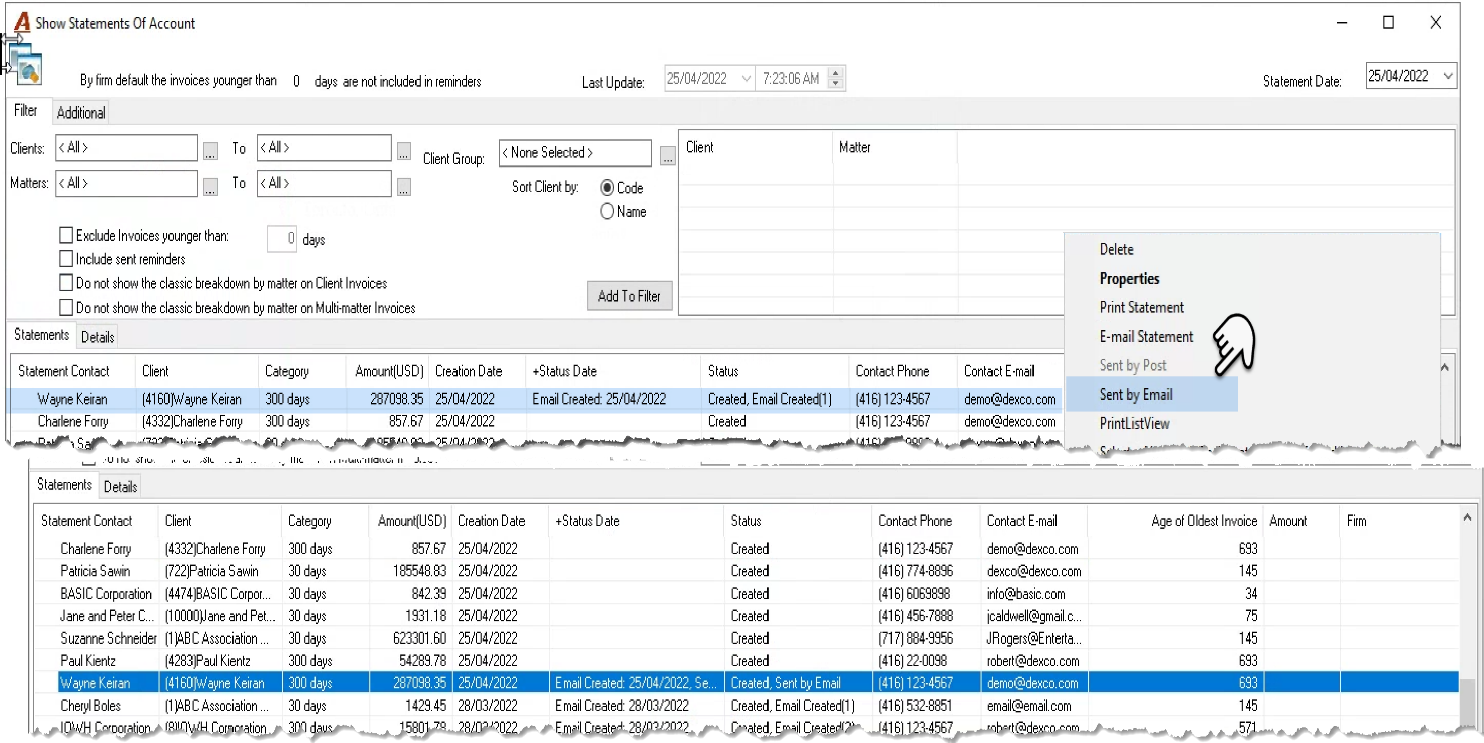
After the email is sent, right-click to select “Sent by Email” from the contextual menu to change its status and finish the process. If this step is not taken, the process is not considered complete, and the statement will remain on the calculated list so it can be sent on the next available workday and eliminate the potential for gaps in the workflow.
Multiple Statement Selection:
Multiple-select the contacts that will receive emailed statements of account and right-click to select “Email Statement” from the contextual menu.
The statements of account are e-mailed to the contacts selected bearing an email address. The statements are included as PDF attachments to the e-mail with content based on the template associated to the paragraph used to generate the statement. This process does not launch the email dialogue box; therefore, the status of the statements is automatically set to “Sent by Email”.
Contacts without an email address are excluded from the process and their status is not modified.
Sent Status
Once identified as “Sent by Post” or “Sent by Email” the statement will only re-list when the oldest outstanding invoice reaches the next category.
Use of Delete
The deleted option is used to remove the statement from the working list. This makes it easier to organize the steps in the process when some statements need changes to the statement of account contact properties.
Statements that are deleted from the working list will be included with the next calculation.
Impact of Duplicate Contact - Person or Address
The statements of account group on unique identifiers (pids) and not on words (text strings). This means that it is possible to have two statements of accounts for what appears to be the same contact at the same address, except that the database contains two separate instances (duplicates) of the same person, address, or both.
When this occurs delete the statements, change the statement of account contact properties content so all the invoices are using the same one. To eliminate the duplicate person and/or address, advice the instance of the duplicate to the person responsible, so they can merge the duplicate persons and/or addresses with respective merge tools
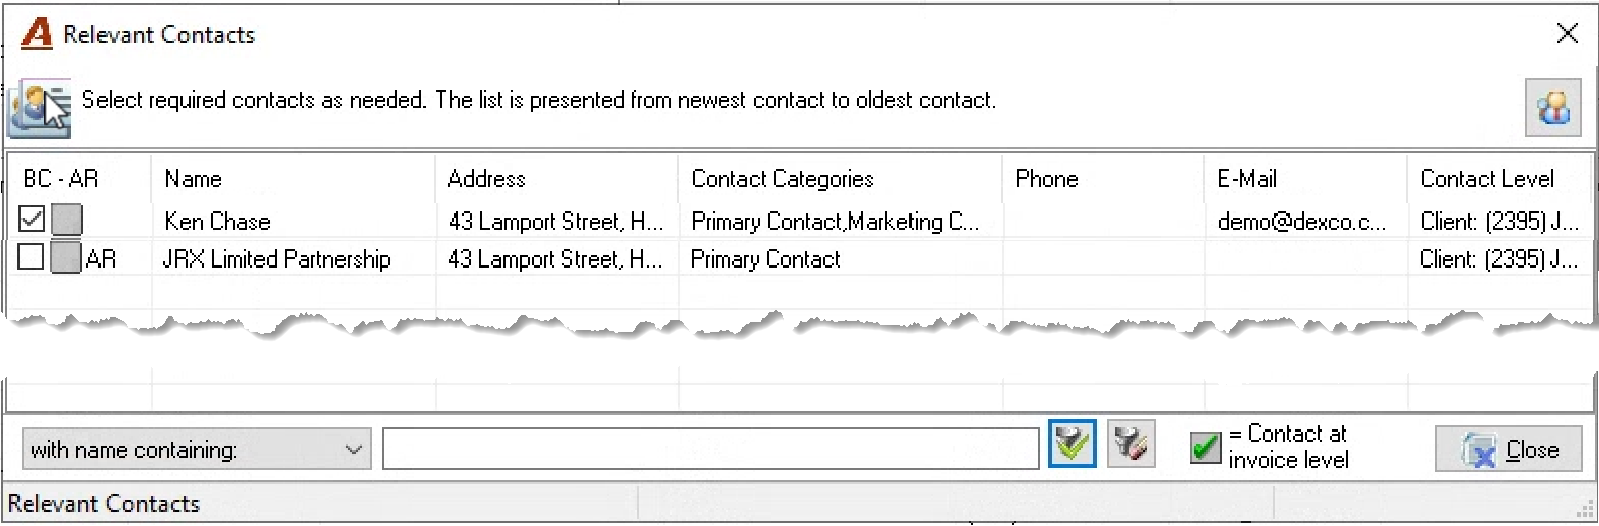
Selection of a New SOA Recipient
This right-click contextual menu option displays other relevant contacts for the statement in case a change is needed. Used at this level, all invoices included within the statement of account will be affected.
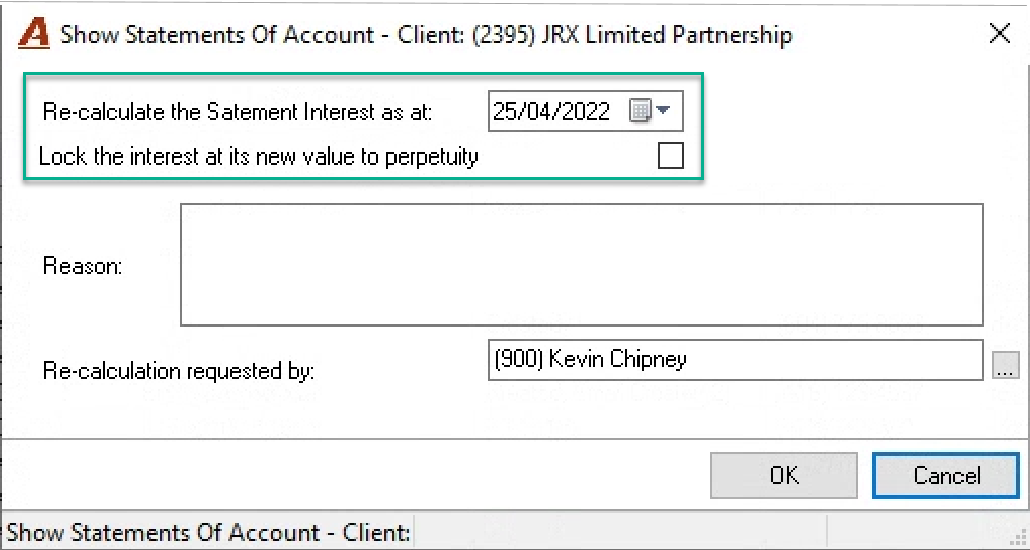
Recalculate the Statement’s Interest as at…
This option calculates the accrued interest for the invoices included in the statement as of user-selected date. Once calculated, the statement of account can be generated with this new interest amount and/or the new calculated value can be saved with use of the “Lock interest…” option. If the new interest value is not saved, the interest will be recalculated as of the server date with the next statement of account calculation.
Filter Options
Filer Tab
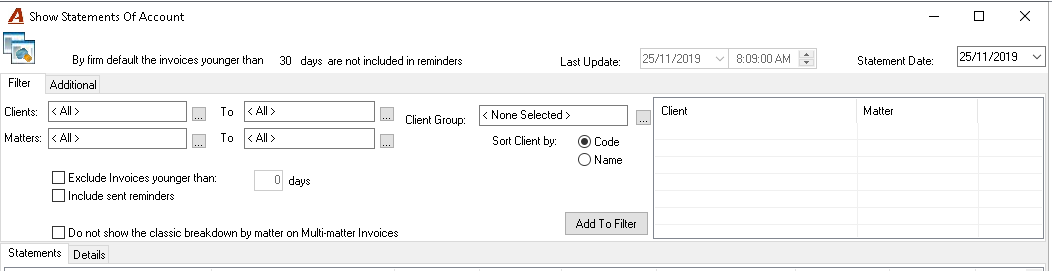
Client, Matter or Client Group: Use the client, matter, or group client fields to build list. The filter is cumulative so press “Add to Filter” after each selection to build the content. Once the list is ready press on “Apply Filter” – bottom left – of the form to obtain the results in context of the computation rule. For example, the filtered results for a matter will find the statement that contains it, which could also contain other matters within the client structure that have invoices in the same billing currency and for the same contact .
Exclude Invoices Younger than: The statements will include invoices with outstanding balances having more than the number of days entered in the firm defaults (set-up). Use the checkbox option to override the default set.
Include Sent Reminders: This option will include sent statements in the filtered results, even though they may not yet be due to be sent again. The results will show the date when sent by post or email. If the statement is re-generated it will be updated to show the current balance outstanding
Do not show the classic breakdown by matter on multi-Matter invoices: If used the statement will only show the per matter content that remains outstanding only.
Additional Tab
Filter by currency: Filters the statements by billing currency.
Statement Total Range: Filters the statements in context of a minimum and/or maximum balance.
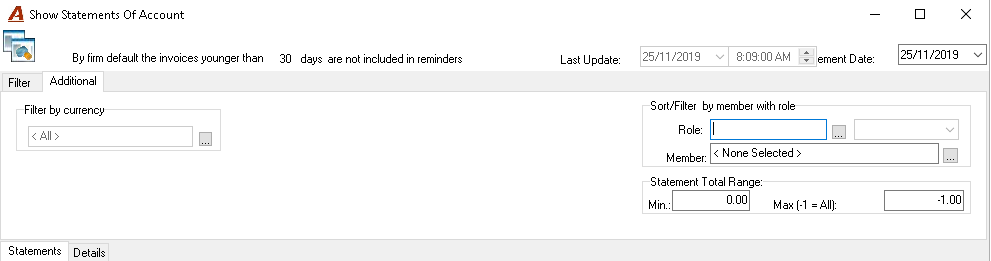
Sort/Filter by member role: Use this filter to find statements for a member based on role. Although it is possible to use a client or matter level role, the results remain in context of the computation rule. For example, the filtered results for a member based on a matter level role will find the statements that contain that matter on which he is the role holder, which may contain other matters where he does not play a role, because within the client structure there are invoices in the same billing currency and for the same contact.
Statements Tab - Contextual Menu Options
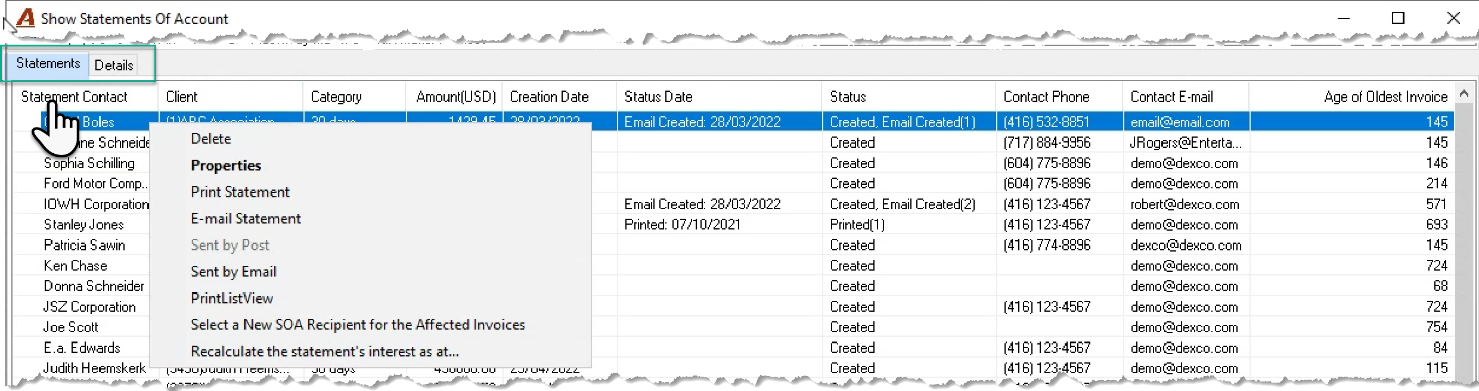
|
Delete |
Removes the statement from the list until the next calculation. |
|
Properties |
Lists the invoices included in the statement. It is the equivalent of pressing on the Details tab for a statement of account. |
|
Print Statement |
Prints the statement and changes its status to printed with the action date. Available as a single instance or on multiple select. |
|
Email Statement |
Emails the statement and changes its status to email created with the action date. Available as a single instance or on multiple select. |
|
Sent by Post |
Logs the statement of account as being “Sent by Post” with its action date. Available as a single instance or on multiple select. |
|
Sent by Email* |
Logs the statement of account as being “Sent by Email” with its action date. Available as a single instance or on multiple select. |
|
Print List View |
Generates the print list view report for the listed statements. Depending on user settings it will export to excel |
|
Select a new SOA recipient for the affected invoice. |
Shows other contacts for the statement for users to make a change. |
|
Recalculate the statement’s interest as at… |
Used to trigger the calculation of the interest as at a specific date and save it (lock it) so it does not recalculate with the next statement of account calculation. |
Details Tab - Contextual Menu Options
This tab shows all the invoices included in the statements of account list.
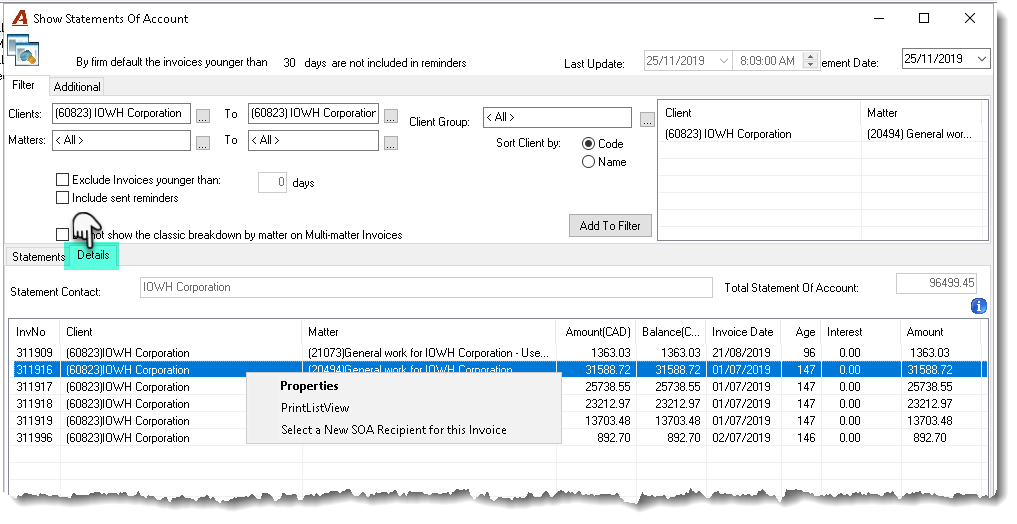
|
Properties |
Launches the properties of the invoice |
|
Print List View |
Generates the print list view report for the listed invoices. Depending on user settings it will export to excel |
|
Select a new SOA recipient for the affected invoice |
Shows other contacts for the invoice for users to make a change. |
More on Select a new SOA recipient for the affected invoice
When a change is made to the statement of account contact for one or more invoices included in the statement of account selected, reapply the filter to work with updated results. The statement tab will list the modified statement of account which excludes the invoices with the changes made as well as include new statements for these invoices.
Shared invoice in statement of account
Firms licensed with Invoice Sharing Concept will have unpaid portions of shared invoices grouped for statement of account purposes under their respective participant- contact combination.
Presentation on the statement of account
The statement of account generated for the participant (the sharer or multiple payer) includes the balance outstanding on regular invoices where the invoice is not shared , as well as shared amounts owed on invoices where there is participation.
Presentation Rule:
First position: non-shared invoices per matter ordered by number
Second position: Shared invoices where the client is a participant AND the host client per matter ordered by number.
Third position: Shared invoices where the client is only a participant per client per matter ordered by number
Billing and Statement of account contact modifications
When launching a shared invoice from the Details tab within the Statement of Account form, the contact section on the invoice properties details tab will be grayed out. This is because the invoice is shared amongst multiple participants rendering the default billing contact not applicable. Navigate to the shared invoice tab to modify any of the shared-invoice contacts
To override the participant business logic and have the statement of account sent to a specific statement of account contact instead of to the relevant participants, select a contact within the statement of account contact properties on the details tab. In this case the SOA contact section will be enabled.
The supporting messaging when making changes to in the contact section of the invoice properties details tab for shared invoices is detailed to ensure the compromise of the shared invoice business logic is intentional.
RELATED DOCUMENTS: