.png)
Overview
The credit note object and related functionality is one of the many receivable management tools available to organizations. More specifically, the Credit Note vehicule is used to reflect inefficiencies captures after the invoice is completed and/or reflect agreed fee or disbursement reductions after the invoice is issued. The document is usually sent to the client.
Best Practice: Issue credit notes to reduce previously billed fees to adjust the invoice to a mutually agreed value. Reserve the receivable write-off process to consolidate the bad debt expense for non-collectable invoiced values due to the client's unwillingness or inability to pay.
Credit Note Process
Access
It is best practice to access it from the AR Inquiry search results form as the AR inquiry lists all invoices for a client or matter with a balance not equal to zero.
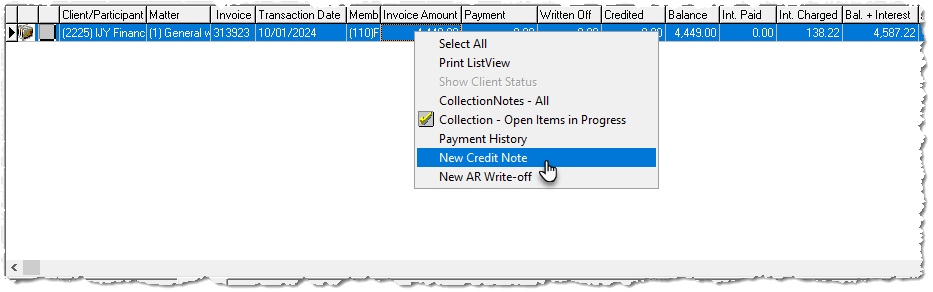
Right-click on the invoice to be credited and select New Credit Note to launch the “Credit Note Properties” form.
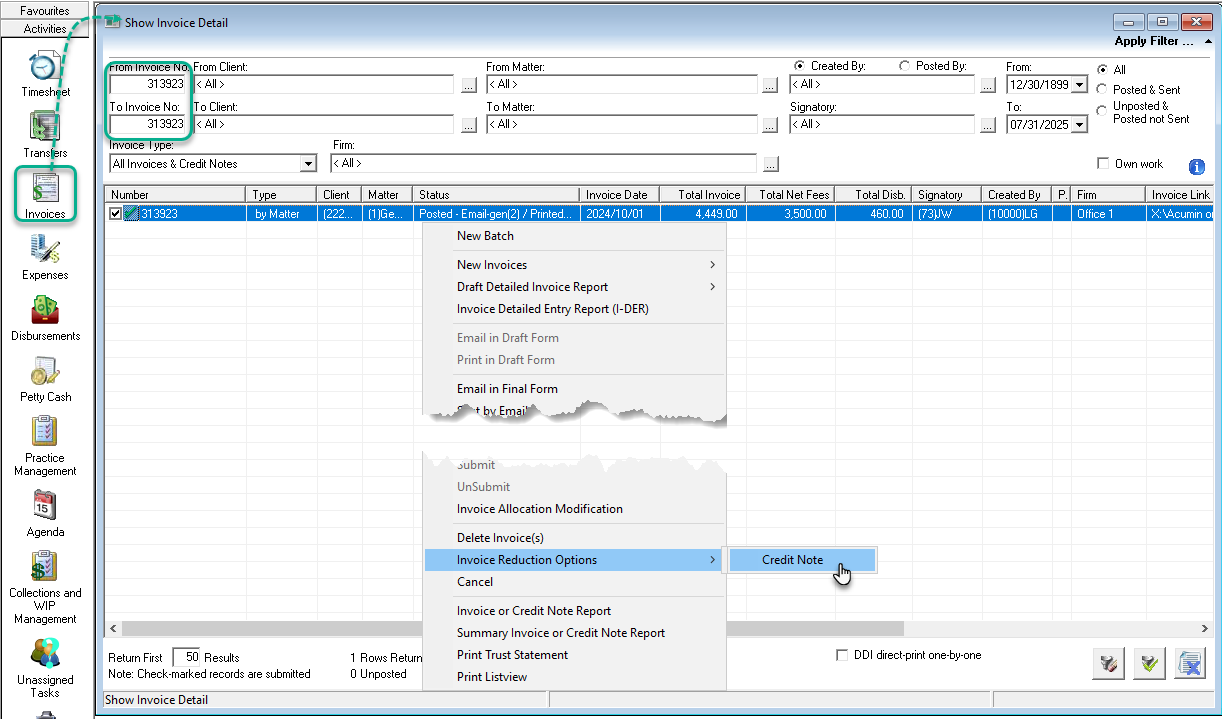
Alternatively, from the Activity task-bar section – press on the Invoice to launch the “Show Invoice” form. Search and select the invoice to be credited and select the , right-click and press Invoice Reduction Options - Credit Note.
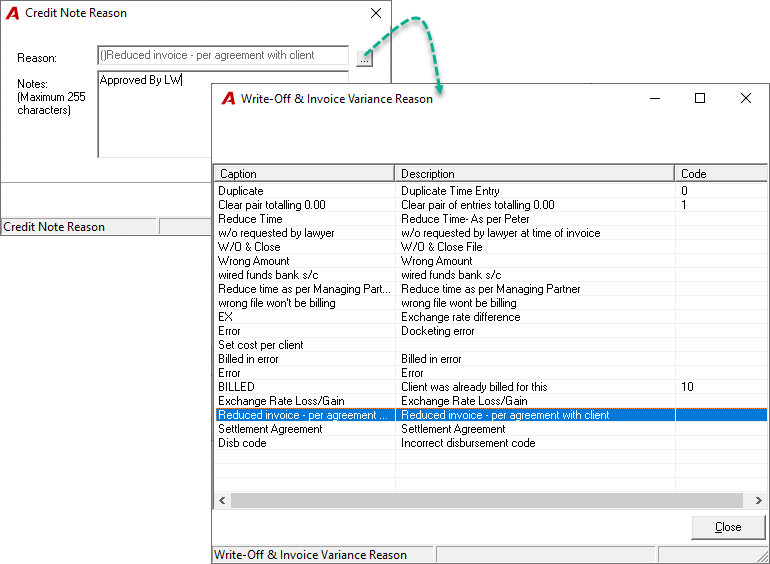
The system will launch the Credit Note Reason form. It is mandatory for the user to select a reason from the list in order to proceed with the Credit Note.
-
This reason will be visible in the Credit note and it will be possible to print it on the Credit Note document sent to the client if needed.
The Credit Note Properties
Review the default settings on every tab and complete required modifications to ensure desired outcomes.
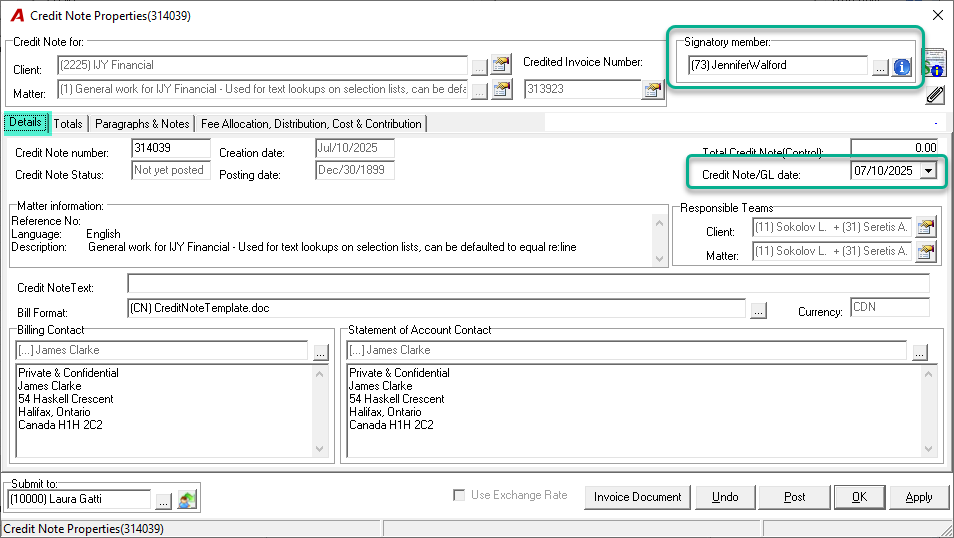
The request for the Credit Note opens on the Details tab pre-populated with the relevant information.
Details Tab – Confirm the requested for member and the Credit Note date. Unless making a correction, it is considered best practice to use the current date as the Credit Note transaction date.
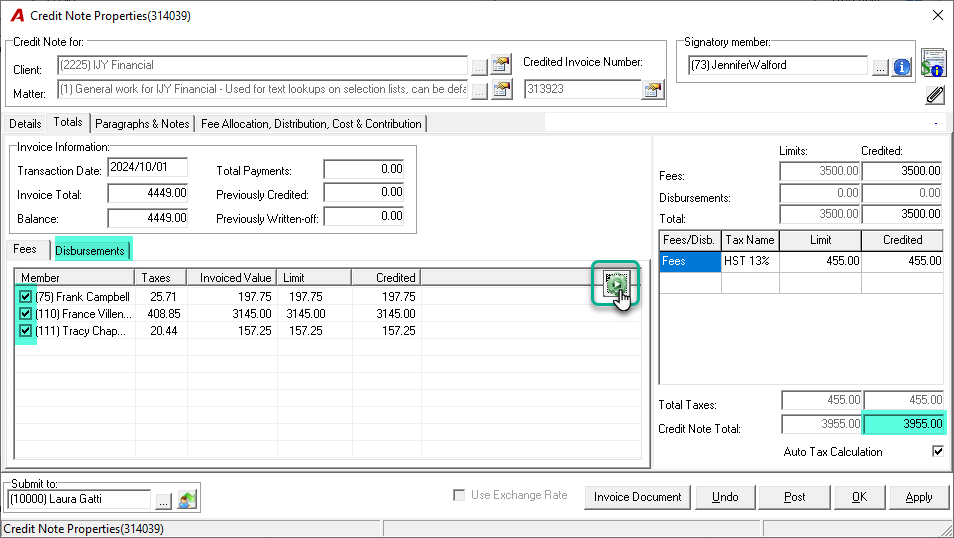
Totals Tab – Confirm the balance to be credited. Press on the disbursements sub-tab to select the disbursements to be credited.
-
The balance does not equal the amount credited? Click on the Disbursements sub tab to include them.
-
Uncheck members to exclude from the credit note. This will reduce the fees amount limit to credit.
-
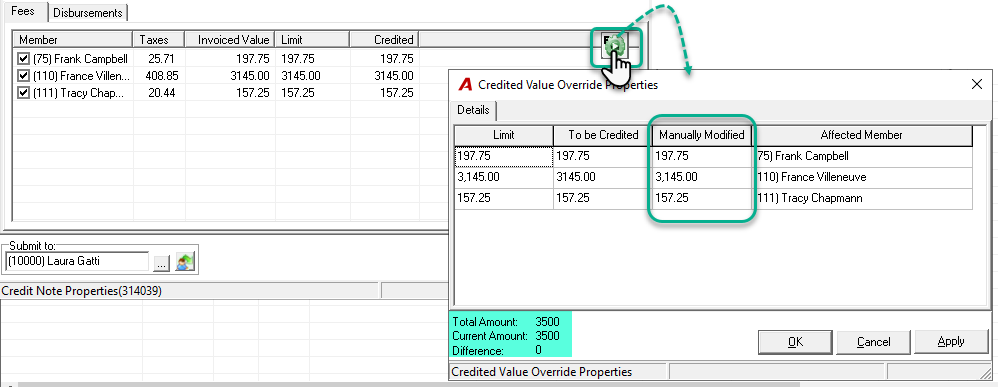
You need to change the credit allocation to not be the one applied at the invoice? Click on the Manual Override Billed Fees Credited Value icon to make the change.
Once checked, the disbursements are part of the total credit note for the balance remaining.
Points to consider
If the invoice to be credited is an invoice created in Acumin, then the Auto tax calculation will be enabled to facilitate the creation of the Credit Note.
If the invoice to be credited is a converted invoice (not created in Acumin) then the limits in distribution and the calculation of tax to be credited must be completed manually by the user. Please note that increased flexibility requires greater caution when completing the Credit Note properties form.
Best Practice:
Ensure that the correct members and disbursements are checked ON before proceeding.
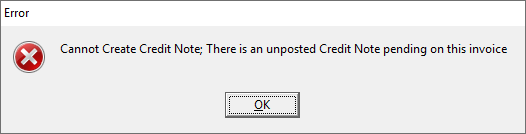
It is not possible to create an Credit Note request if there are pending receivable related unposted objects associated to the same invoice. More specifically, the user will not be able to generate an Credit Note request when one of the following items remains in progress:
-
The affected invoice itself not yet posted or;
-
There is at least one unposted payment, credit note, or AR Write-off for the affected invoice.
The user will receive a warning message indicating the un-posted object.
Printing the Result
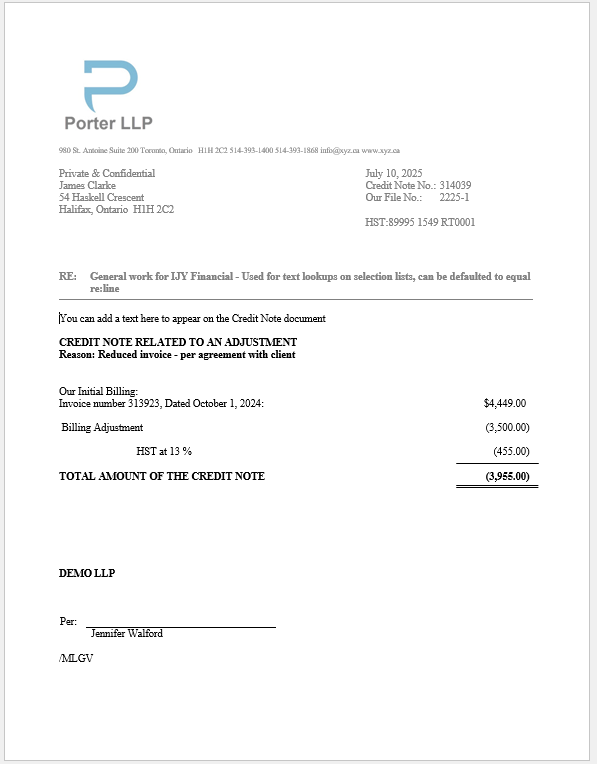
Once the request is complete, if the user is not authorized to process and post the Credit Note, he or she will typically execute the word merge function by proceeding with the print function and e-mail or print the request for the person responsible to process and post it as well as submit it electronically in Acumin to the submitted person.
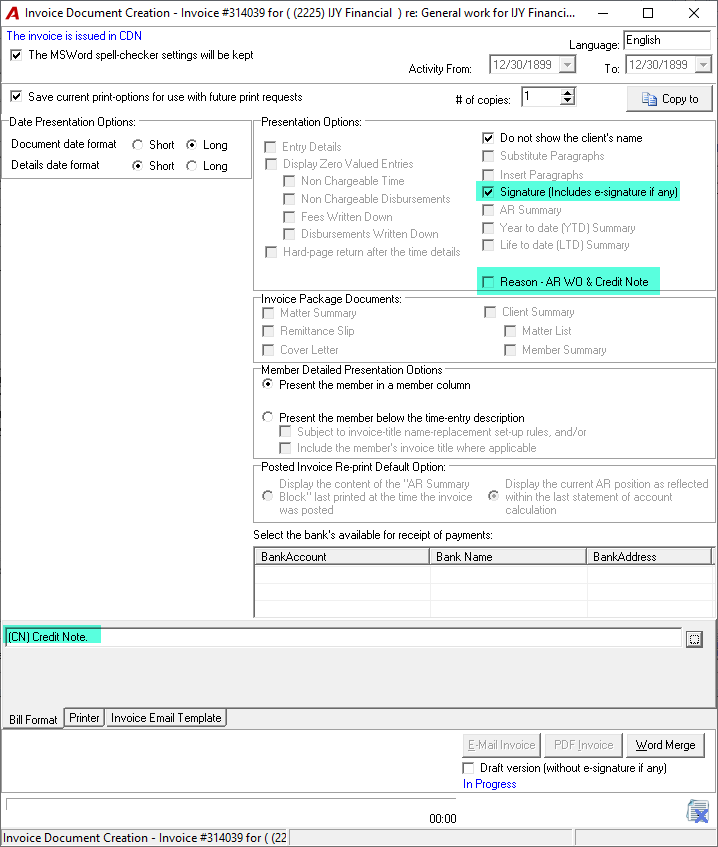
The user can decide to include the signature and/or the Reason selected at the beginning on the document.
Press on the Print button to generate the Word document.
The Credit Note document can only be generated through WORD.
Modifying Default Credited Values
The Credit note is typically use to modify default credited value to reflect a fee or disbursement reduction process reflective of the accounting transaction; it is possible to specifically select members and or disbursements through the credit note process.
Crediting fees:
-
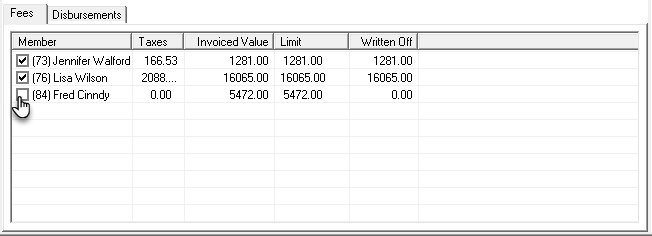
Check/Uncheck the checkbox beside any member to determine the amount limit to credit.
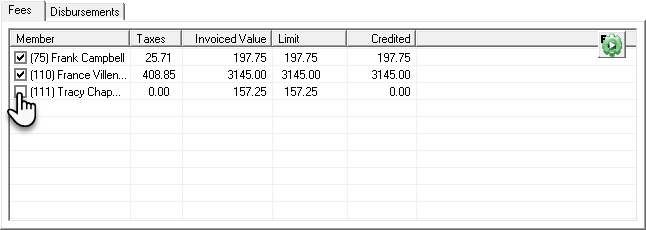
Note that when you check/uncheck the boxes next to members' names, you're simply defining the maximum fee amount eligible to be credited. This selection does not determine how the amount credited will ultimately be allocated.
By default, the system allocates the amount credited according to the original invoice's final fee allocation.
If you need to override this default behavior and allocate the amount credited to only one individual for example when in the original invoice, the fees was allocated proportionally to all working members, you must manually reallocate the amount credited using the Manual Override Billed Fees Credited Value option located in the Fees sub tab of the Credit Note form.
-
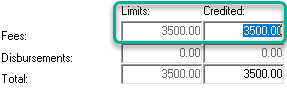
On the totals fee section modify the fees to be credited. Users can modify the value to an amount equal to or less than the limit.
Crediting Disbursements:
-
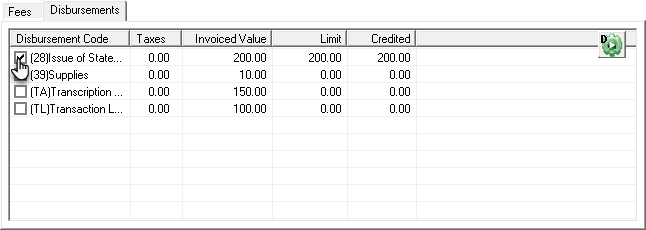
To access the list of potential disbursements to be credited, the user must select the Disbursements tab:
-
Check a disbursement to include it in the Credit Note.
-
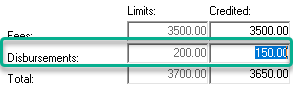
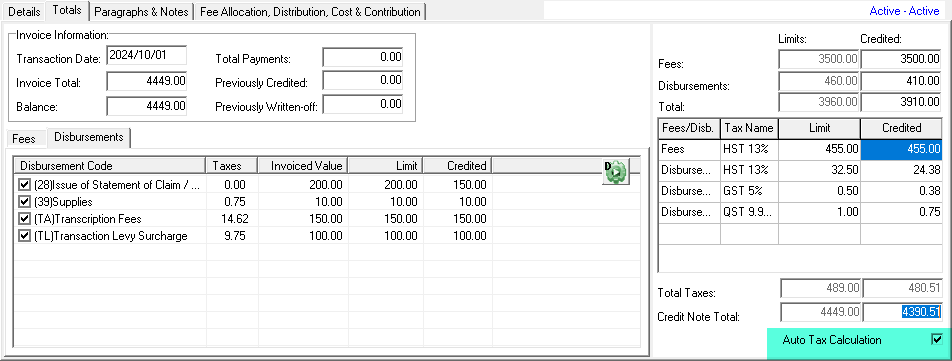
On the totals disbursement section modify the disbursements to be credited . Users can modify the value to an amount equal to or less than the limit. In this example the $150.00 credit will be proportionately accounted for against the checked disbursement “Issue of Statement of Claim”.
Crediting Sales Tax:
-
If the invoice to be written-off was not created in Acumin (but converted) the user will not be able to use the “auto tax calculation” function.
-
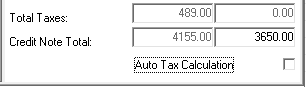
To manually write-off sales tax (because it is a converted invoice or because we are only writing off the sales tax as it was incorrectly charged), the user must ensure that the “auto tax calculation” checkbox is OFF in order to insert the amount to be written–off into the sales tax box:
-
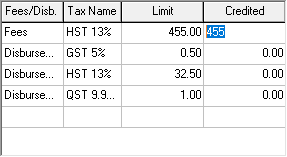
To access the tax field, click on the tax line of tax to be credited. The cursor will then appear in the Credited cell of the row. (you may not see it but if you type, the amount will be presented) Enter the tax amount to credit and click on Apply or OK to confirm.
-
If the auto tax calculation setting is ON, the user will have the option to override the credited total and the sales tax to be credited will be automatically calculated.
Credit Note Properties Form – Field Definition
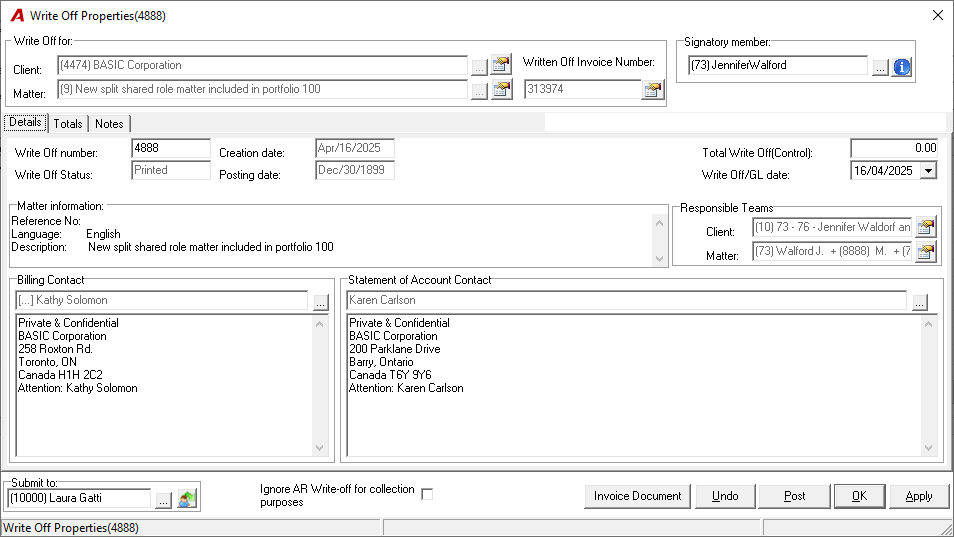
Details Tab:
-
Credit Note for: This section displays the Client, Matter, Invoice Number and currency of the original receivable Invoice to be credited.
-
Signatory member: The member that requested the credit note and presented on the printed document if requested.
-
Credit Note number: The receivable credit note number.
-
Credit Note Status: Status of current receivable Credit Note.
-
Creation date: The receivable Credit Note’s date of creation (defaults to the current date at creation).
-
Posting date: The receivable Credit Note’s posting date 12/30/1899 means no date. The date will only be stored once the transaction is posted.
-
Total Credit Note (Control): To be able to post the credit note, authorized user needs to enter the same amount shown in the Credit Note Total (Credited) field in the Totals tab.
-
Credit Note / GL date: The receivable Credit Note’s transaction date (equal to the date of GL the Operations). The user should confirm this date.
-
Matter information: Selected Matter Information. Clicking on the Ellipsis Button will bring the user to the Matter Properties form.
-
Responsible Teams: Lists the composition of roles at the client and matter levels.
-
Billing and Statement of Account contact: The Billing and Statement of Account Contacts of the Invoice being credited. The credit note document will be addressed to the same billing contact.
Totals Tab:
-
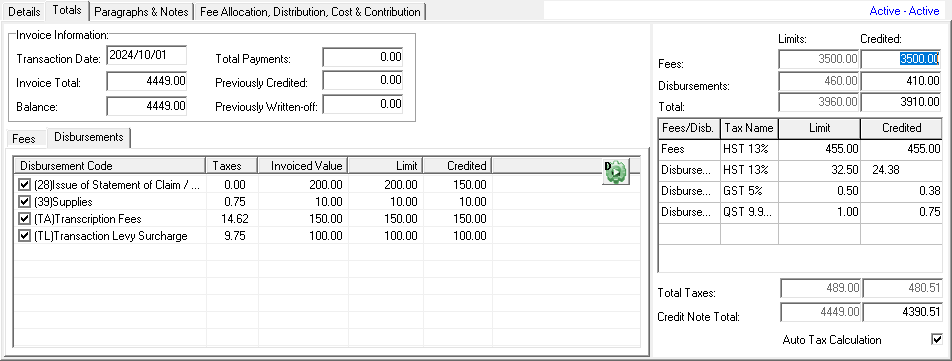
Invoice Information: Displays the Invoice Date, the Total Original Invoice Value and the Unpaid Balance. The unpaid balance is the limit of the credit note.
-
Fees / Disbursements: This section displays a summary of fees and disbursements included in the original invoice.
-
The Fees tab lists the value of fees invoiced of all Members that participated on the selected invoice. The amounts shown are the one billed to the client per member.
-
The Disbursements tab lists all the disbursements included in the original invoice summarized by code.
-
-
Totals Section: This section displays the limit based on what is selected in the Fees/Disbursement subtab, whereby the user cannot exceed this total limit between fees, disbursements and taxes to be credited. The credited column allows the user to override the default values not to exceed the stated limit.
-
If the Auto Tax Calculation is Checked ON: The tax value to be credited will be automatically calculated based on taxable fees and/or disbursements included in the Credit Note.
Note: The sales table lists the limit of the sales tax (or sales taxes) applicable to fees and/or disbursements by tax rule.
Paragraphs & Notes Tab
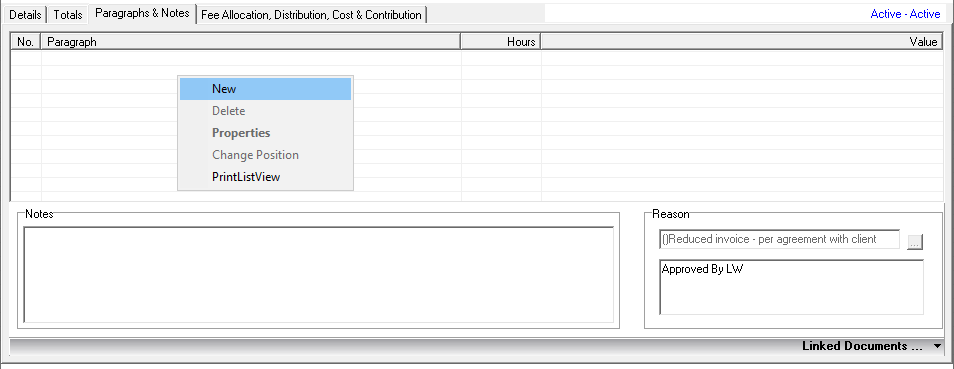
Paragraphs: Users can create special paragraphs and based on firm credit note design, these paragraphs will print on the client document.
Notes: This section enables users to create additional notes for personal reference in relation to the credit note.
Reason: This section lists the reason selected. Users can make other selections or add text while the credit note remains un-posted.
Linked Documents: It is possible to link related document withing the Credit note
Fee allocation TAB
What is shown will depends on the licence you have.
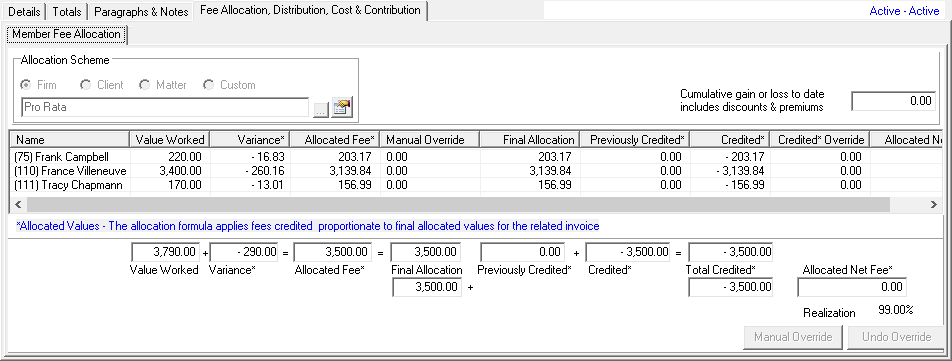
Allocation Scheme: Will show the allocation schema applied in the related invoice.
Allocated section: Present a detailed view of the fee allocation credited based on the final allocation applied in the related invoice.
Other Options Available:

-
If the user does not have permission to post Credit notes, the user will need to transfer electronically (Submit) the information to an authorized person (Submit to content).
-
Click on the ellipsis button to select the submittee (if there is no default or the default is incorrect).
-
Press submit to transfer the Credit Note for processing to the person populating the Submit to field.
-
Undo will cancel all modifications made to the credit note and return the content as it was when the credit was first generated.
-
Print will launch the Document Creation form
Credit Note GL Operations
The Post button will execute the GL Operations and change the credit note status to Posted in the Show Invoice form:
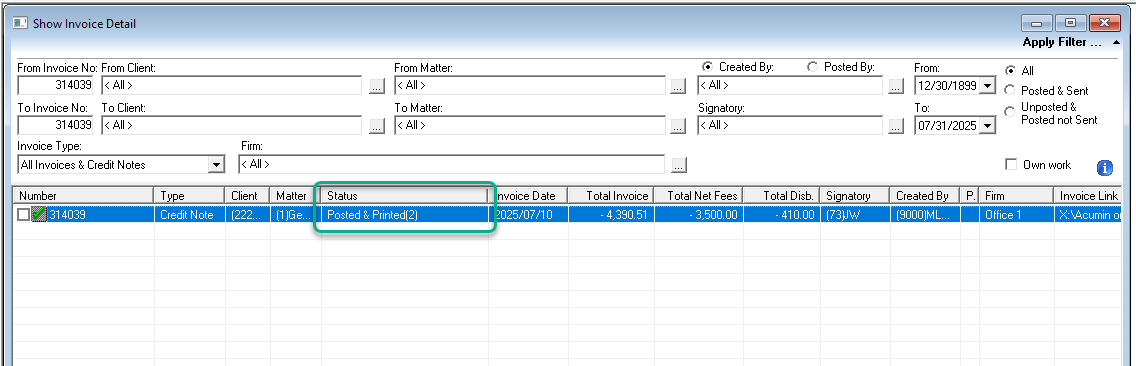
Typically a receivable write-off will affect the Following GL Accounts:
|
GL Accounts |
Debit |
Credit |
|---|---|---|
|
Fees Credited (Master Account - Contra-Revenue) |
3500.00 |
|
|
Disbursements Credited (Master Account - Contra-revenue) |
410.00 |
|
|
Sales Tax (if any) as assigned to the sales tax rules |
480.51 |
|
|
Account Receivable (Master Account - asset) |
|
4390.51 |
The above displayed entry is just an example on how to credit an invoice that has Fees, Disbursements and Sales Tax.
Although the actual GL Operation will differ depending on what is being credited, it is important to note that a credit note does not reduce the Billed Time GL Account (the revenue GL Account) balance but its own fees and/or disbursement credited GL Account.
The GL transaction description will include:
-
the member code and initial of the member that posted the credit note;
-
the Credit Note number;
-
the client code and name,
-
the matter code,
-
the tax scheme
RELATED DOCUMENTS:
Cash Allocation - Impact on Cash Receipt Allocation when issuing AR Write-Offs & Credit Notes
Cancellations of a Converted Invoice or Credit Note