.png)
Scope and Purpose
The purpose of this document is to provide users with a comprehensive guide to efficiently manage their invoicing processes using the Show Invoice Detail Form. It aims to streamline workflows for:
-
Locating and filtering invoices.
-
Making necessary adjustments or corrections to invoice entries.
-
Generating reports or final invoices for submission or review.
-
Ensuring compliance with firm-level billing guidelines and instructions.
This guide is intended to help users understand the full functionality of the invoicing system, ensuring accurate invoice preparation, timely submission, and proper tracking of invoice statuses.
Show Invoice Detail Form
The Show Invoice Detail form provides users with the ability to view, filter, and manage invoices that are currently in progress or posted but not yet sent. This form helps users organize and track invoices they own, as well as create new invoices or drafts when needed.
Access
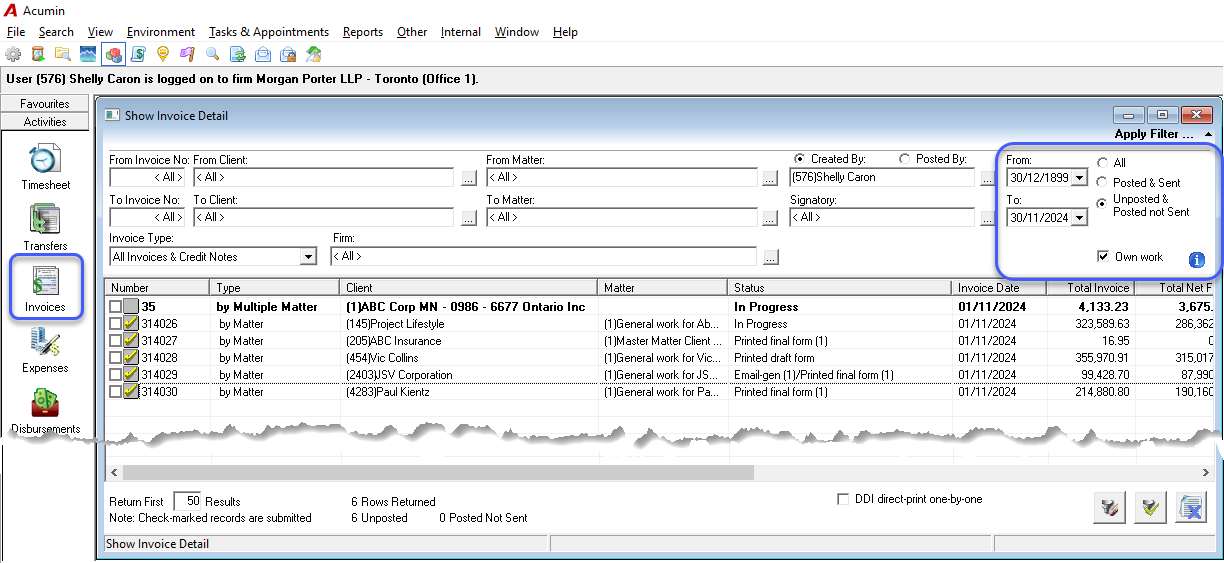
To access the Show Invoice Detail form, follow these steps:
-
Press the Invoices icon located in the Activities section of the Taskbar.
-
The form will open but will appear empty initially.
-
By default, the filter is set to display all unposted and posted invoices not yet sent the logged-in user currently own.
Filter Options
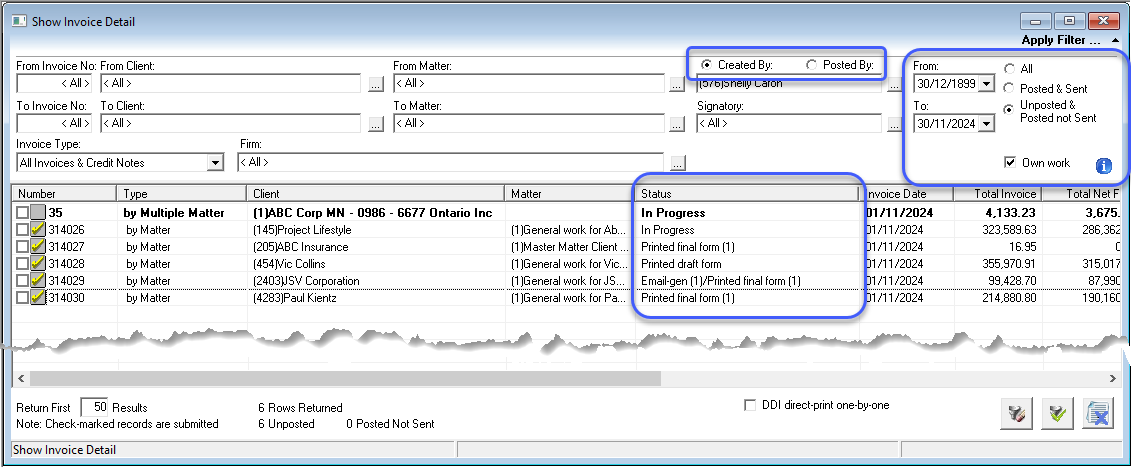
The Show Invoice Detail form serves two primary purposes:
-
Filtering for existing invoices
-
Creating new invoices, including Regular Invoices, No Time Invoices, Interim Matter Invoices, Invoice and/or Matter Drafts as well as Credit Notes
Note: Both Multi-matter and Client invoices can only be created from the To Bill tab section.
Default Filter Settings
When you first open the form, the filter is set to the following default values:
-
Created by: Equal to the logged-in user (you).
-
Own Work checkbox: Enabled.
-
Invoice Status: Set to “Unposted & Posted not Sent.”
-
From Date: Set to January 1, 1899 (the beginning of time).
-
To Date: Set to the last day of the current month.
After adjusting any necessary filters, press the Apply Filter button (located in the bottom-right corner) to view a list of invoices that you own and that are currently in progress.
The “Show Invoice Detail” filtered results are the equivalent of the working checklist for invoice prepares participating in the invoice preparation process from start to finish - status created to posted and sent. As a result, when accessing the form directly for the “Activities” taskbar section “Invoices” button, or from the custom toolbar, the default filter for status is intentionally set to “Unposted & Posted not Sent” on the expectation that it is most desirable for users to move invoices in-progress to the “Posted & Sent” status, therefore eliminating the requirement for additional filter selections.
What You’ll See
When you apply the filter, the form will display a list of invoices you need to clear by:
-
Completing changes
-
Submitting them
-
Posting them
-
Identifying posted invoices as sent (via email, post, or e-billing)
Working with Columns
Given the number of columns available on this form:
-
Many users find it helpful to maximize the form for better visibility.
-
While columns cannot be hidden, they can be resized to give the appearance of being hidden.
Understanding the Filters
-
Own Work Filter: Displays invoices you’ve created through the invoice creation filter (via the “To-Bill” or “Results” tab) or through the right-click “New Invoice” option on this form. It also includes invoices submitted to you by someone else in your workflow.
-
In-Progress Posted & Not Yet Sent: Displays invoices that have been posted but not yet sent (either via post or email). This filter will eventually also include any "batch" invoices.
Sorting and Organizing Invoices
To help manage your workflow, you can organize and sort your invoice list bu clicking the header of any column to sort by that field.
-
A plus sign (+) means it is sorted in ascending order.
-
A minus sign (-) means it is sorted in descending order.
Additional Sorting Options
Beyond filtering by invoice number, you can further organize your list by:
-
The lawyer responsible for the invoice (e.g., signatory if invoices need to be signed).
-
The client and matter or a specific range of matters.
Applying and Clearing Filters
Both buttons are located at the bottom-right of the form.
-
To apply any filters you’ve set, press the Apply Filter button.
-
To reset to the default filter settings, press the Clear Filter button.
Viewing Filter Results
After applying a filter, a summary displaying the number of results per status (either Unposted or Posted Not Sent) will appear at the bottom of the form when you select the "Unposted & Posted not Sent" radio button.

Flags and Status
Invoice Statuses:
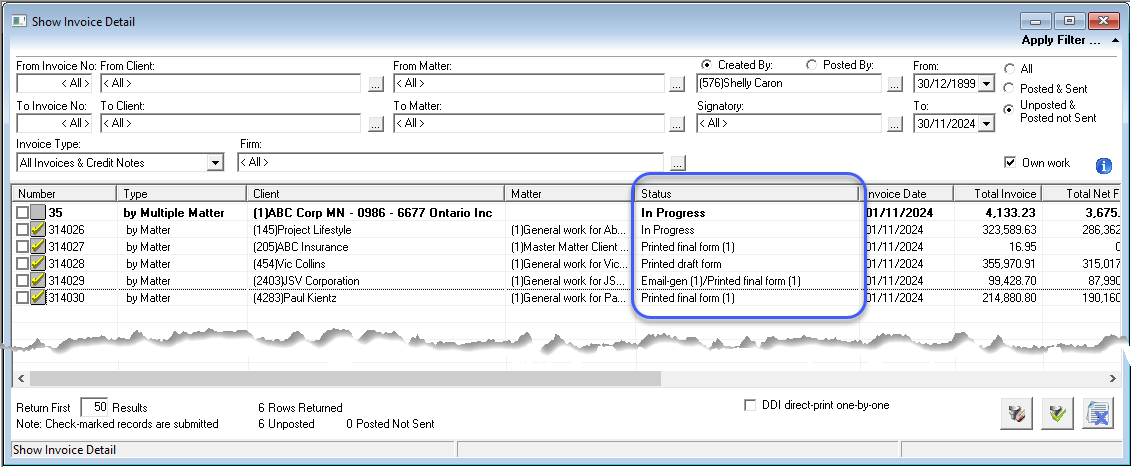
-
In Progress: Newly created invoices that haven't been printed, emailed, or e-billed.
-
Printed Draft Form:
-
Printed as a draft without remittance slip or e-signature.
-
Not saved automatically but can be regenerated multiple times.
-
-
Printed Final Form:
-
Printed as a final version with remittance slip and e-signature (if applicable).
-
Automatically saved and can be printed multiple times.
-
-
Email Generated: Email generated with either the saved final document or a new final invoice attached.
-
Ebill Generated: E-bill output was generated and saved.
-
Posted: Invoice posted and combined with output generated status (Print, Email, or E-bill).
-
Cancelled: Invoice has been cancelled.
Icons
Each invoice record displays an icon indicating its process-flow phase:

|
Invoice in progress (not yet opened) |

|
Invoice opened at least once or created from this form |

|
Posted invoice |

|
Cancelled invoice |

|
Locked invoice (included in another user's batch) |

|
Indicates submitted invoices |
Right-Click Functionality
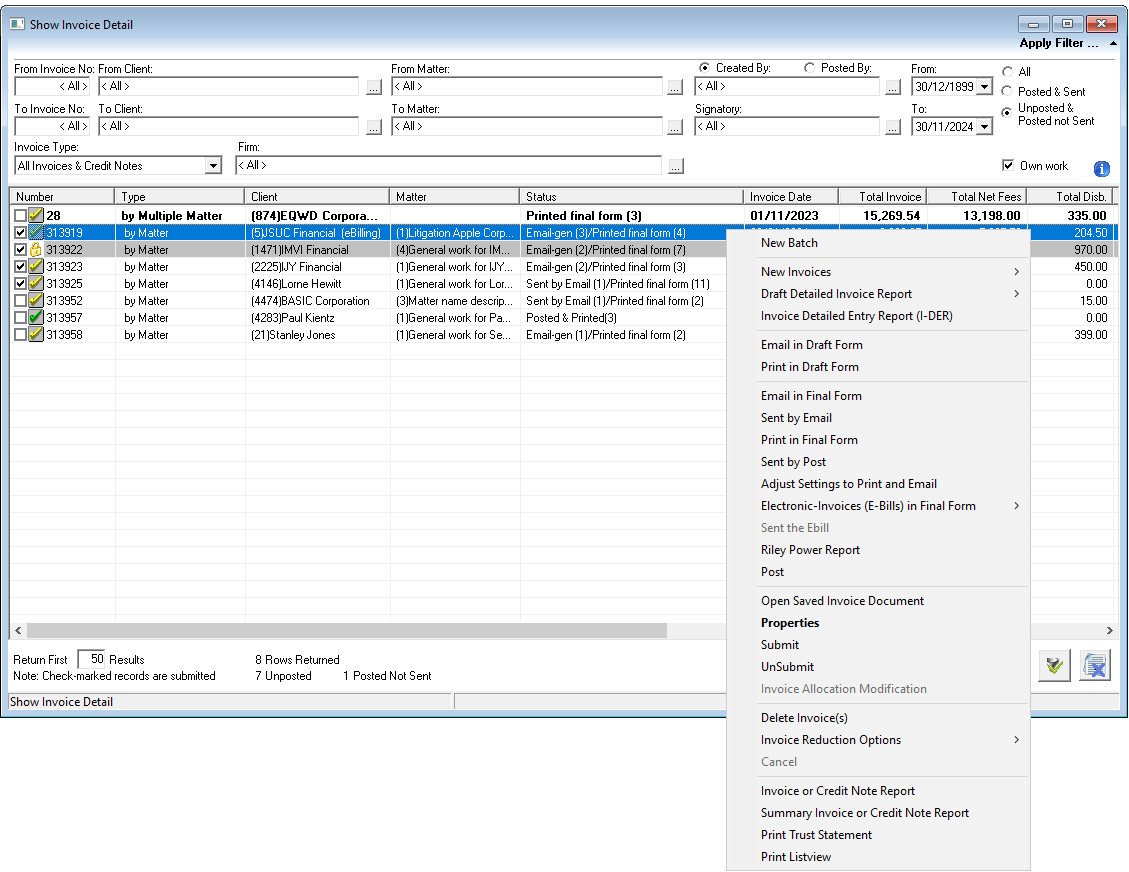
|
Option |
Description |
|
New Batch |
Launches the Invoice Batch Processing form, allowing users to perform invoice-related actions on multiple matter invoices included in the batch. For more details, refer to "Invoice - Use of Batch Processing Options - Quick Start.docx." |
|
New Invoice |
Regular: Creates an invoice per matter, including fees or no fees, and disbursements from the WIP.
|
|
Draft Detailed Invoice Report |
Opens the Draft Detailed Invoice (DDI) report for the selected invoice (Matter, Client, or Multiple Matter Invoice). |
|
Invoice Detailed Entry Report (I-DER) |
Opens the Invoice Detailed Entry Report (I-DER) for the selected invoice. |
|
Email in Draft Form |
Generates an email with the draft invoice attached. The user selects the recipient manually; the email text is hardcoded. |
|
Print in Draft Form |
Directly prints the invoice in draft form based on saved print options. The draft copy is not saved. |
|
Email in Final Form |
Directly generates and sends an email with the final invoice attached, using a personalized email template and the billing contact's address. This option is not available for those on the Invoice Custom Templates. |
|
Sent by Email |
Flags the invoice as sent by email, completing the billing process. This option is not available for those on the Invoice Custom Templates. |
|
Print in Final Form |
Directly prints the invoice in final form using saved options. The user can choose to print the saved document (if any) or generate a new final invoice copy. |
|
Sent by Post |
Flags the invoice as sent by post, completing the billing process. |
|
Adjust Settings to Print and Email |
Launches the Invoice Document Creation form to adjust print and email settings before generating the invoice. |
|
Electronic Invoices (E-Bills) in Final Form |
Generate E-bill: Creates and saves an electronic invoice file based on the LEDES or custom format selected in the task set, stored in the folder specified at client properties.
|
|
Sent the E-bill |
Flags the invoice as uploaded on the client’s website, completing the e-bill billing process. |
|
Post |
Records the transaction entries in the general ledger. This option becomes available once the total invoice amount is entered in the "Control Total" field. Posting can only be done by authorized users. |
|
Open Saved Invoice Document |
Opens the saved invoice document for review or reprinting. |
|
Properties |
Opens invoice properties for both posted and unposted invoices. Edits to posted invoices are limited to billing and statement of account contacts. |
|
Submit |
Submits the invoice to the individual selected in the Submit field, as per firm processes. Users can select multiple invoices for bulk submission. Once submitted, invoices are removed from the list. |
|
Unsubmit |
Unsubmits an invoice if the "Submit to" person has not yet begun working on it. If work has started, they can submit it back to the original user if needed. |
|
Invoice Allocation Modification |
Opens the Allocation Override Properties form to make the necessary changes in allocation. Modifications can only be done by authorized user on unposted and posted invoice. How to Modify Fee Allocation on Posted Invoices |
|
Delete Invoice(s) |
Deletes unposted invoices that are no longer required or will not be billed in this billing period. The assigned invoice number will still be recorded as used. For unposted Client or Multiple Matter Invoices, delete individual matters included within the envelope. Users can delete multiple matters at once. |
|
Credit Note |
Creates a Credit Note request for POSTED invoices with an unpaid balance. Credit Note requests can also be made from the AR Dashboard or during file closing processes.
|
|
Cancel |
Reverses GL transactions of a posted invoice. Pay attention to the cancellation date selected. It will limit the transaction date user can select for future invoices includings entries from this one. |
|
Invoice or Credit Note Report |
Prints an Invoice or Credit Note report based on what is selected (Invoice or Credit Note). Users can select multiple invoices for batch printing of reports. |
|
Summary Invoice or Credit Report |
Prints a Summary report of either a Client or Multiple Matter Invoice, or a Credit Note report based on what is selected. |
|
Print Trust Statement |
Prints a proforma Trust Statement directly from the invoice selected. |
|
Print Listview |
Prints a list view of all invoices displayed in the Show Invoice Details form. |
Invoice Properties
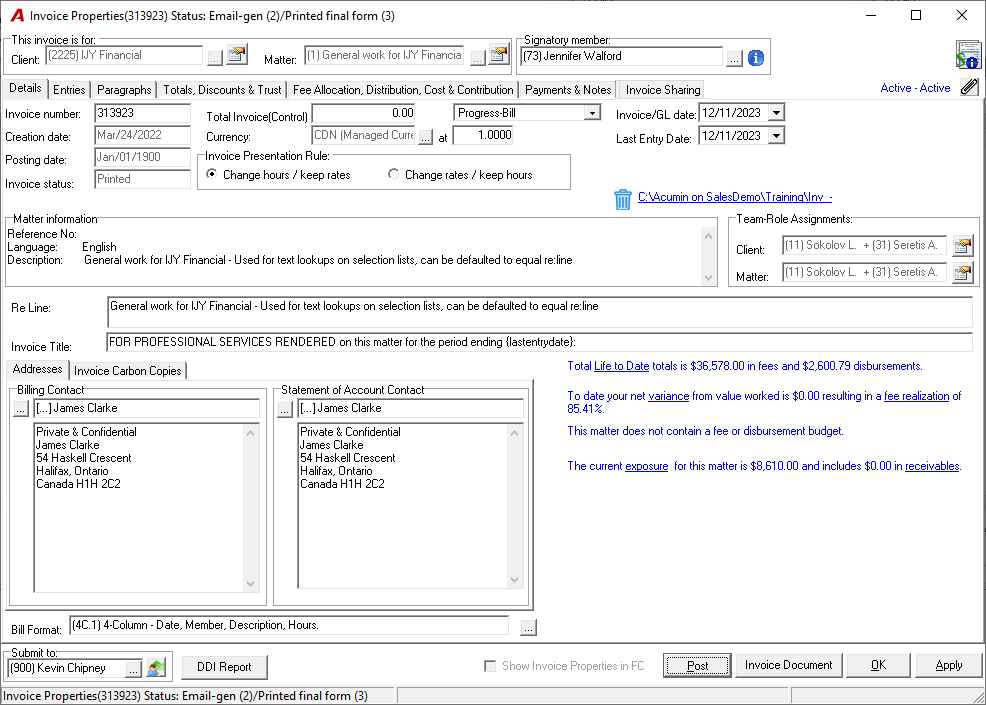
The Invoice Properties form is designed to provide users with a structured approach to viewing and modifying invoices. It contains seven (7) tabs, each serving a specific purpose in the invoice management process:
-
Details
-
Entries
-
Paragraphs
-
Total, Discounts & Trust
-
Fee Allocation, Distribution, Cost & Contribution
-
Payments & Notes
-
Invoice Sharing
These tabs are organized according to the typical workflow, ensuring a logical and efficient progression when making changes to an invoice.
Best Practice recommends following the tab order to streamline modifications and avoid errors.
Billing Guidelines and Invoice Instructions
When opening the Invoice Properties form, the Client and Matter Level Invoice Instructions and Billing Guidelines Panel will be presented first. This panel provides essential billing instructions that apply at various levels, from firm-wide policies to invoice-specific details. The panel can also be accessed at any time from within the invoice properties.
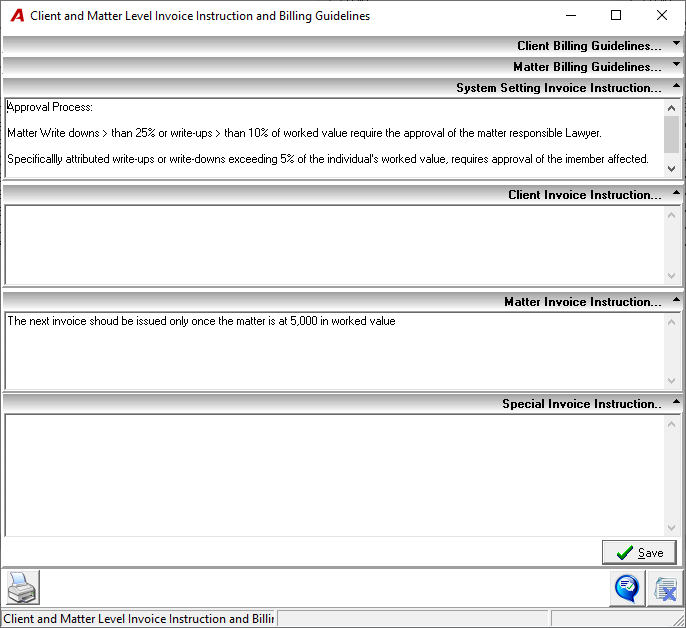
Key Features of the Panel:
-
Collapsed/Expanded View:
-
The Billing Guidelines sections are always collapsed by default.
-
The Invoice Instruction sections are expanded by default, whether populated or not.
-
Printable Content:
-
You can print the Client and Matter Invoice Instructions and Billing Guidelines by clicking the Print icon.
-
Types of Instructions:
Client and Matter Billing Guidelines:
-
This section supports unlimited text, allowing users to enter detailed information as needed.
-
To add or edit these guidelines, click the Billing Guideline button in the Client/Matter Dashboard under the Billing Phase & Instructions tab.
System Settings Invoice Instructions:
-
These instructions provide firm-wide guidelines and reminders.
-
Only authorized users can modify this section through the Acumin System Settings, under the Defaults – Invoices & Credit Notes – Settings subtab.
Client and Matter Invoice Instructions:
-
These are shorter, more specific instructions related to each individual invoice.
-
Users can edit these instructions in either the Client and Matter Properties (Billing & Receivables – Invoice Instruction subtab) or directly from the Client/Matter Dashboard.
Special Invoice Instructions:
This section allows users to enter invoice-specific instructions, typically for internal communication about the next steps in the workflow.
Reports Where Instructions Appear:
The invoice instructions you enter will be printed on:
-
The Draft Details Invoice Report
-
The final Invoice Report
This ensures that all relevant billing instructions are retained throughout the invoicing process and can be easily communicated to the relevant parties.
By following this structured approach within the Invoice Properties form and adhering to the recommended workflow, users can efficiently manage invoices while ensuring compliance with billing guidelines at all levels.
Invoice Header and Footer
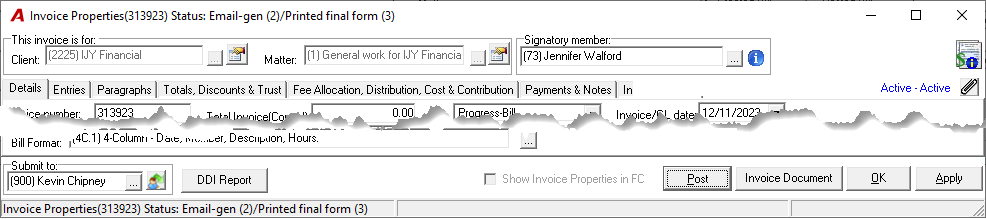
Header Section:
The header displays the client and the matter associated with the invoice. You can access the Client and Matter Properties directly by clicking the icons next to the respective fields. This allows for quick editing or review of relevant information.
The Signatory Member is the person whose name will appear next to the signature line on the invoice.
-
If the system is configured to include signatures on invoices, this member's name will be assigned automatically when the invoice is created through the Billing Management Tool Module.
-
If not automatically assigned, or if changes are needed, the signatory can be selected or modified directly from within the invoice properties.
The Billing Guidelines and Invoice Instructions Panel can be opened at any time during invoice preparation by clicking the icon located at the top-right of the form. Additionally, you can use the paper clip icon to view or input specific instructions. The client and matter status appears in blue.
Footer Section:
The footer displays the person responsible for Reviewing or Submitting the invoice, as defined in your firm's properties.
Depending on your firm's procedures, users may need to send invoices for review before submitting them for final posting. This can be done by clicking the appropriate icon.
Next Steps:
Once all necessary modifications are made, press OK to accept changes and exit the form. Alternatively, click on Invoice Document to access the Invoice Document Creation form and generate the invoice.
If substantial changes were made, it may be beneficial to re-print a Draft Detailed Invoice (DDI) Report to review all updates before printing or submitting the final invoice. This can be done by clicking the DDI Report button.
Posting the Invoice:
Only authorized users can post an invoice. The Post button will only be enabled once the total invoice amount has been entered in the Total Invoice (Control) field. After an invoice is posted, no further modifications can be made, except for changes to the Billing and Statement of Account Contacts.
By following this sequence of actions, users can efficiently review, modify, and submit invoices while adhering to system and firm-specific guidelines.
DETAILS TAB
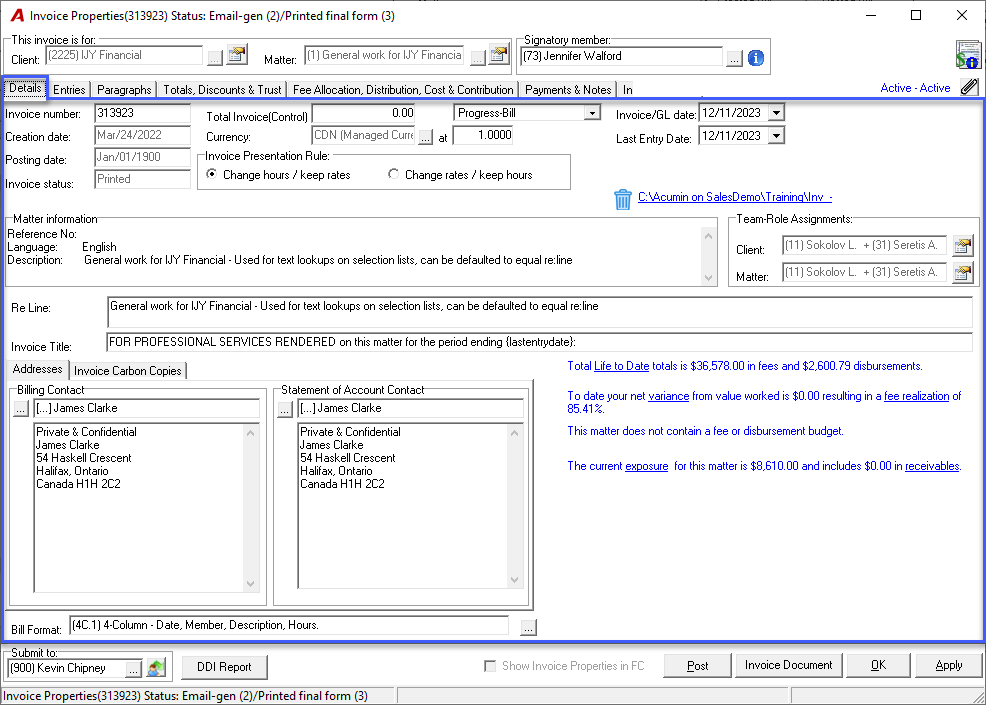
The Details Tab provides key fields and options to define and manage invoices effectively. Below are the definitions and best practices for each field to ensure accurate and efficient billing processes.
Fields Definitions
Progress-Bill / Final Closing Bill Status: At creation, the invoice is set to the “Progress-Bill” status. As an alternative setting, users can select “Final Closing Bill” within invoice properties. This status is used to trigger a prompt asking whether to inactivate the matter once the invoice is posted.
Best Practice: This option helps reduce delays between posting the final invoice and inactivating the matter, ensuring no further time or disbursements are added in error.
Invoice/GL Date: The date when the invoice was generated or the date set on the E-WIP statement. This date appears on the client invoice and serves as the date of the General Ledger (GL) transaction when posting the invoice.
Best Practice:
-
Invoice all entries up to the end of the previous month at the start of the new month.
-
Set the invoice date to either 5 days from when modifications began or to match the "Account Deadline"—whichever occurs first.
Last Entry Date: The most recent entry included on the invoice. This date cannot be newer than the invoice date. Exaple: If an invoice is dated January 27th, entries dated January 28th or later cannot be included.
Invoice Presentation Rule: Defines how time or rates are adjusted when modifications are made in the billing section of an invoice. The defaulted position can be set in system settings.
Adjustment Options:
-
Keep Rate, Change Time: Modifies time while keeping the rate constant.
Example: Original entry = 1 hour × $100 = $100 → Adjusted entry = 0.80 hours × $100 = $80.
-
Keep Time, Change Rate: Modifies rate while keeping time constant.
Example: Original entry = 1 hour × $100 = $100 → Adjusted entry = 1 hour × $80 = $80.
Matter Information: Basic information coming from the Matter Properties. It cannot be modified.
Team Roles Assigments: Teams pulled from the Client and Matter Properties. Click the icon next to the respective fields to access the Team Properties if needed.
Linked File: Once an invoice is printed as “Final,” a document is saved, and a blue hyperlink appears in the invoice properties.
-
Click the link to open the saved file directly without reprinting.
-
Delete the hyperlink using the trash can icon next to the link, if needed.
Re Line: The matter name pulled from matter properties by default. Users can override this at the invoice level, and changes will reflect on the printed invoice.
Invoice Title: Populated from the invoice format layout set at the matter level (e.g., “For Professional Fees and Disbursements rendered”).
-
Users can override this content at the invoice level, which will reflect on the printed invoice.
-
Once populated, this field will not update if a different bill format is selected later.
Addresses
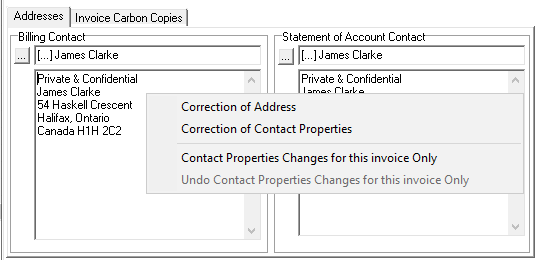
-
Defaulted to contacts set at the matter level but can be modified for:
-
The specific invoice only.
-
The client/matter level through options in the contextual menu.
Billing Contact: The person and address receiving invoices for the client.
Statement of Account Contact: Typically identical to the billing contact, this person/address receives statements summarizing all invoices (across matters).
Invoice Carbon Copies
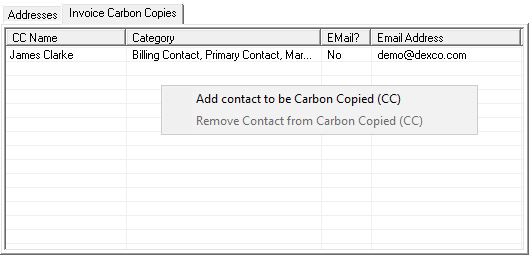
Defaulted to contacts from the CC list defined in the Client and Matter Propertiesset but can be modify for this specific invoice only through options in the contextual menu.
Bill Format
-
Default Setting: Pre-selected format based on matter-level settings.
-
Modification: Click the ellipsis button to select an alternate bill format, if needed.
ENTRIES TAB
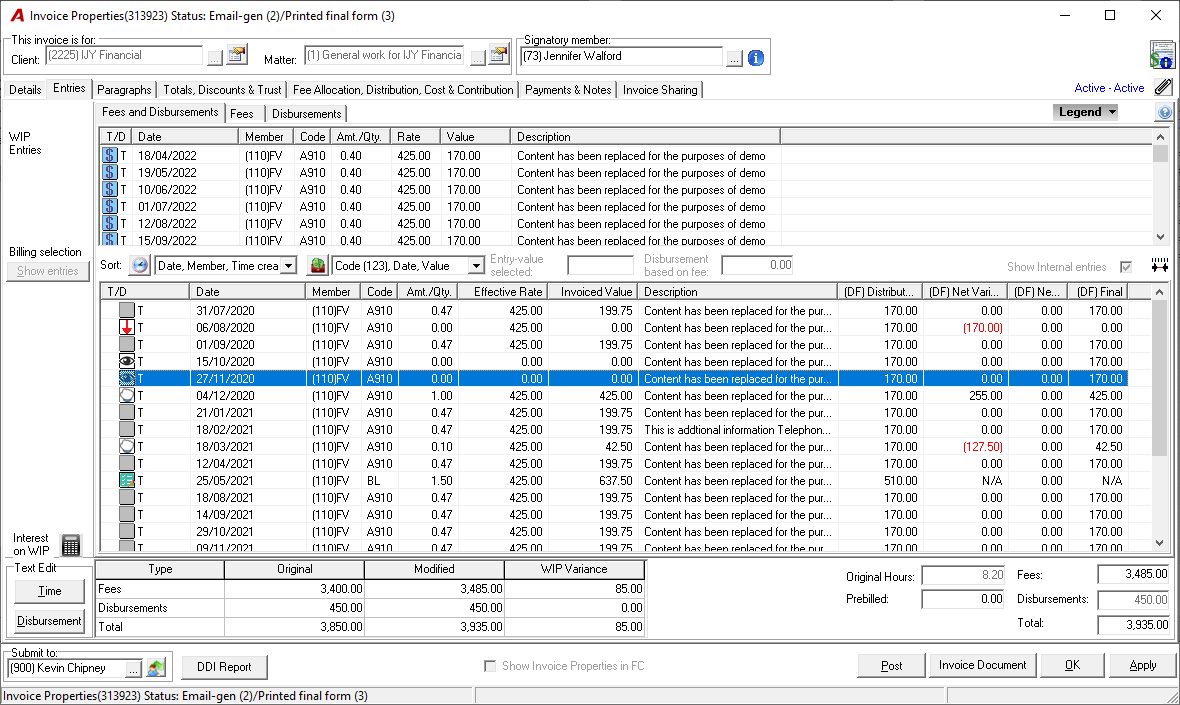
The Entries Tab is divided into two main sections: WIP Entries and Billing Selection. These sections help manage all posted, unbilled entries for a matter, allowing users to prepare items for invoicing. The options and interface in this tab are similar to those found in the WIP Dashboard.
Working with Fees and Disbursements Tabs:
-
Users can work on both fees and disbursements simultaneously or toggle between separate tabs for each.
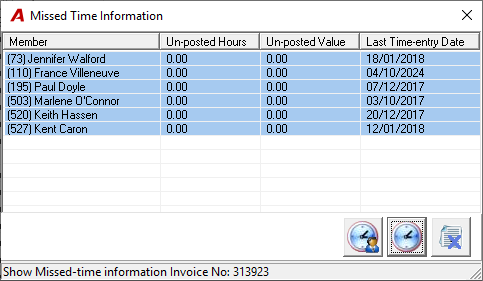
Missing Time Information icon:

-
For quick verification of missing while preparing the invoice, click on the icon. This will launch the Missed Time Information form with access to different Missing Time tool.
Legend of Icons:
-
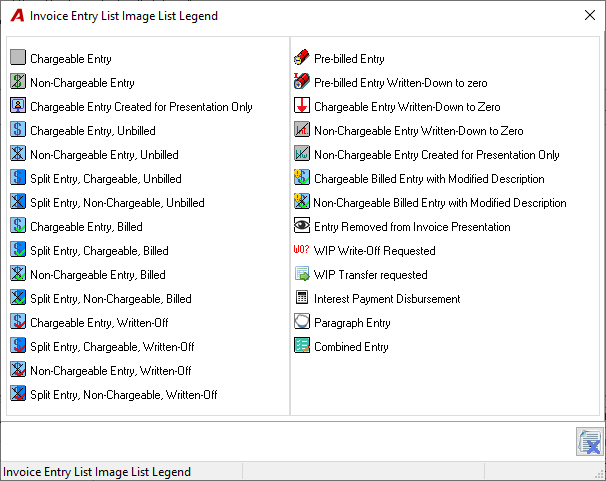
For a quick reference to icons used in this section (e.g., fee, disbursement, chargeable, non-chargeable), click on the Legend button. This will provide a clear understanding of what each icon represents within your list of entries.
WIP Entries Section:
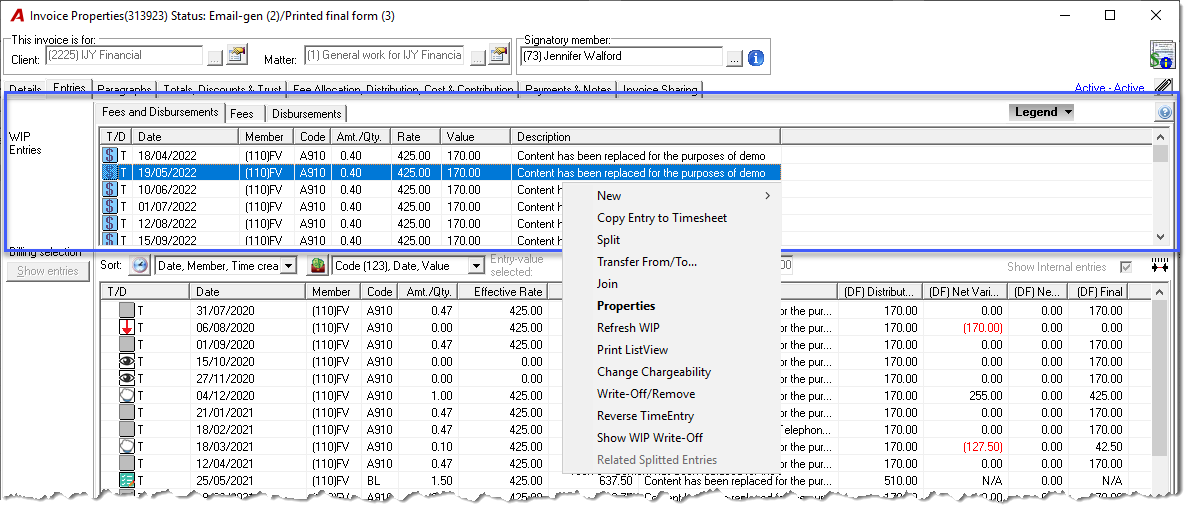
In the WIP Entries section, you will find all Work-In-Progress (WIP) entries that have not yet been selected for billing. These unbilled entries are available for correction by authorized users. Adjustments made here can include changes to the description, member, date, chargeability status, and time posted.
Modifications to Entries:
-
Modifications can be made selecting options in the contextual menu. These are the same options available in the WIP Inquiry and the Show Time Entries form of the Monthly Calendar section.
-
Any changes made in the WIP Entries section will impact the actual recorded value of the entry. This also affects the timekeeper's calendar, as these changes reflect corrections to original time or disbursement entries.
-
Typically, changes made in this section are corrections for errors such as inaccurate time entries or mis entered disbursements.
Including WIP Entries in the Invoice:
-
To include an entry in the current invoice, drag and drop it from the WIP section into the Billing Selection section. This should be done according to the date range specified in the Details Tab.
Right-Click Functionality:
Below are the available options when you right-click on an entry in the WIP section:
|
Option |
Description |
|
New – Time or Disbursement |
Add missing time or disbursement entries at the time of billing. After entering the details, press POST to include them in the WIP entries section. Alternatively, pressing OK will save them as unposted entries on the time (or disbursement) sheet of the creator.
|
|
Copy Entry to Timesheet |
Copies the selected time entry back to the user’s timesheet as unposted for further modifications or review. |
|
Split |
Splits a time or disbursement entry into two separate entries, allowing for a more detailed breakdown of work performed. |
|
Transfer from/to |
Transfer entries to another client/matter, member, or date. This option is useful if an entry was logged under the wrong client or on the wrong day. |
|
Join |
Combines multiple entries for the same member and same day into a single entry. This is helpful for consolidating time entries for a clearer record. Note: This action impacts WIP. |
|
Properties |
Opens the properties of the selected entry for further modification. This includes changing the timekeeper, date, entry value, rate override, or making text edits. |
|
Refresh WIP |
Updates the WIP list to display any newly posted entries for the selected matter. |
|
Print Listview |
Prints a list of all entries currently displayed in the WIP section as they appear in the list view. |
|
Change Chargeability |
Adjusts the chargeability status of the selected entry (e.g., from chargeable to non-chargeable or vice versa). |
|
Write-Off/Remove |
Write off or remove an unbilled entry at the request of a member. If user permissions are restricted by firm policy, a write-off request will be generated automatically instead of directly removing the entry. |
|
Reverse Time Entry |
Deletes an erroneous time entry by creating a negative entry that cancels it out. This action affects WIP and allows both entries to be written off together. Additionally, an unposted copy of the original entry can be created if needed. |
|
Show WIP Write-Off |
View all written-off entries for the matter to date through the WIP inquiry screen. Unbilled entry write-offs can be reversed (restored) if necessary. |
|
Related Split Entries |
N/A (not applicable). |
Important Notes:
-
Modifications made in this section affect Work-In-Progress (WIP), and therefore, they will impact the timekeeper's total hours worked.
-
After making corrections in the WIP section, remember to drag and drop the corrected entries into the Billing Selection form to include them in the current invoice.
By using these options effectively, users can ensure that all WIP entries are accurate and properly accounted for before they are billed.
Billing Selection Section:
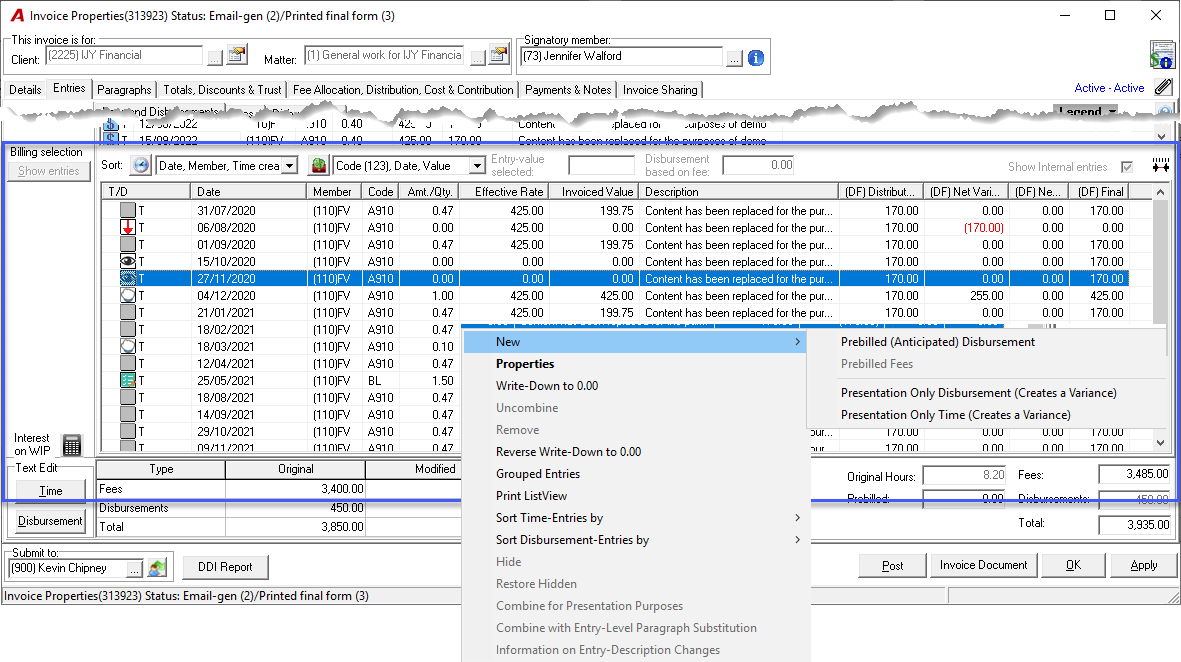
This section contains all selected entries that will be included in the current invoice. Any adjustments made here are for invoice presentation purposes only and do not affect the actual recorded values in the WIP or timekeeper's calendar.
Modifications to Entries:
-
Modifications can be made selecting options in the contextual menu.
-
Any changes made in the Billing Entries section will not affect the actual recorded value of the entry. This will not affects the timekeeper's calendar.
Removing Entries from the Invoice:
-
To remove an entry from the current invoice, drag and drop it from the Billing Selection section into the WIP Entries section.
Sorting Entries:
-
Click on the Sort Time or Sort Disbursement icons to change the order of how entries are displayed within the list and on the final invoice.
-
The default sort order is pulled from settings in the matter properties.
Modification Limits:

-
Click on the Modification Limit Icon to view the user's limits for editing fees and disbursements. This helps users stay within authorized modification boundaries.
Text Editing:
-
Use the Text Edit buttons to apply spell checking or find-and-replace functionality, ensuring a polished presentation for descriptions on the invoice.
Right-Click Functionality:
The entries in the Billing Selection section are Work-In-Progress (WIP) items that have been selected for billing. These entries are locked for modification and cannot be corrected directly once they are moved into this section.
Changes made here focus on presentation adjustments for the invoice. These adjustments will not affect the timekeeper's total hours worked or their work-in-progress, as they are purely for how the invoice details are displayed to the client.
For more information on which options to use and their impacts when making WIP corrections or invoice adjustments, refer to the "Invoice – WIP Adjustments and Corrections How To & Impacts – Reference Notes" document.
|
Option |
Description |
|
New – Pre-billed (Anticipated) Disbursement |
Allows you to invoice in advance for a disbursement that has not yet been recorded on the matter. This action creates a negative disbursement entry in the WIP section. |
|
New - Presentation Only Disbursement or Time (Creates a Variance) |
Allows you to create a positive disbursement or time variance. Important: This is not the same as adding forgotten time or disbursements. It is for invoice presentation only and does not add hours or disbursements to total recorded entries. |
|
Properties |
Opens the properties of the selected entry, allowing you to apply an entry-specific fee or disbursement override (write-up or write-down). This will modify either the hours worked or the rate, depending on the invoice presentation rule set in the Details tab. |
|
Write-Down to 0.00 |
Reduces the entry value to zero. The entry will not display in the invoice details unless you enable the option to print zero-value entries. |
|
Uncombine |
Releases time entries that were previously combined into one. Available only if a combined entry is selected. |
|
Remove |
Deletes pre-billed (anticipated) disbursements, presentation-only disbursements, or presentation-only time entries from the list. Available only for these specific types of entries. |
|
Reverse Write-Down to 0.00 |
Restores an entry that was previously written down to 0.00 back to its original value. Available only if a write-down to 0.00 entry is selected. |
|
Grouped Entries |
Provides additional presentation and modification options for entries that are grouped by member (timekeeper) or disbursement code. |
|
Print Listview |
Prints a list of all entries currently displayed in the Billing Selection section as they appear in the list view. |
|
Sort Time-Entries by |
Allows you to change the order of time entries listed in the invoice. Since dragging and dropping entries from WIP and Billing sections can change their order, it’s important to re-sort them before proceeding to the totals tab. |
|
Sort Disbursement-Entries by |
Similar to time entries, this option allows you to change the order of disbursement entries listed in the invoice. Ensure proper sorting before moving on to the totals tab after rearranging entries in this section. |
|
Hide |
Hides an entry from being displayed in the invoice details while still including its value in total fees. Hidden entries will cause invoices with detailed presentations to show a higher effective rate, as their value is spread proportionally across all unmodified entries. |
|
Restore Hidden |
Restores hidden entries back to their full value and makes them visible again in the invoice details. Available only if a hidden entry is selected. |
|
Combine for Presentation Purposes |
Combines multiple entries into one for presentation purposes without restrictions. The original entries are set as ‘internal’ with a value of zero, and their descriptions are combined into a single entry (separated by commas). You can modify the description as needed. |
|
Combine with Entry-Level Paragraph Substitution |
Combines entries based on common paragraphs assigned to time entries. These paragraphs are assigned directly within each time entry using the "Substitute time entry description with" field. |
|
Taskset Information |
Displays information about the task set used for an entry at the matter level, including task phase and task code details. This option is visible only for invoices generated from a matter with an e-bill task set assigned. |
|
Information on Entry-Description Changes |
N/A |
|
Change Tax Scheme |
Allows authorized users to change the tax scheme applied to specific entries if required by client or matter-specific rules. |
By utilizing these right-click options effectively, users can tailor how entries are presented on the invoice without altering actual WIP values or affecting timekeeper records for hours worked.
Other Types of Modifications
Override Fees or Total Fees and Disbursements
To override the total fee, users can directly replace the amount in the Fees field or the Total field, located in the last column of the Billing section list view. Both actions apply the variance to the fee portion only.
-
The system automatically applies any variance to fees and allocates it to members based on a fee allocation formula. This results in a change in the Rate or Hours column, depending on the Invoice Presentation Rule .
-
Even if the variance isn’t displayed on the invoice, it can still be calculated by the client if a detailed invoice presentation is provided.
Disbursement Write-Up/Write-Down
To adjust a disbursement (either a write-up or write-down), users can override the specific disbursement entry through its properties within the billing section. Alternatively, users can override totals for a disbursement code through the Grouped Entries View (using right-click functionality).
Billing Selection: Grouped Entries
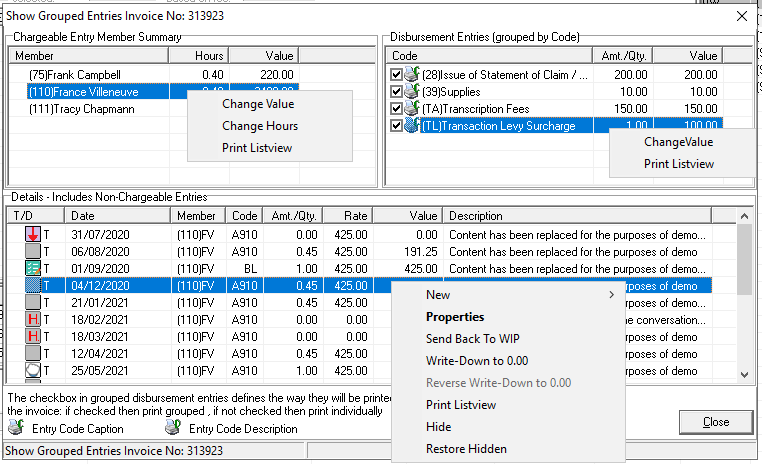
Grouped entries allow for easier management of multiple entries, either by member or by disbursement code. Below are key options available when working with grouped entries:
Chargeable Entry Member Summary Section
Used to adjust all time entries (write-up/write-down) for an individual member by affecting the value or the hours. These changes impact only the selected member's entries and their presentation on the invoice.
Details – Includes Non-chareable Entries Section
This section provides additional options for managing both chargeable and non-chargeable entries. Once an entry is highlighted, you can access various actions from the details section.
|
Option |
Description |
|
New Pre-billed (Anticipated) Disbursement |
Invoice in advance for a disbursement not yet recorded on the matter. It creates a negative disbursement in WIP Entries. |
|
New - Presentation Only Disbursement OR Time (Creates a Variance) |
Creates a positive disbursement/time variance. This is for presentation purposes only and does not add hours or disbursements to total recorded entries. |
|
Properties |
Opens entry-specific properties to complete a fee override (write-up/write-down). Depending on invoice presentation rules, this will adjust hours or rate applied. |
|
Send back to WIP |
Moves the selected entry from billing back to WIP (Work in Progress) section. The entry will reappear in WIP once the "Show Grouped Entries" form is closed. |
|
Write-down to 0.00 |
Writes down an entry to zero. The entry will not appear on the invoice unless the option to print zero-value entries is selected during printing. |
|
Reverse Write-down to 0.00 |
Restores an entry that was written down to 0.00 back to its original value. Available only if an entry written down to 0.00 is selected. |
|
Print Listview |
Prints a list of entries as they currently appear in the list view. |
|
Hide |
Hides an entry from invoice presentation but includes its value in total fees. Hidden values are proportionally spread across all unmodified entries, raising the effective rate. |
|
Restore Hidden |
Restores hidden entries to their full value. Available only if a hidden entry is selected. |
Disbursement Entries (Grouped by Code) Section
Allows you to manage how disbursements are grouped and presented in invoices by their code. The value can also be adjusted (write-up/write-down).
-
Grouping by Disbursement Code:
-
Disbursement codes marked with the "group" option in their properties will appear as a single line item on invoices.
-
To group or ungroup disbursements:
-
Check ON: Groups all entries for this disbursement code into one line.
-
Check OFF: Displays all individual entries for this code separately.
-
-
-
Invoice Presentation Rules for Grouped Entries:
-
Description on Invoice: The name of the disbursement code will be used as the description.
-
Date on Invoice: The date shown will depend on the setting in the disbursement code properties:
-
No Date
-
Invoice Date
-
First-instance Date
-
Disbursement Indicators:


Green C: If grouped, disbursements with this indicator will display with the disbursement code caption.
Green D: If grouped, disbursements with this indicator will display with the disbursement code description.
PARAGRAPH TAB
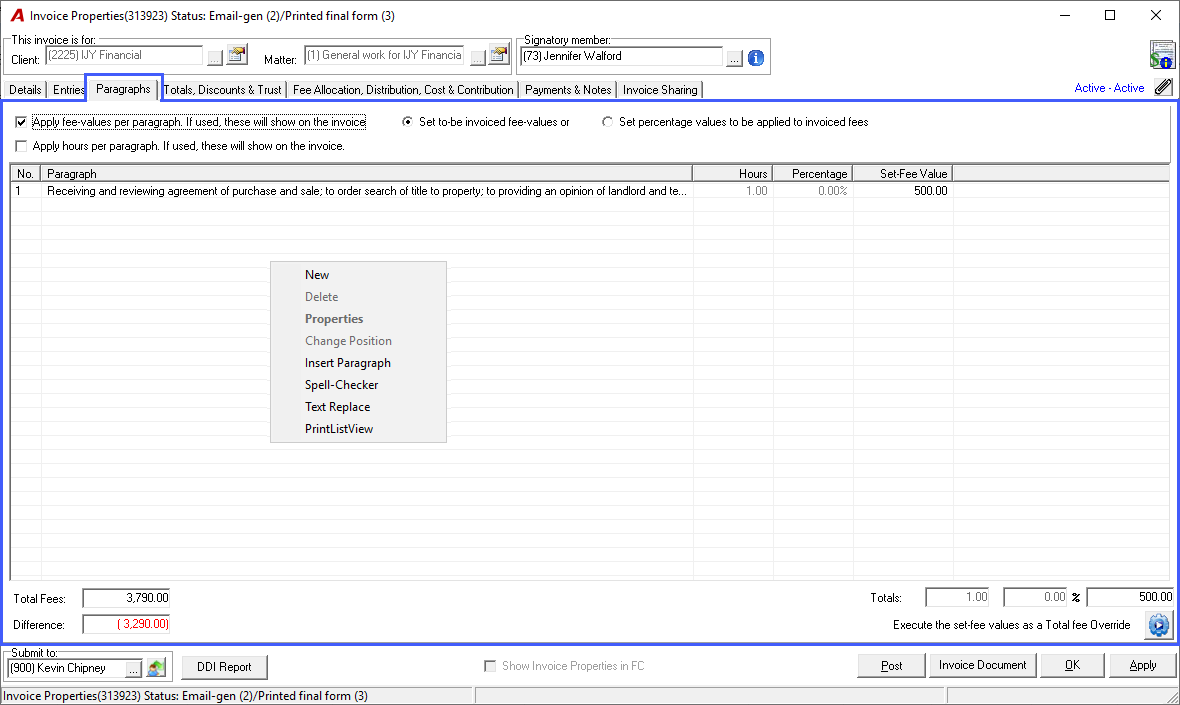
The Paragraph Tab is designed for Paraphrased (Narrative) Invoices. It allows users to present an invoice using specific custom or standard paragraphs, without altering the recorded time entries or affecting their groupings. This feature is particularly useful for standardizing the presentation of invoices and tailoring the narrative to suit client needs while keeping underlying time and fee details intact.
Users can insert pre-set standard paragraphs, create new ones, re-order them, and modify existing text without impacting the source paragraph for future use. Below is a breakdown of the functionalities available in the Paragraph Tab.
Paragraph options available in the contextual menu
|
Option |
Description |
|
New |
Create a new custom paragraph specific to the invoice without modifying the list of standard paragraphs. |
|
Delete |
Delete the currently selected paragraph (either standard or custom). |
|
Properties |
Open and view/edit the properties of the selected paragraph. This allows for further customization of the paragraph's content. |
|
Change Position |
Re-order the selected paragraph to modify how it is presented on the invoice. |
|
Insert Paragraph |
Insert one or more standard paragraphs from the firm’s paragraph library. These can be edited for the invoice without altering the original standard paragraph in future cases. |
|
Spell-Checker |
Apply spell-check to the selected paragraph to ensure correct spelling before finalizing the invoice. |
|
Text Replace |
Use the "Text Replace" function to quickly find and replace words or phrases within the selected paragraph. |
|
Print Listview |
Print a list of all entries as they appear in the current list view on screen. |
Using Paragraphs for Time Entry Replacement
Paragraphs can replace time entries on an invoice, either with or without affecting time and value. Below are the different ways you can apply paragraphs:
Replacing Time Entries Without Affecting Time/Value
To replace time entries with paragraphs without affecting the time or value:
-
Either select an existing paragraph or create a new one.
-
You may choose to include or omit time and value fields for the paragraph.
Note: The paragraph can contain hours and/or fees, but if you choose to include these, their total must match the total hours and fees of the overall invoice.
Replacing Time Entries with Time/Value Impact
To replace time entries with a paragraph that affects time or value, users can choose from the following options:
-
Apply Fee-Value per Paragraph:
-
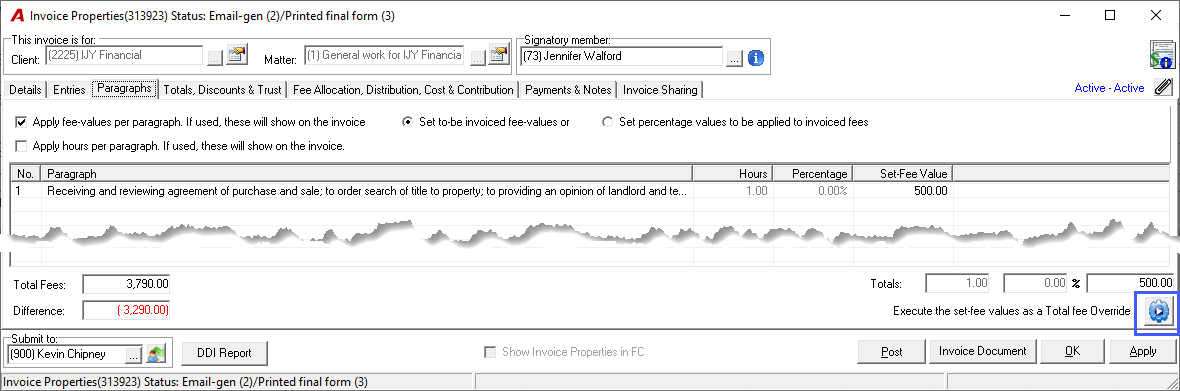
Set to-be-invoiced fee values: The sum of all paragraphs must equal the total fees in the Entries tab. If they differ, it will trigger a total fee override, which can be managed by adjusting the "Total Fees" and "Difference" fields.
-
Once satisfied with your changes, click the Execute icon to apply them.
-
Set Percentage Values for Invoiced Fees: Users can enter percentage values to allocate fees across paragraphs. The invoice will display either entered values or percentages, but no fee override will occur in this case.
-
Apply Hours per Paragraph: When hours are entered for a paragraph, they will be displayed on the invoice regardless of whether they match the total invoice hours.
Executing a Total Fee Override:
-
To apply a fee override, press the Execute icon after setting your desired fee values.
-
To undo this action, use the Undo Fee Override button located in the Totals, Discounts & Trust Tab.
Printing Paragraphs on Invoices
When printing invoices that include paragraphs, there are two main methods for incorporating them into the invoice layout:
-
Substitute Paragraph
-
This option replaces the time table (fee section listing time entry details) with one or more paragraphs.
-
The printed paragraph(s) will include any specified values and/or hours that were entered.
-
-
Insert Paragraph
-
This option prints paragraphs before the time table (fee section listing time entry details).
-
Note that when using this option, only text is printed—hours and values will not be displayed.
-
TOTAL, DISCOUNT & TRUST TAB
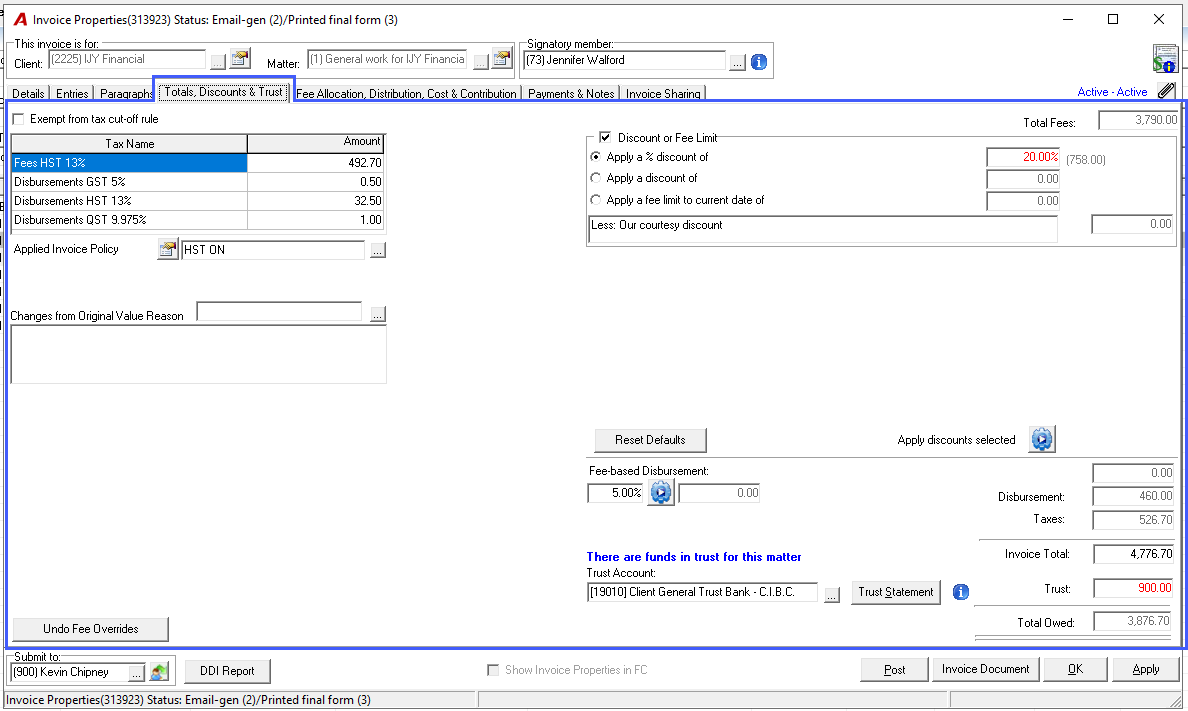
The Total, Discount & Trust Tab provides users with the tools to manage taxes, discounts, premiums, trust payments, and other financial aspects of the invoice. This tab allows you to apply discounts or premiums, adjust invoice totals, and utilize trust funds for invoice payments. The functions are designed for flexibility to ensure accurate billing and presentation of the final invoice.
Below is a detailed breakdown of each section and its functionality.
Field Definitions
Tax Section: The Tax Section lists all applicable tax rules and their corresponding amounts. These taxes are calculated based on the total fees and disbursements presented in the invoice.
Applied Invoice Policy: This section displays the client's invoice policy, specifically the tax rules applied to the invoice. Users can select or re-select the invoice policy by clicking on the ellipsis button ( … ) to adjust the taxability of the invoice or re-calculate the total taxes.
Change from Original Value Reason: Depending on the firm’s internal policies, users may be required to select a reason for any write-offs or invoice variances from a pre-defined list or manually enter a reason in this field. This reason will be saved in the invoice properties for future reference.
Discount or Fees Limit Options: Populated by default from the Client or the Matter properites if set, user can enter or override the content.
|
Option |
Description |
|
Apply a % discount of / Apply a discount of |
Apply a percentage (%) or fixed currency amount ($) discount to fees. Pre-set discounts can be configured at the Client or Matter level to automate this during billing. |
|
Apply a fee limit to current date of |
If there is a fee limit set at the matter level, it will be displayed here. Any amount exceeding this limit is automatically calculated as a discount and displayed accordingly. |
|
Discount Text Box |
By default, this field displays the discount line set in system settings, Client, or Matter. Users can override this text directly within the invoice if necessary. |
Additional Discount or Premium (Optional): This option may not always be visible depending on the firm set-up. It can be set at the Client or Matter level.
|
Option |
Description |
|
Apply a % - Discount of / Premium of |
Apply an additional percentage (%) discount or premium on fees. |
|
Apply a currency-value premium or discount |
Apply a fixed currency amount ($) discount or premium on fees. |
|
Apply the discount on total fees after first discount is applied |
If enabled, the additional discount is calculated after applying the first discount. If disabled, it's calculated on the full total fees amount. |
|
Apply the fee-variance as a discount or premium |
This option allows you to display fee-variances (negative as discounts or positive as premiums) on a separate line with user-defined labels. |
|
|
|
Apply Discount and/or Premium Selected: Depending how the environment is set, Discount and/or Premium can already be applied or not.
-
If not, once all changes are made in the Entries, Paragraphs, and Total, Discount & Trust tabs, users must click the Apply Discount Selected button for discounts or limits to appear on the invoice.
-
If further changes need to be made that affect fee values, click the Undo Discount Selected button to undo previously applied discounts/premiums.
-
Reset Default Button: This button resets all fields in the discount section back to their original values and settings, allowing users to start fresh if needed.
Fee-Based Disbursement (Optional): Once all modifications affecting fees are complete, users can calculate and apply a fee-based disbursement charge by clicking the Execute button. This will create an administrative disbursement based on a percentage of total fees.
-
Users can modify the preset percentage before applying it.
-
After applying, users can override the calculated disbursement amount by accessing the disbursement properties.
Invoice Total: Users have the ability to override the invoice total manually if necessary. When this occurs:
-
The application automatically recalculates sales tax based on the new total.
-
Any variance is applied to fees and allocated to members based on allocation formulas.
-
The change in value will reflect as an adjustment in effective rates or hours depending on the Invoice Computation Rule.
Trust Account: If trust funds are available (indicated by a message in blue), users can select and apply them to pay an invoice.
-
Once selected, trust funds are reserved for payment.
-
When the invoice is posted, these funds will be included in a cumulative trust cheque requisition payable to the firm.
Trust Statement: Clicking this button allows users to print a proforma Trust Statement showing payment of this invoice (with invoice number) even if it hasn't been posted yet.
-
The date will default to that of the last generated invoice but can be changed.
-
Trust descriptions can be edited and saved for accurate presentation.
Undo Fee Override: The Undo Fee Override button allows users to revert any modifications made to fee and disbursement values in the Entries tab, such as write-ups/write-downs.
-
This action also reverses any paragraph-related fee overrides.
-
This option does not affect anticipated disbursements—these must be deleted using the “Remove” option.
FEE ALLOCATION, DISTRIBUTION, COST & CONTRIBUTION TAB
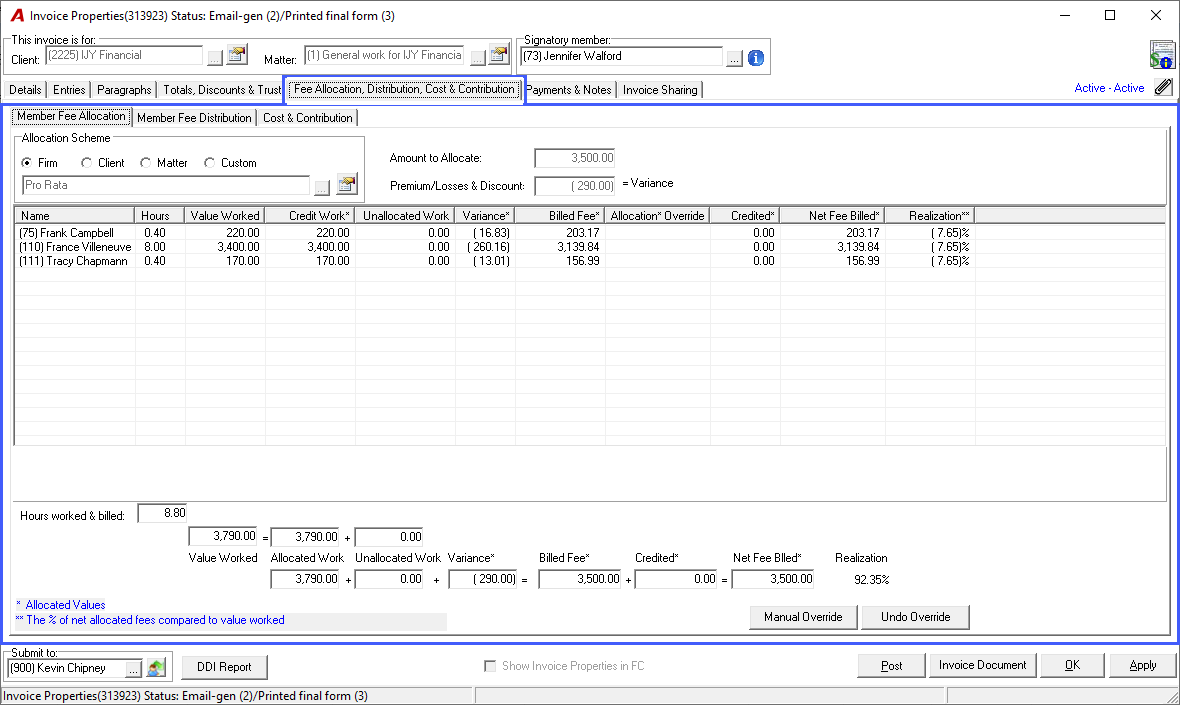
The Fee Allocation, Distribution, Cost & Contribution Tab is used to allocate fees among members based on a predefined allocation formula. The allocation formula may vary and is not always based on a pro-rata distribution. Authorized users can modify this allocation by selecting preset formulas or applying a manual override when necessary.
This section provides an overview of the key columns and options available on the Member Fee Allocation Tab, as well as how to apply custom allocations or manual overrides.
Member Fee Allocation Tab: Column Definitions
|
Column |
Description |
|
Hours |
Displays the original hours worked by each timekeeper whose work in progress (WIP) is included on the invoice. |
|
Value Worked |
Shows the original value of each timekeeper’s WIP included in the invoice. |
|
Credit Work |
Displays the allocated WIP values based on the allocation formula. This may not always match the values in the "Value Worked" column. |
|
Unallocated Work |
Lists any unallocated credit work from other members (if applicable). |
|
Variance |
Shows the allocation of any variances or discounts. |
|
Billed Fee |
The final result of the allocation formula, representing the sum of allocated credit work, unallocated credit work, and net variance. |
|
Allocation Override |
Reflects the most recent modification to the allocation (Billed Fee) made by an authorized user. These changes affect timekeeper reports but do not alter the invoice presentation. |
|
Credited |
Displays any fee allocations stemming from a credit note. This column is only available for posted invoices. |
|
Net Fee Billed |
Shows the value of fees billed after accounting for any credits. |
|
Realization (%) |
Presents the percentage of net allocated fees in comparison to the value worked (calculated as Variance / Value Worked). |
Manual Override
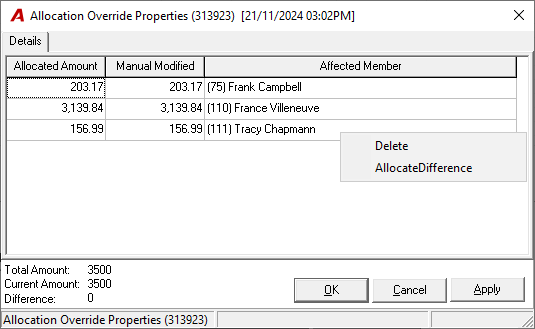
The Manual Override feature allows authorized users to manually adjust fee allocations. This functionality supports both modifying existing allocations and adding new members to the allocation, even if they are not listed on the invoice or part of the client/matter team. Manual overrides do not affect how fees are presented on the invoice but do impact timekeeper fee reports.
Steps to Apply a Manual Override:
-
Click on Manual Override: Launches the Allocation Override Properties form.
-
Modify Allocations: Adjust amounts in the manual modified column as needed.
-
Balance the Difference: To close the form, ensure that the difference between allocated fees equals 0.00.
-
Adding Members: If necessary, you can add new members to the fee allocation by using the Tab key to add a new line.
-
Delete: Deletes any selected line from the allocation table.
-
Difference: Allocates any remaining difference to the selected field.
Undo Override
The Undo Override button resets all manual modifications made in the allocation table back to their original state.
When to Use Undo Override:
-
If you need to revert all manual changes and restore the allocation formula's original results.
-
If an error was made during manual allocation and you need to start over.
PAYMENTS AND NOTES TAB
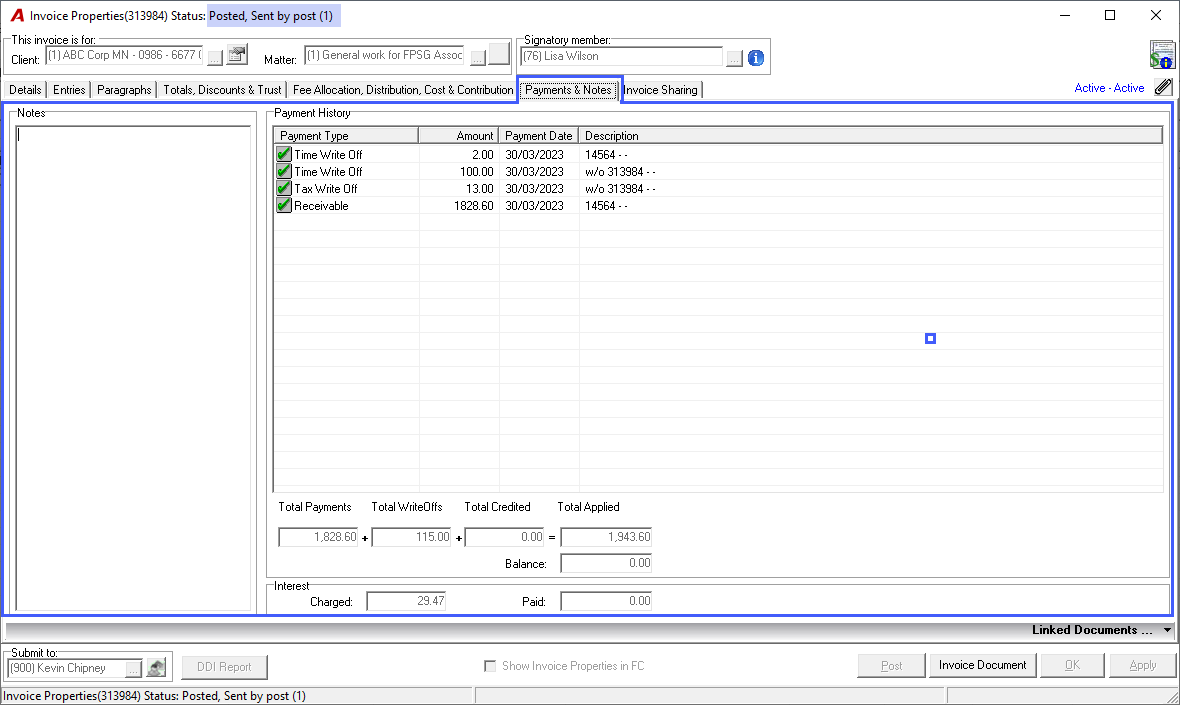
The Payments and Notes Tab plays a vital role in tracking changes and actions taken on an invoice after it is posted. With the ability to add important notes and review payment history—including credits and write-offs—this tab provides a clear audit trail for all financial transactions related to the invoice. Be sure to regularly update notes and review the payment history for an accurate understanding of the invoice’s status. Below is a detailed breakdown of the key features available within this tab.
Notes Section
The Notes section allows users to add comments or remarks related to the invoice. These notes are not just for internal use—they will also appear in the Invoice/Credit Note report when printed or shared.
Best Practice: Use this section to document useful information about the invoice, such as special agreements, additional details about services rendered, or any other relevant data that needs to be communicated alongside the invoice.
Payment History Section
The Payment History section displays a list view of all payments, credit notes, and AR write-offs related to a posted invoice. This section only becomes active once the invoice has been posted. This gives users a comprehensive view of the financial actions taken against a specific invoice, allowing for better tracking and management of outstanding balances.
-
What is Displayed in Payment History?
-
Payments: Any payments applied to the invoice.
-
Credit Notes: Any credit notes issued against the invoice.
-
AR Write-offs: Any accounts receivable write-offs applied to the invoice.
-
Viewing Payment Details:In the list view, select a payment, credit note, or write-off entry. Double-click or right-click and choose Open to view the properties of the selected item.
INVOICE SHARING TAB
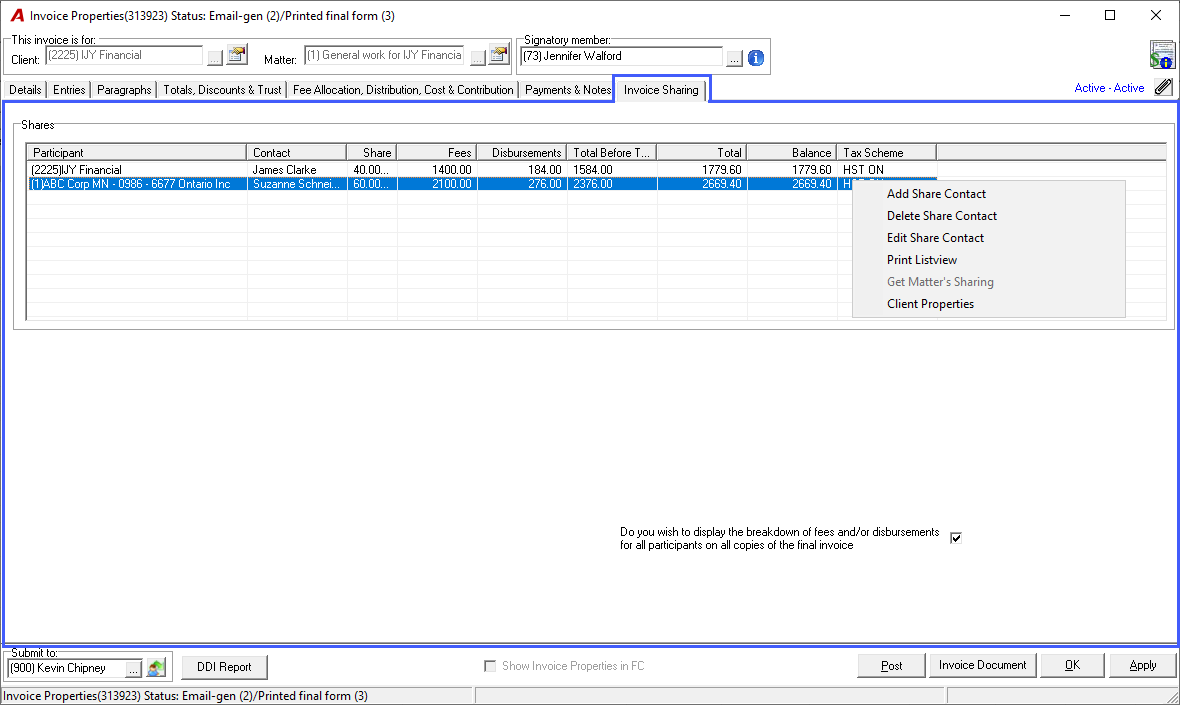
The Invoice Sharing Tab allows users to share an invoice among multiple participants, distributing the total invoice amount based on predefined percentages. This functionality is especially useful for clients who have shared billing responsibilities. Participants (also known as "sharers") can be set up at the matter level or added directly when creating the invoice.
Key Points to Know:
-
Participants may already be entered at the matter level (if licensed), and they will automatically appear in the Invoice Sharing Tab when creating an invoice.
-
Additional Participants can be manually added using the Add option, regardless of licensing status.
-
The client for whom the invoice is created is called the “Host” of the sharing structure. He may or may not be one of the participants.
Participant Setup Requirements:
-
Client Information: Each participant needs client-type information, such as an accounting profile (e.g.,taxability status, billing contact, statement of account contacts). Therefore, participants must first be set up as clients, even without a corresponding matter.
-
Billing Contacts: Participants can be organizations (companies) or individuals, with designated billing contacts for proper invoice presentation.
-
Shared Percentage: The sum of shared percentages must always equal 100%. Each participant's copy of the invoice will include the full details, with a final line indicating the amount owed by the specific participant, as well as a summary table showing amounts owed by all participants.
Invoice Sharing Tab Options
|
Option |
Description |
|
Add Share Contact |
Adds a new participant to the sharing structure. The Show Contacts form will open, displaying client-level billing contacts of the Host (the entity sharing the invoice). To add a new participant, click the ellipsis button and search/select a client to add as a participant. |
|
Delete Share Contact |
Removes the selected participant from the sharing list. |
|
Edit Share Contact |
Allows you to edit the details of a selected participant, including their name, billing contact, shared percentage, and invoice policy status. |
|
Print Listview |
Prints a list of all participants as they appear in the list view. |
|
Get Matter’s Sharing |
Retrieves the sharing structure from the matter if it was not set at the time of invoice creation. |
|
Client Properties |
Opens the client properties of the selected participant for review or editing. |
|
Auto-Adjust Share % to Equal 100% |
Adjusts the shared percentages to ensure they sum to 100%. This option is only visible if the user has previously chosen not to auto-reallocate leftover percentages. |
Invoice Presentation for Shared Invoices
Each participant will receive a copy of the shared invoice that includes:
-
The full invoice details.
-
A final line showing their specific amount owed.
-
A table summarizing amounts owed by all participants, which reconciles with the total invoice amount.
Printing Options
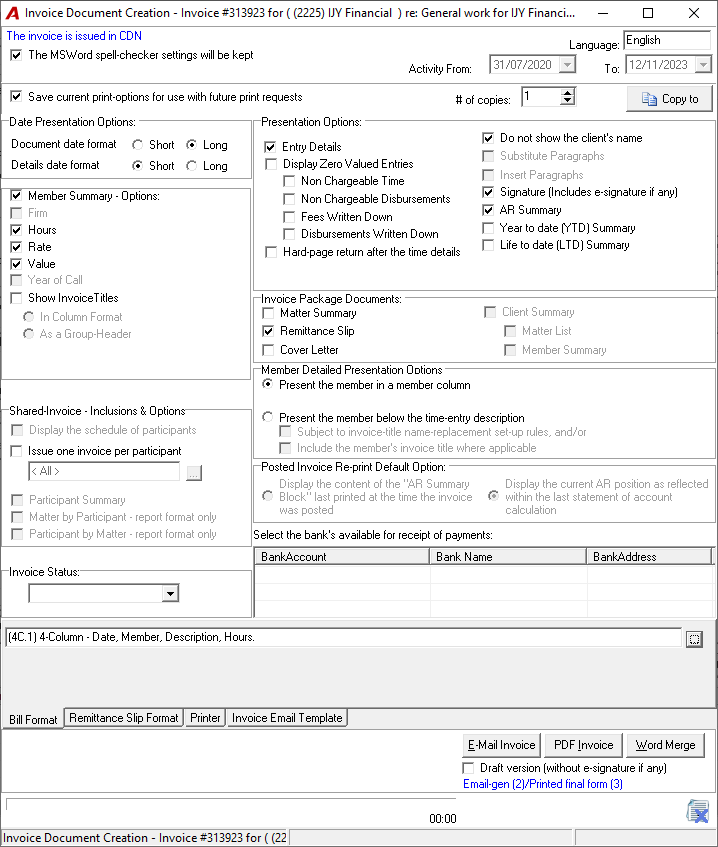
When the user is ready to print or send the invoice to the client, they can click on the Client Document button. This action will open the Invoice Document Creation form, which presents all possible printing options available for that specific invoice. These options provide further customization, allowing users to tailor the invoice presentation. Some options may be unavailable (greyed out) or not displayed, depending on the firm’s settings. Click on the options to add or remove them from the final invoice presentation.
The options available are derived from the Billing & Receivables – Format & Printing subtab at the matter level when the invoice is initially created. Any changes made to this subtab after invoice creation will not be applied retroactively and will therefore not affect existing invoices.
When ready, the user can select Email Invoice to send the invoice via email, or click on the PDF Invoice button to generate a PDF version of the invoice. The Word Merge button is reserved for special cases (No Time, Interim and Credit Note) and is used only for exceptions or environment still working with Custom Invoices.
Below is a detailed breakdown of each option and its functionality.
Options Definitions

Currency: Show the currency the ivnoice will be issued in blue.
MSWord Spell Checker: If this option is checked ON, Acumin will use the default MS Word spell-check function to ensure correct spelling. If unchecked, users must define a desired dictionary for each required language.
Language: Shows the language of the document to be printed.
Activity From/To: Shows the from/to date of the entries to be printed on the document.
Saved Current Print-Option for Future Use: This option allows users to save their current print settings, making it easier to reprint the same invoice with consistent formatting. By default, this option is enabled.
# of copies: Defaulted to 1, enter the number of copies to print if different.
“Copy to” button: Allows users to copy the set of presentation options selected in this form to a recipient client, matter, or invoice.
Date Presentation Options section
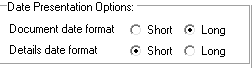
Document Date Format: This option controls how the invoice transaction date appears on the printed invoice. By default, it follows system settings, usually set to "long" format for optimal presentation.
Details Date Format: If the selected invoice template includes a column for entry dates in the detailed fee section, this option will determine whether dates are displayed in short format (recommended for best column sizing) or long format. The default is typically set to "short."
Member Summary Options
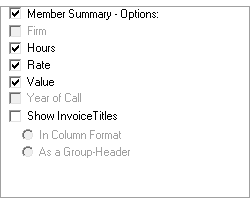
Member Summary – Options: If selected, a table summarizing time entries by each working member will be included in the invoice.
The user can customize which columns to display by selecting from options such as Title, Firm, Hours, Rate, and Value. If no specific details are selected but Member Summary is enabled, a legend with member names or initials will be included on the invoice.
Shared-Invoice – Includions & Options section
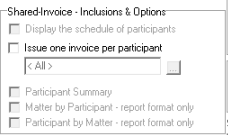
This section only appears when an invoice is shared among multiple participants:
-
Issue One Invoice Per Participant: Generates individual invoices addressed correctly based on selections made from a drop-down list. Each participant receives their specific owed amount along with copies sent to other participants listed in the Invoice Sharing tab.
-
Display Schedule of Participants: Adds a table showing all participants and their shares at the end of each detailed invoice before the signature block.
-
Participant Summary: Available only for shared multi-matter or client invoices. Displays a summary table showing all participants and their shares across all matters on multi-matter or client summary pages.
-
Matter by Participant – Report Format Only: Lists each matter with corresponding participants and their shares on separate pages added to multi-matter or client invoices.
-
Participant by Matter – Report Format Only: Lists all matters where each participant has shares on separate pages included in their multi-matter or client invoices.
Invoice Status
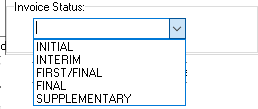
This option appears only if enabled directly in the invoice template properites selected. Users can select an invoice status (e.g., INITIAL, INTERIM, FIRST/FINAL, FINAL, SUPPLEMENTARY) from a drop-down menu. The selected status will print next to the invoice number in the header of the invoice.
Presentation Options section
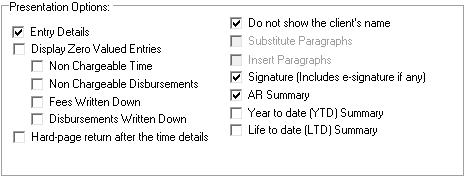
Entry Details: This option is typically enabled by default and ensures that all time details (or substituted paragraphs) are displayed according to the selected invoice template. Some templates may exclude time details altogether.
Display Zero Entries: Enable this option if you want to include non-chargeable time or time written down to zero in the printed document. For example, if a time entry has no monetary value but includes details such as member name, date, and description, these details will still be printed. For non-chargeable entries, the label "Non-chargeable" will appear at the end of each line. This label can be customized in system settings.
Hard-Page Returns After Time Details: If selected, this option inserts a page break after the fees summary section, which moves disbursements to a new page.
Do Not Show the Client’s Name: This hides the client’s name on the printed document. It is useful when addressing only a billing contact or when using "c/o" content without including the client’s name. If the client and billing contact names are identical (common for individual clients), only the billing contact name will appear by default.
Paragraphs: Only one option can be selected at the time
Substitute Paragraphs: This option is available when at least one standard or custom paragraph has been inserted into the invoice via the "Paragraph" tab in Invoice Properties. These paragraphs replace time entry details in the billing section of the invoice. Note that
Insert Paragraphs: Similar to substitute paragraphs, but instead of replacing time entry details, these paragraphs (without values or hours) appear above the time entry details to avoid double counting.
Signature (Include E-Signature if any): Inserts a signature line for the member designated as the signatory in the invoice properties form.
AR Summary: Adds an accounts receivable summary showing amounts outstanding for either the matter or client. Interest can be included or excluded from this summary depending on system settings. The labels can be customized in system settings.
Year-to-Date (YTD) Summary: If selected, year-to-date information—such as fees, disbursements, and taxes—will be included at the end of the main invoice document. The labels can be customized in system settings.
Life-to-Date (LTD) Summary: If selected, life-to-date information—such as fees, disbursements, and taxes—will be included at the end of the main invoice document. The labels can be customized in system settings.
Invoice Package Documents Section

Matter Summary: A one-page summary of total fees, disbursements, and taxes for the detailed matter invoice content.
Remittance Slip: If selected, a remittance slip is included in the package that summarizes total fees, disbursements, and taxes along with payment information (if configured by the firm).
Note: Once an invoice is posted, reprinted copies will not include a remittance slip to avoid confusion from AR activities such as payments or credit notes. Firms that auto-save invoices will still have access to remittance slips from the original PDF output.
Best Practice: When reprinting posted invoices, it is recommended not to include a remittance slip. Instead, accompany reprinted invoices with a statement of account or reminder notice that reflects any AR modifications for clarity.
Cover Letter: Adds a cover letter based on a selected layout. If used, generate the full invoice package using the Word Merge button.
Client or Multi-Matter Summary: Generates a one-page summary of total fees, disbursements, and taxes for client or multi-matter invoices. The label adjusts depending on invoice type.
Matter List: Lists all matters included in a client or multi-matter invoice along with corresponding fees, disbursements, taxes, and total amounts.
Member Summary: Summarizes time entries by member across all matters included in a client or multi-matter invoice on a separate page. Users can choose which columns they want displayed using member summary options.
Member Detailed Presentation Options
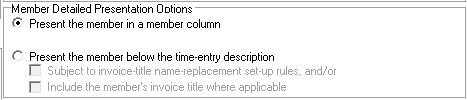
Present Member in Member Column: Enabled by default in templates that showcase member details. Members will be listed in their own column.
Present Member Below Time Entry: This option shows members' names below each time entry and depends on settings under System Settings > Client Documents > Presentation Options > Template Flags 3 tab.
Posted Invoice Re-print Default Option section

Display AR Summary Block Last Printed: When reprinting a posted invoice with an AR Summary block, shows values as they were when last printed.
Display Current AR Position: This is the default option when reprinting invoices and reflects current AR values as calculated in recent statements of account.
Select Banks Available for Receipt of Payment
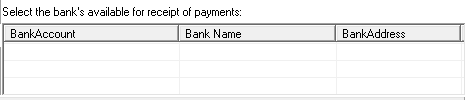
Users can include up to six bank accounts on printed invoices to facilitate direct deposits as payment methods once bank account setup is completed within system settings. (Subject to licensing)
Bill Format and Other “Format” Subtabs

Depending on selections made under "Invoice Package Documents," section, users can choose different layouts by clicking on an ellipsis button before generating their invoices.
An email template must be selected under the Inovice Email Template subtab if users plan to send invoices via email using the Email Invoice button.
Generating the Invoice Document

Always review your final document against any internal requirements before sending it out to clients. Ensure all modifications are accurate and that any necessary signatures are obtained based on firm billing policies.
Draft Version (Without E-Signature if any) option
-
When selected, this option prints an invoice labeled "Draft" next to its number. No remittance slip or e-signature is included in draft versions. Drafts are not saved as part of the final record.
-
If not selected, the invoice prints as "Final" with all applicable elements. The final copy is saved automatically and available as a hyperlink in the Details tab.
-
This option can be set ON by default in system settings
E-mail Invoice Button
-
For invoice generated as:
-
Final: This button launches an email form using the template selected under "Invoice Email Template." The email is addressed to the billing contact and includes a PDF attachment of the final client document. Users has the choice to use the saved final version or regenate a new final version of the client document in PDF.
Note: The email button is grayed out for those using the custom invoice templates.
Draft version: This button launches an email with a prepopulated text with the PDF attachment of the Draft invoice. Users can select the person to send the email to with the PDF attachment of the draft invoice for revision.
The system records how many times an email has been generated.
PDF Invoice Button
-
Generates a PDF version of the invoice via Crystal. Users can print from this document if needed.
-
The number of times a PDF has been generated is recorded by Acumin.
Custom Word templates: Generates first the client document in Word and then in PDF.
Word Merge Button
-
Generate a Word verison of the draft or final client document;
-
It is mostly used by firms who utilize custom Word templates which have limitation in term of options and formats.;
-
It can be used as an exception for specific needs or if there is a need to generate cover letters along with the client document for example.
Note that this option will eventually be phased out and replaced by newer processes.
RELATED DOCUMENT:
WIP & Invoice Management Process - E-WIP To Bill Tab Dashboard - Quick Start
How to map and manage the Invoice Template Library in Acumin