.png)
Scope and Purpose
The credit card payment functionality simplifies the management of vendor payments made via credit cards while ensuring the accuracy of purchase records. This feature enables you to create payable vouchers directly against the actual vendor—such as "Staples"—instead of the credit card provider, like VISA or MasterCard. Transactions for vendors designated for credit card payments are recorded in a dedicated clearing account rather than your regular bank account. Subsequently, the payment made to the credit card company is posted as a single-line distribution against this same clearing account.
For organizations adopting this feature, purchases paid via credit card are recorded under the vendor's name, providing greater transparency in purchase tracking. Upon receiving the credit card statement, a payment batch can be created to reconcile all relevant transactions. These payments are processed automatically as debit memos applied to the clearing account. Posting the payment batch creates offsetting credit entries in the clearing account, allowing for a single consolidated payment—via cheque or debit memo—against the clearing account. This process ensures efficient reconciliation and streamlined accounting.
To leverage this functionality effectively, the clearing account must be configured as a bank account, and vendors must be set up for credit card payment. Additionally, following best practices and utilizing reporting features will help maximize efficiency and accuracy.
System Setup
1. Creating the Credit Card Clearing Account
-
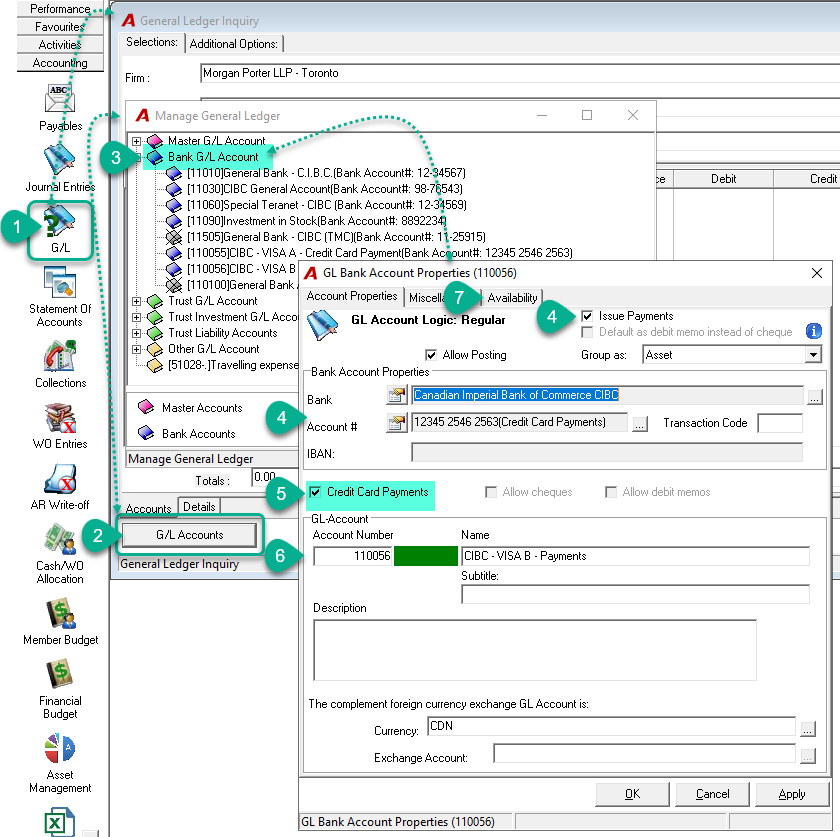
Navigate to the Accounting section and select the GL Accounts icon.
-
Press on the G/L Accounts button.
-
Under the Bank G/L Account section:
-
Create a GL Bank Account for each credit card type (e.g., "TD Visa," "MasterCard," "AMEX") or for each individual card (e.g., "Visa 1," "Visa 2").
-
-
In the GL Bank Account properties:
-
Set the Account Kind to Asset.
-
Leave the "Issue Payment" flag ON (unchecking it would prevent using this account for credit card payments).
-
In the Bank Properties section,
-
Select the appropriate bank branch by using the ellipsis button.
-
Select a bank account having the credit card number and the cheque range number set.
-
-
-
Enable the Credit Card Payments option:
-
Assign a GL Account Number along with an appropriate Name and Description.
-
On the Availability tab, specify which firms will have access to this account for credit card payments.
2. Creating a Credit Card Company as a Vendor
-
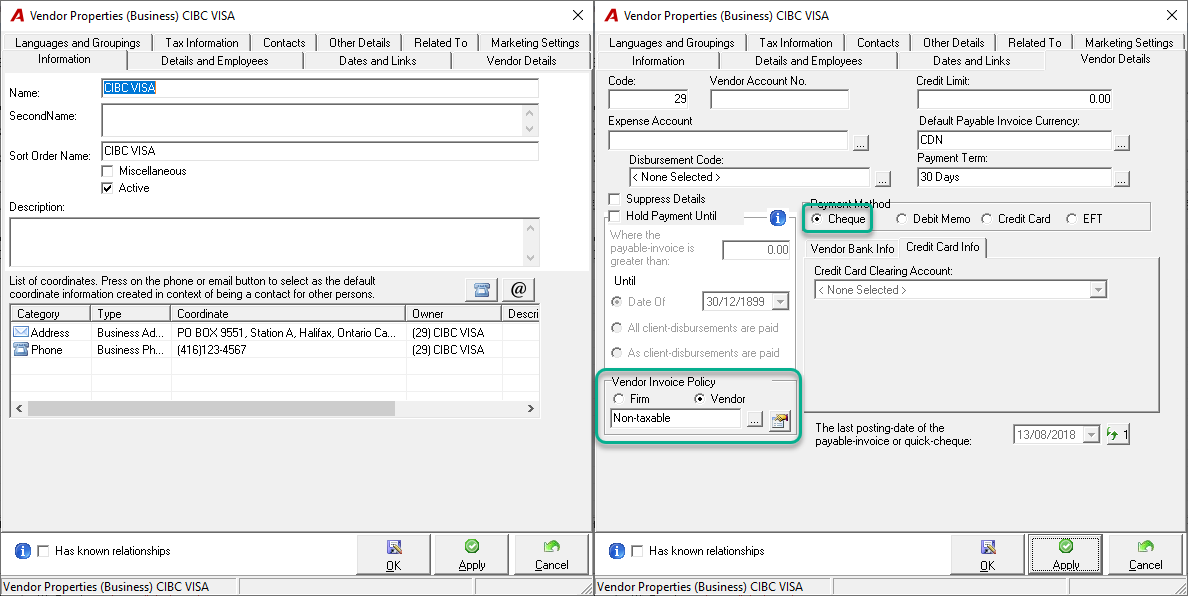
Create a vendor profile for each credit card clearing account with a payment method set to Cheque. This aligns with how payments to credit card companies are processed.
-
Since credit card companies are not actual vendors, set their tax scheme to NONE or NON-TAXABLE for smooth payment processing.
3. Updating Vendor Properties
-
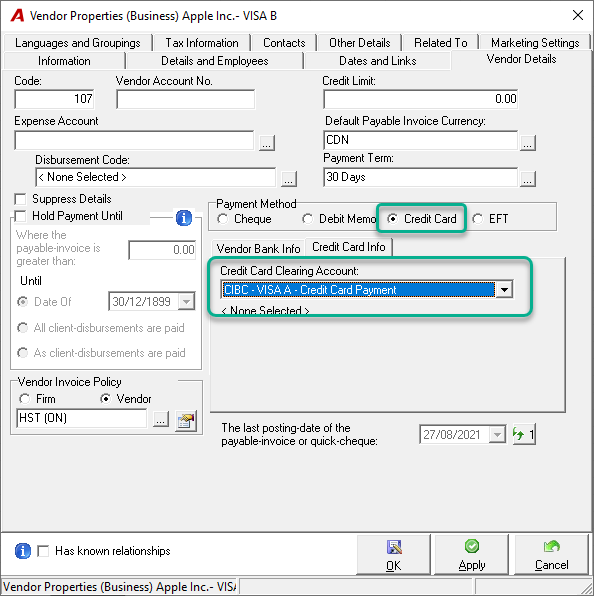
For vendors whose payments will be made via credit card:
-
Modify their Payment Method to Credit Card.
-
-
To access vendor properties:
-
Use either your favorite vendor list or navigate to View > Person Properties > Vendor, then search by name or code.
-
-
In the Vendor Details tab:
-
Select "Credit Card" as the payment method and assign the appropriate Credit Card GL Bank Account (e.g., TD Visa, MasterCard, AMEX).
-
For one-off purchases paid by credit card without creating individual vendor profiles, create a “miscellaneous vendor” (e.g., "VISA One-Off Vendor Purchases") with a payment method set to Credit Card.
Entering Payables Paid by Credit Card
1. Recommended Process: Entering Vendor Payables
-
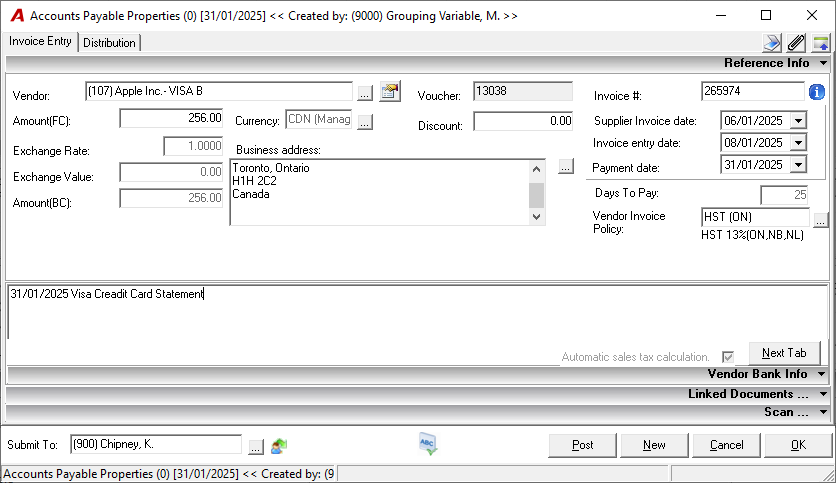
Record payables using your regular payable invoice process and source documents.
-
Select the vendor designated for credit card payment or use the "One-Off" vendor option if applicable.
-
In the invoice description field:
-
Add a unique identifier (e.g., expected credit card statement date) to facilitate reconciliation. (This same identifier should be used in the Invoice field when the payable to the credit card company is posted;)
-
-
Print the AP voucher and attach it to the source document.
-
Upon receiving the credit card statement:
-
Reconcile with the entered invoices in your system.
-
Process payment to the credit card company.
-
2. Alternative Process: Entering Payables via Credit Card Statement
-
Classify source documents until you receive the credit card statement.
-
Reconcile your statement with these source documents.
-
Enter invoices into your system using the same steps outlined above.
General Ledger (GL) Operations for Payables:
-
Debit (DR): Expenses, Matter Charges, or Input Tax Credits (ITC), depending on firm and GL account settings.
-
Credit (CR): Accounts Payable (based on firm where payables were entered).
Applying Payments by Credit Card
-
Create a Payment Batch:
-
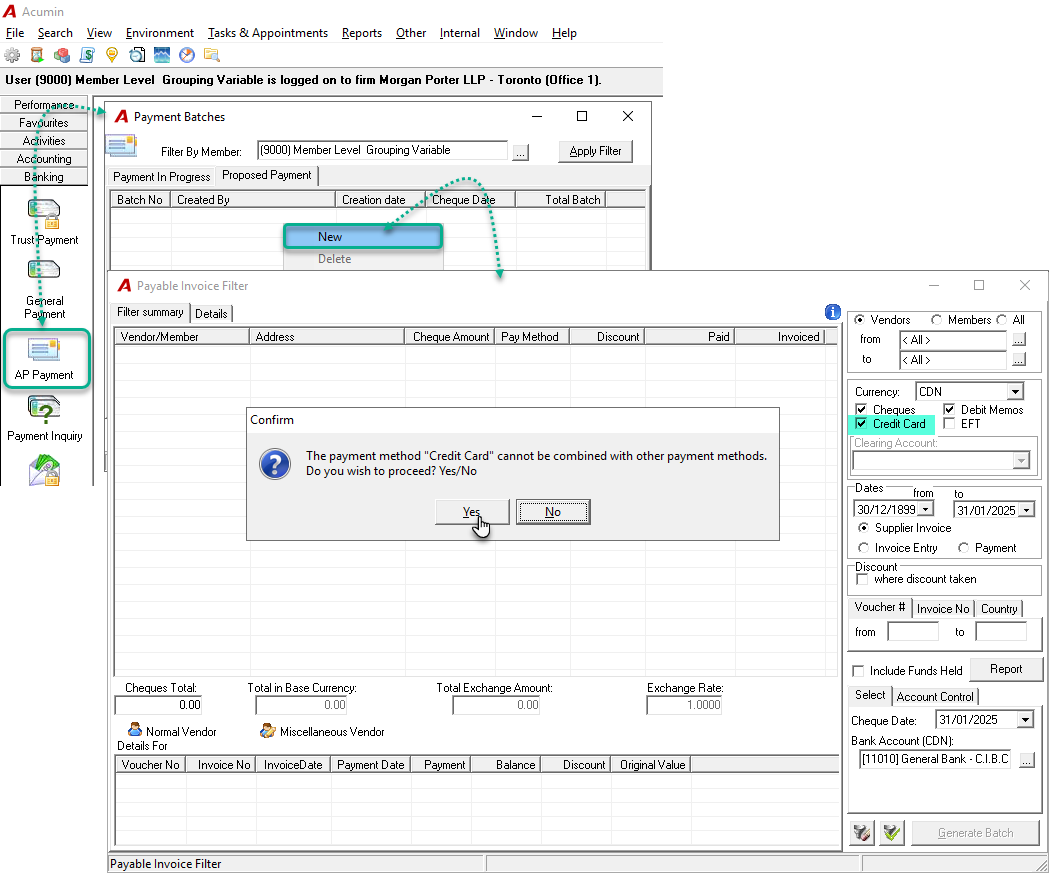
Navigate to the Banking section on the task bar and select AP Cheques.
-
Click on the Proposed Payment tab.
-
Right-click and select New to create a new batch.
-
Use the Credit Card Payment filter on the right-hand side. A prompt will appear—click Yes to continue.
-
-
Filter and Review Payable Invoices:
-
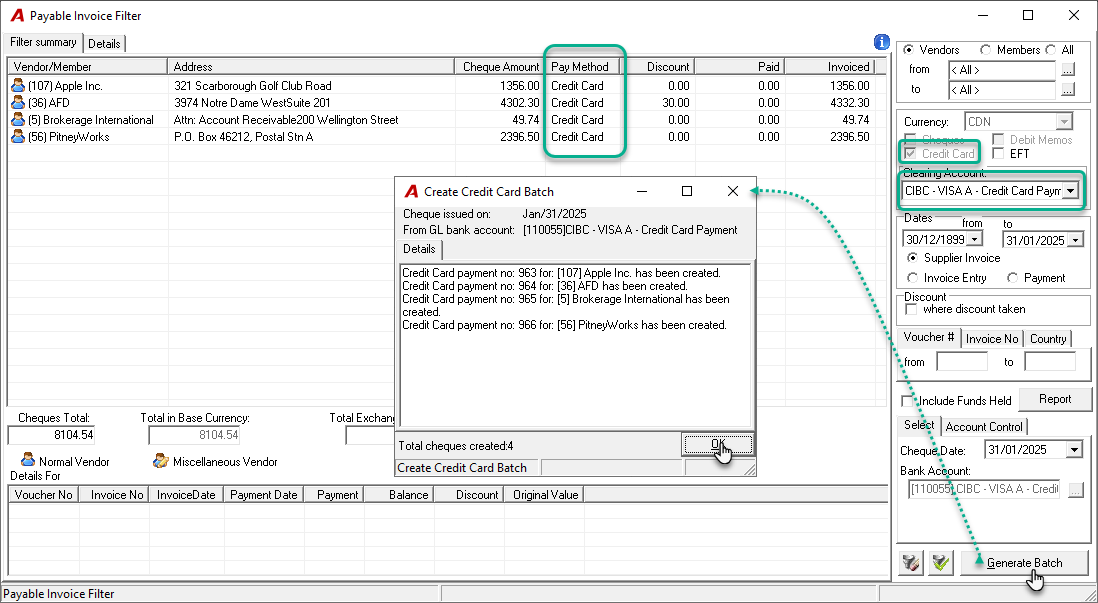
Upon applying the filter, Acumin will search for all payable invoices with outstanding balances for vendors whose payment method is set to "Credit Card."
-
Review and reconcile this list with your credit card statement.
-
-
Best Practices:
-
While not mandatory, it is recommended to prepare separate payment batches for each credit card. You can do this by filtering by the clearing account or cumulatively by vendors linked to the same clearing account.
-
-
Generate the Payment Batch:
-
Click Generate Batch to execute the credit card batch, then click OK to proceed to the list of processed payments.
-
-
Print and Attach Documentation:
-
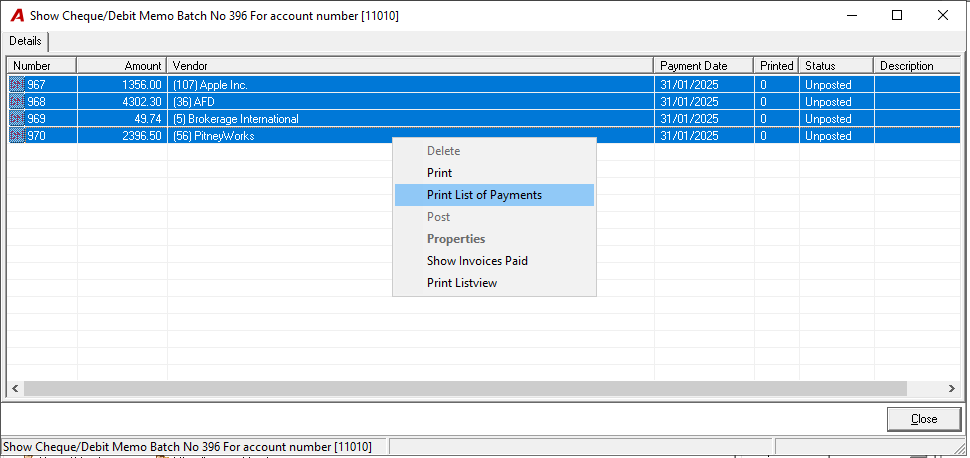
Select multiple payments, right-click, and choose Print to generate proof of payment, which can be attached to the credit card statement.
-
Repeat the process to print the List of Payments, which serves as supporting documentation for the credit card payments.
-
-
Post the Payments:
-
After completing the print steps, right-click and select Post to finalize the payment batch.
-
General Ledger (GL) Operations:
-
Debit (DR): Accounts Payable – Based on the firm associated with the payable voucher.
-
Credit (CR): Credit Card Payment Bank Account – The GL account must be available for the firm where the payable vouchers were posted.
Creating a Payable Voucher for the Credit Card Company
-
Start a New Invoice:
-
Go to the Proposed Payment tab and right-click to select New.
-
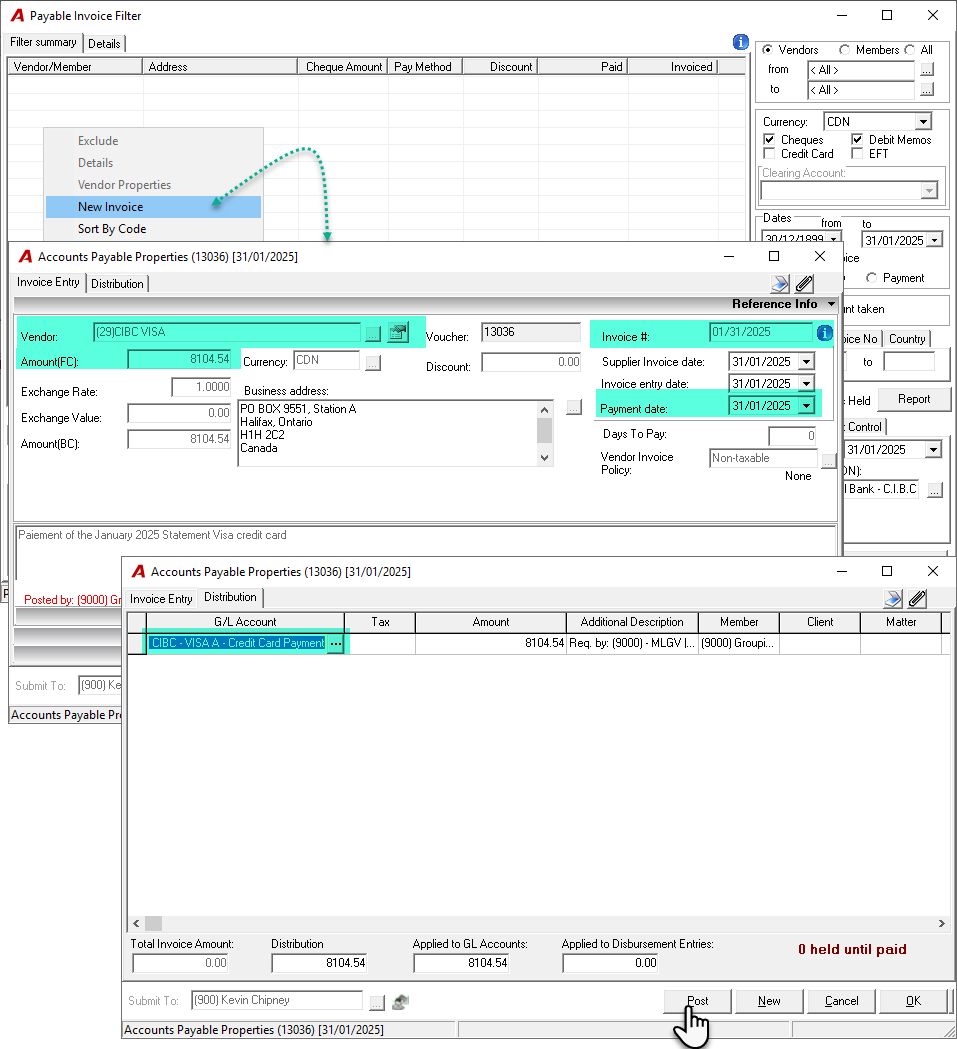
Right-click on the empty Payable Invoice Filter and select New Invoice.
-
-
Enter Invoice Details:
-
Fill out the invoice properties for the corresponding credit card company (e.g., Visa Bank of Montreal).
-
The vendor should be set as Non-Taxable, as credit card companies are not subject to tax schemes.
-
In the invoice field, enter a unique identifier (e.g., the statement date) matching what was entered in the description field when expenses were recorded through payable invoices.
-
-
Enter Payment Amounts:
-
In the amount field, input the total payment owed to the credit card company.
-
-
Assign GL Accounts:
-
In the distribution tab, specify the "Credit Card Payment Bank Account" as the GL account.
-
Enter amounts for vendor payments based on the printed List of Payments.
-
If there are administrative charges or interest included in the payment, create an additional row in the distribution tab and allocate those amounts to their respective GL accounts.
-
-
Finalize and Post:
-
Press Post to save and finalize the payable invoice.
-
The system will return you to the Payable Invoice Filter, where the invoice will now be ready for payment.
-
-
Generate a Cheque:
-
Click Generate Batch to create a cheque for the credit card company.
-
Print and post the cheque, then attach supporting documents (e.g., List of Payments) to the credit card statement for filing.
-
Applying a Credit Received from the Credit Card Company
When receiving a credit from your credit card company:
-
It is best practice to apply this credit as a debit note against the payable invoice for the corresponding vendor.
-
If this is not possible, you can alternatively apply the credit as a debit note against the payable invoice issued for payment to the credit card company.
RELATED DOCUMENT:
Account Payable Process - Quick Start | Acumin Documentation