.png)
e
Bank Reconciliation
Scope and Purpose
The purpose of the bank reconciliation is to consolidate the tasks involved in balancing the GL’s bank position to its corresponding physical bank account.
Its scope extends across the clearing of cheques and deposits, the preparation and completion of GL bank account adjustments, the documentation of required bank corrections and the ability to generate supporting reports.
Highlights
To optimize operability, a physical bank account can be associated to more than one GL account. For example, to split trust funds received on a matter between funds reserved to pay legal services invoices and funds reserved to complete the legal transaction thus providing better visibility for exposure measures and collections efforts, many firms associate the one physical bank account to a retainer funds GL trust bank account as well as a mixed trust one. To support these workflows and efficiency gains, the bank reconciliation is completed for the physical bank account with full visibility of the GL bank accounts affected when there is more than one.
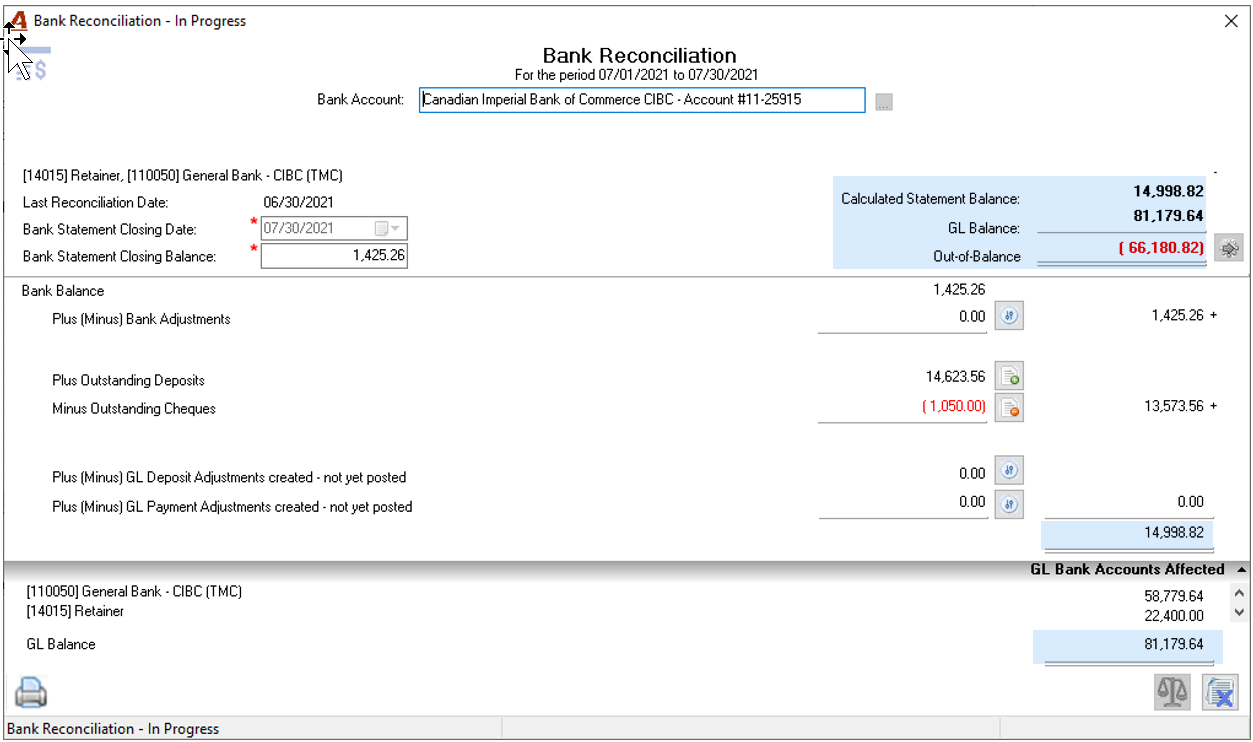
The main bank reconciliation form captures the affected GL Balances for the physical bank account selected as at the “to” date entered. This balance is compared to the balance of the physical bank account entered by the user, and the difference between the two is auto calculated and updated as the user completes the clearance and adjustment process.
From the main form the user will:
-
Drill through to update the list of outstanding cheques by clearing the ones included in the bank statement. The same functionality is available to identify outstanding deposits.
-
Complete bank adjustments to reflect bank transactions not yet recorded in the GL bank account, for example interest and bank charges.
-
Add any detected bank errors or adjustments to be made by the bank.
Once the bank reconciliation is balanced, it is be committed, a process that saves the bank reconciliation for future access. Users can leverage the filter options offered to locate committed bank reconciliations as needed.
The Bank Reconciliation Process
Access
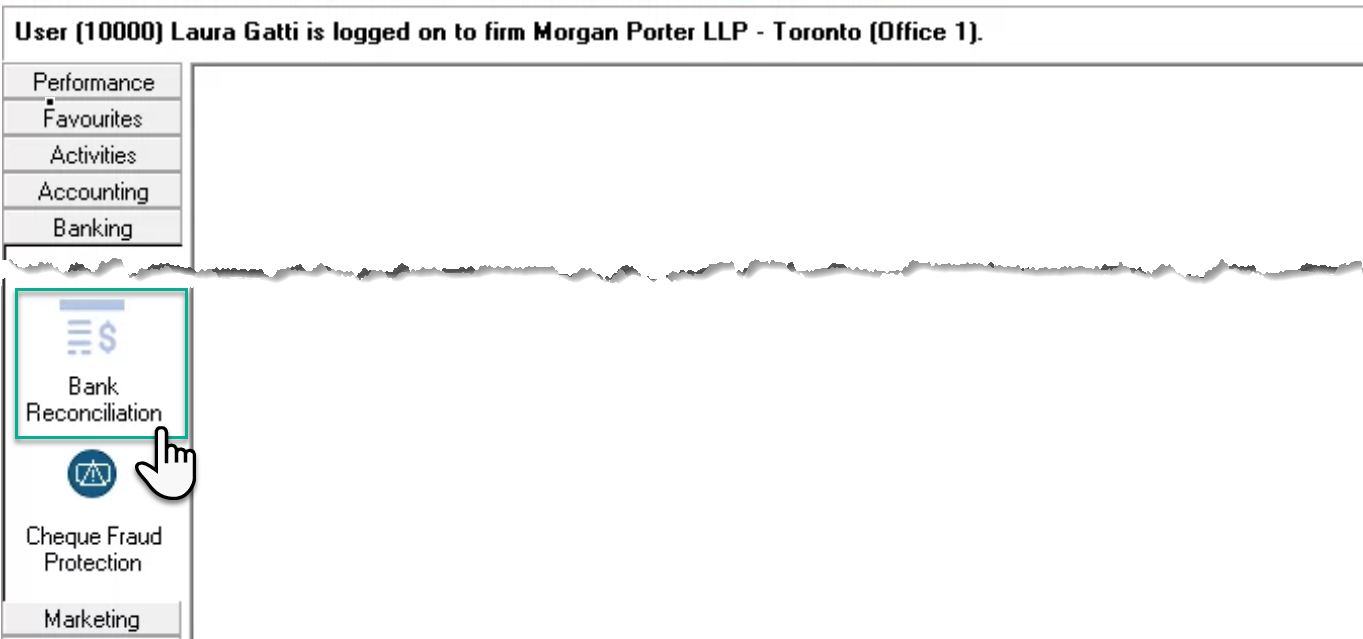
Press on the “Bank Reconciliation” icon located within the banking section of the task bar to get started.
Show Bank Reconciliations:
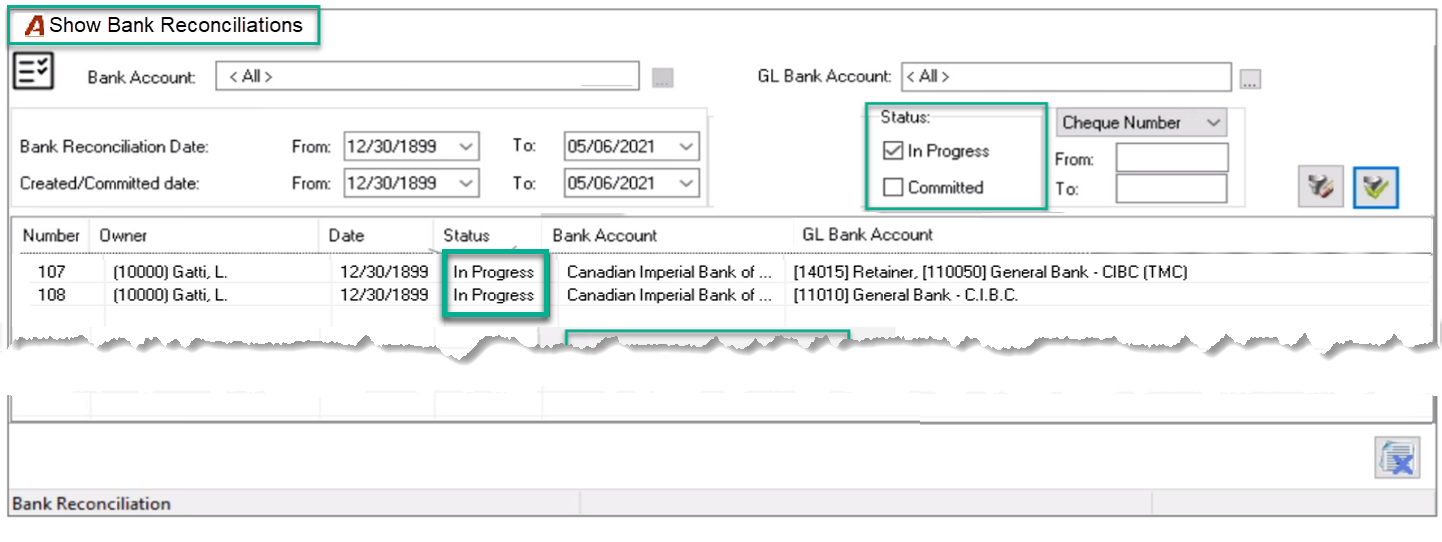
The show bank reconciliations filter and list-view will launch pre-populated with the bank reconciliations in-progress.
Filter Options:
To retrieve a bank reconciliation, filter by bank account, GL bank account, status and/or date-range. Users can also find a bank reconciliation that includes a cheque or deposit batch by applying the cheque or deposit batch number within the object number filter.
Right-Click Contextual Menu:
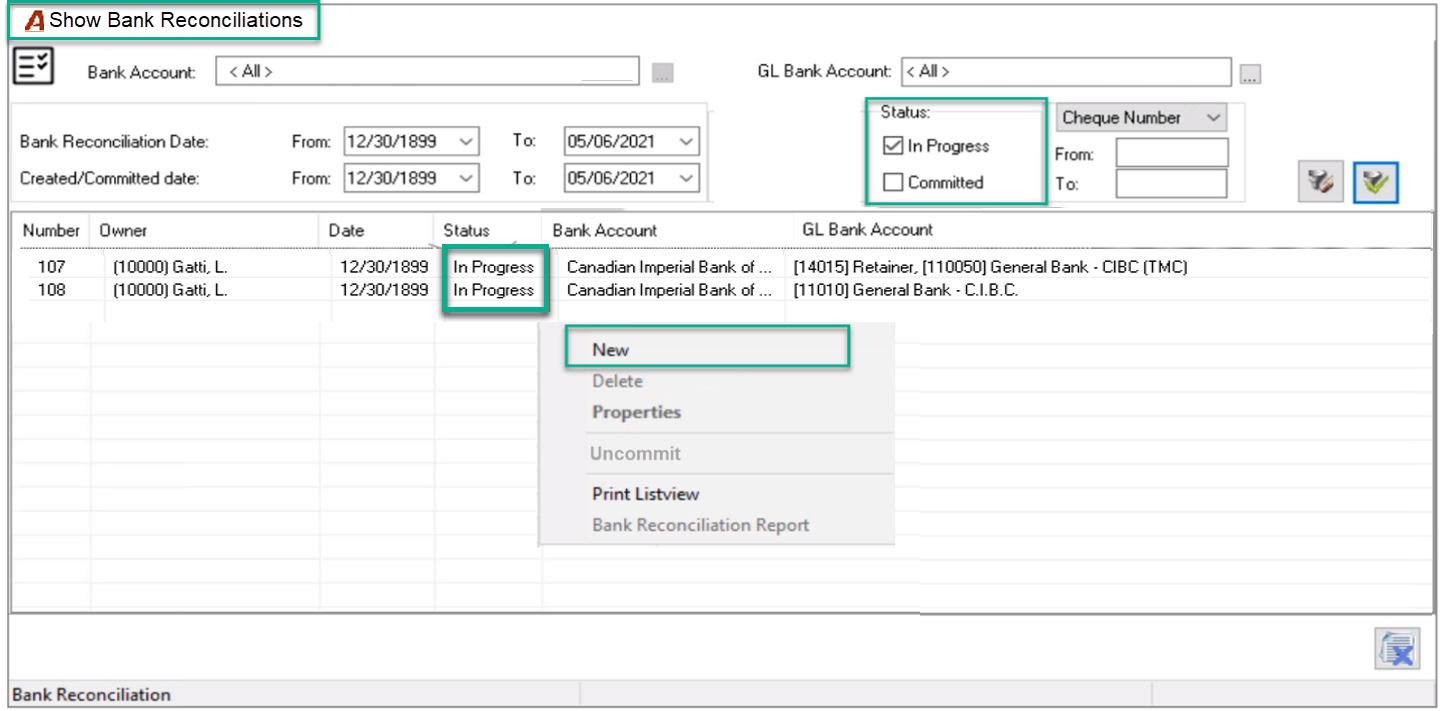
New: Launches a new Bank Reconciliation form.
Delete: Applies to Bank Reconciliations that have the status “In Progress”. Committed bank reconciliations cannot be deleted.
Properties: launches the Bank Reconciliation Form. If the status is “In-Progress” the user will have full read-and-write access, however if the status is “Committed”, the user will be able to filter and report content but will have a limited access to bank reconciliation changes.
Uncommit: Reverses the bank reconciliation committed status, to status in-progress provided the subsequent bank reconciliation is in-progress. Although the user can make modifications, if there is a subsequent bank reconciliation, regardless of its status, the dates cannot be changed due to their interdependency. This provides the control needed to avoid creating unwanted gaps.
Print List View: Standard functionality, where depending on the user’s preferences set, the list view will generate as a report or as an export to excel.
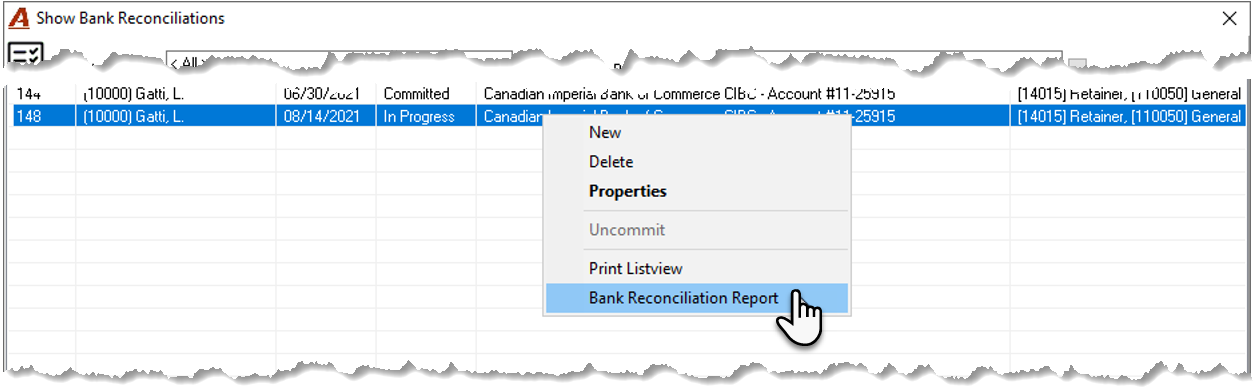
Bank Reconciliation Report: Generates the Bank Reconciliation Report.
Select “New” to start a new bank reconciliation process.
The Bank Reconciliation Form
-
Press on the ellipsis button to select the physical bank account to reconcile
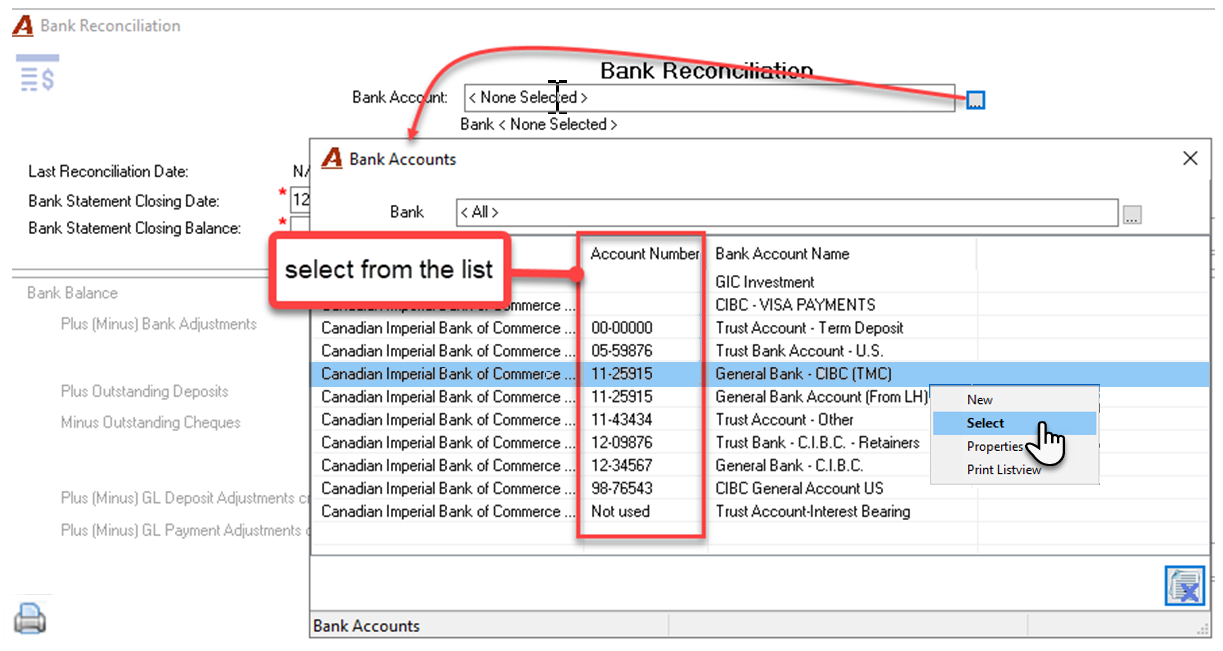
Important: if this the first time you reconcile this bank account, The system will prompt you first to enter the Last Reconciliation Date for this bank account. This is a one-time set-up, and the date cannot be reversed afterward, so it's crucial to enter the correct date.
-
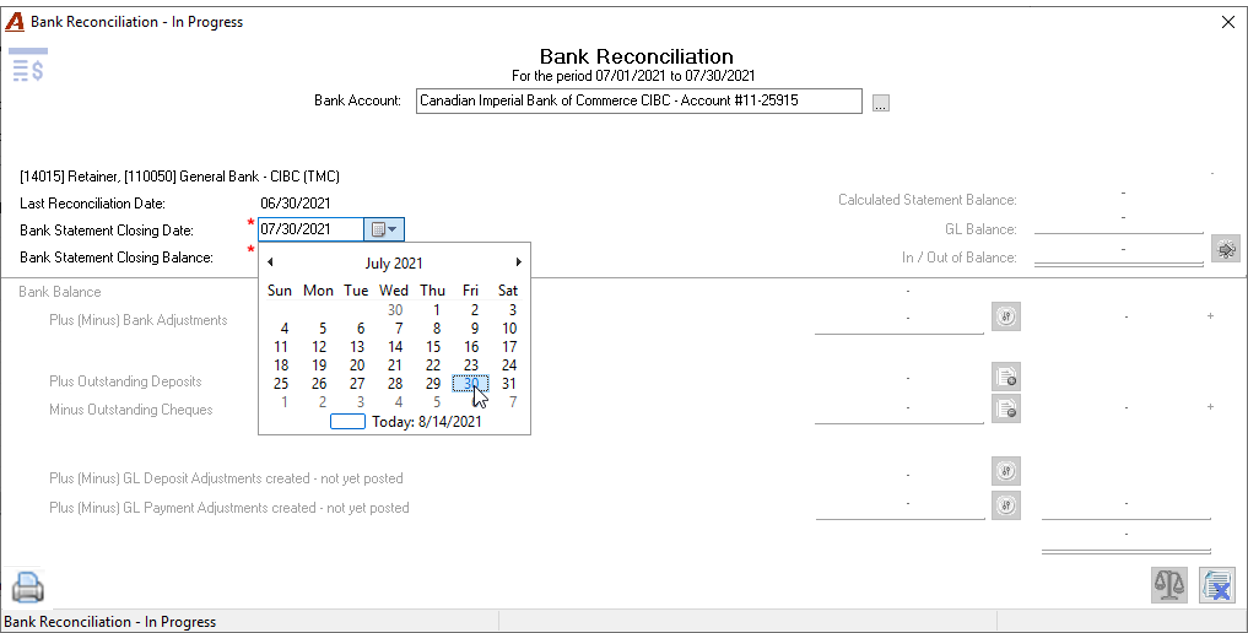
Choose the Bank Statement Closing Date. The default will be the current date.
Important Note: The Bank Statement Closing Date can be modified until the user clicks Execute. The system uses this date to perform its calculations and determine which items to display.
If the date was entered incorrectly, the only way to fix it is to delete the current reconciliation in progress and create a new one with the correct closing date.
-
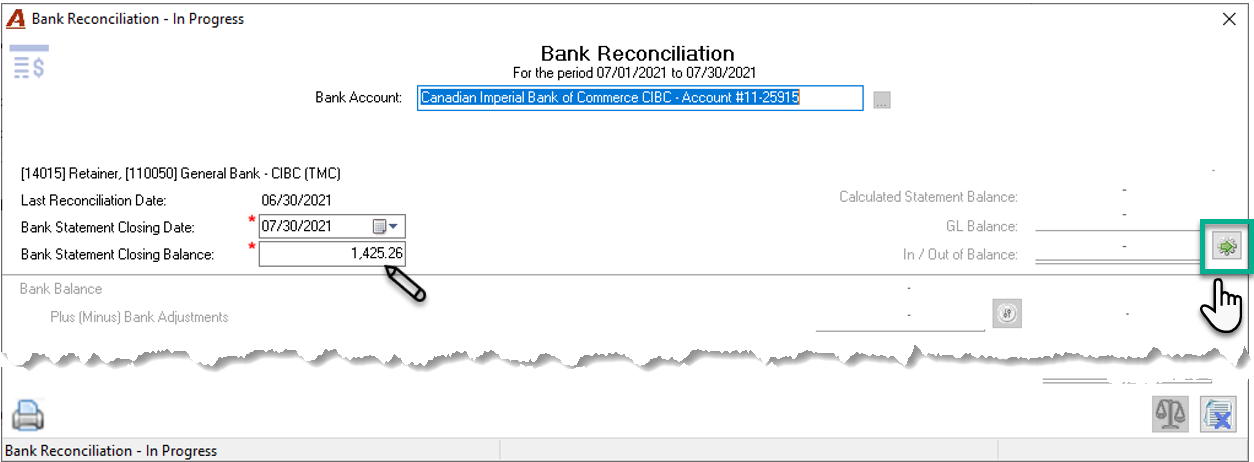
Enter the Bank Statement Closing Balance and press the execute button to provide access to the bank reconciliation clearance and adjustment options and calculated statement balance, update the GL balance and calculate the difference.
Deposit Clearance Process
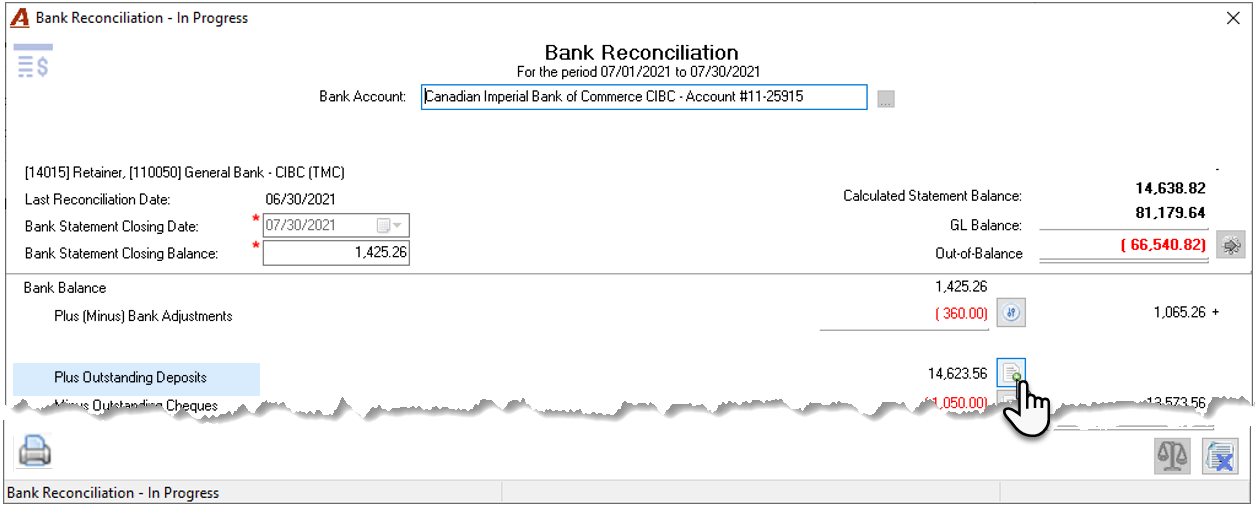
Press on the button to the right of the outstanding deposits measure to launch the receipt clearance form.
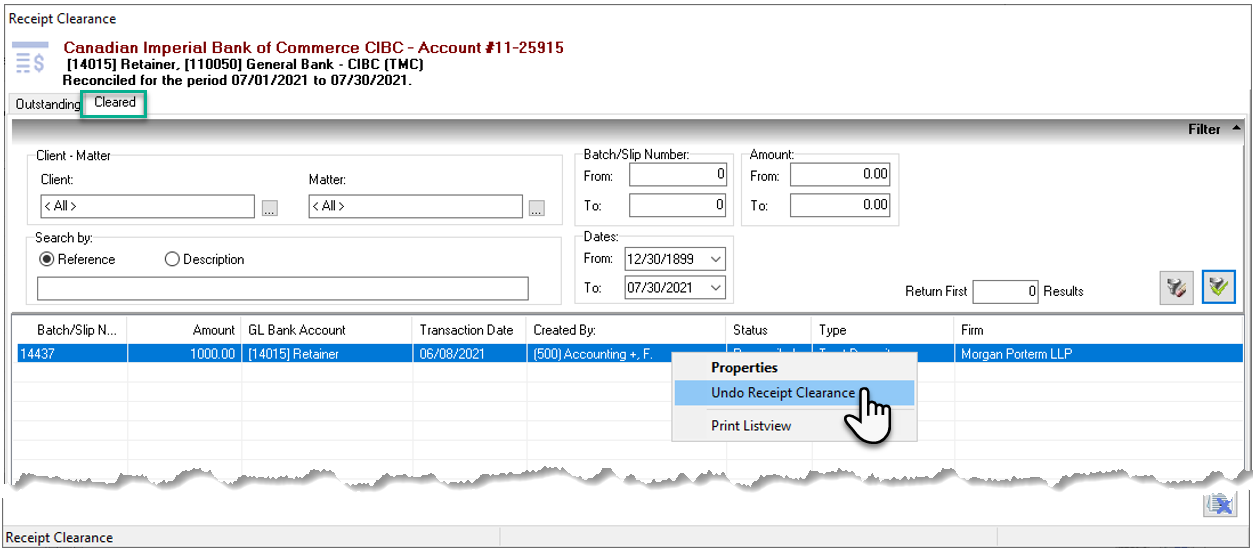
Cleared Deposits
Deposits are presented as individual receipts, with the status reconciled on the cleared tab, with each receipt-record showing its deposit batch to match the bank. The reconciled default position supports current banking practices, as it is rare to have outstanding deposits. To unreconcile a deposit batch in transit, select all the receipts included in that batch and right-click to select “Undo Receipt Clearance”.
As the list of reconciled deposits must align with the individuality of receipts so a user that needs to cancel a reconciled receipt, can un-reconcile the one receipt, to then cancel it, without affecting the rest of the deposits, the reconciled deposits are listed as individual receipts with the batch number used to make the deposit.
Outstanding Deposits
To reconcile – clear – outstanding deposits checkmark the individual receipt or the top checkbox to select all and press on the “Clear Selected Receipts” button.
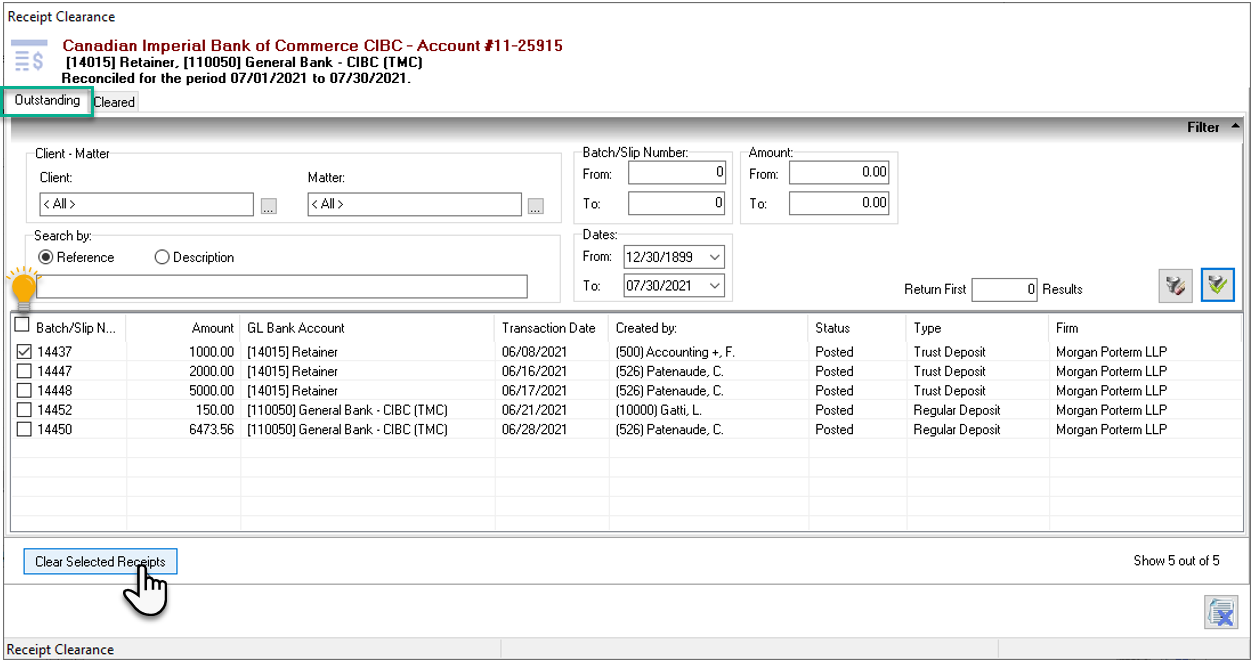
Hint: As it is rare to have outstanding deposits, checkmark the master checkbox to the left of the Batch/Slip No column header, to select all the deposits at once and uncheck any that remain outstanding before pressing the "Clear Selected Receipts" button.
Filter Options
Users can apply filter options to find “Outstanding” or “Cleared” receipts using filter criteria offered.
Cheque Clearance Process
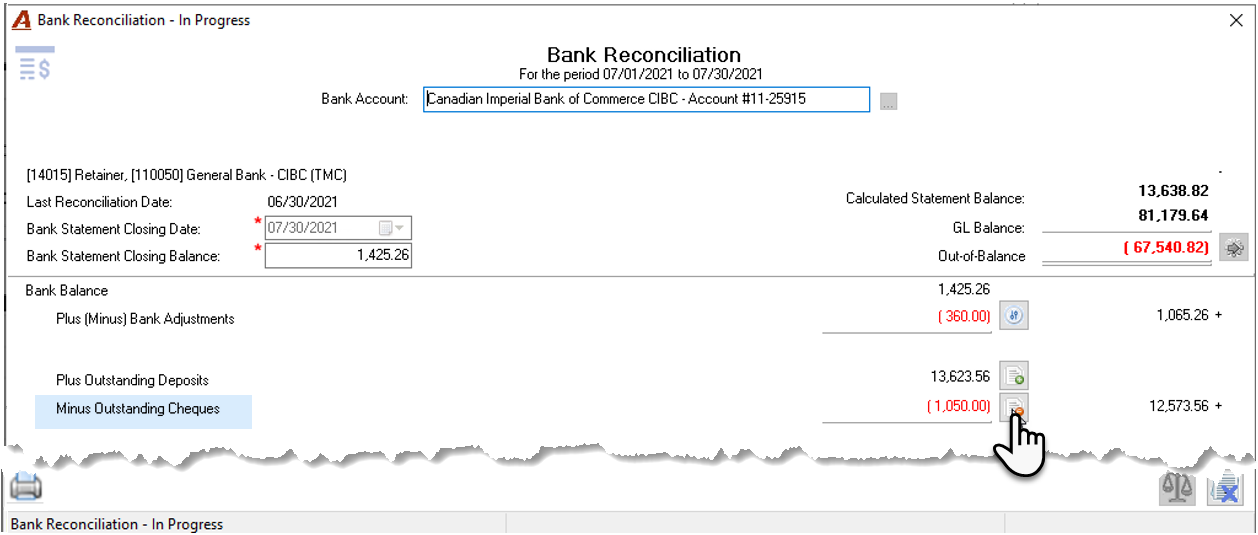
Press on the button to the right of the outstanding cheques measure to launch the cheque clearance form.
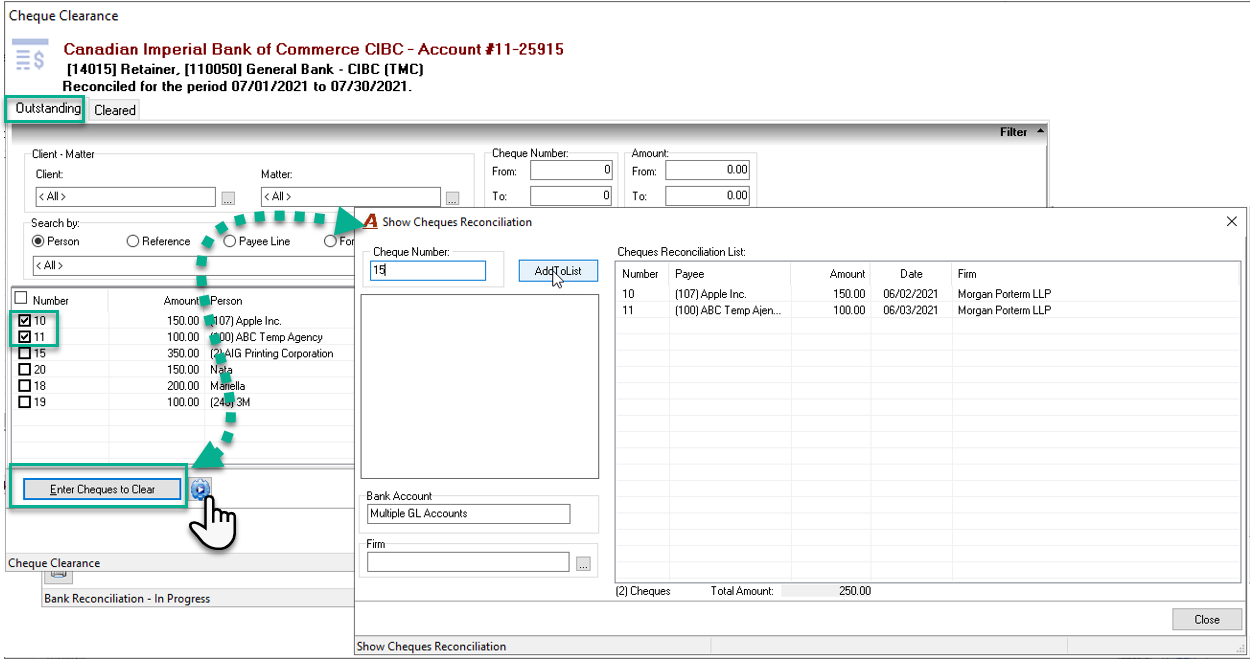
Outstanding Cheques
Although it is possible to checkmark the cheques that have cleared the bank directly on the the “Outstanding” cheques tab, due to volume and order, it is more effective to press on the “Enter Cheques to Clear” button – bottom left - and launch the “List of Cheques to Clear” form and enter the cheques to clear by cheque number.
Once the list is complete, close the form. The corresponding cheques will be autmatically checkmarked. Press on the execute button to clear the selected cheques and transfer them to the cleared tab.
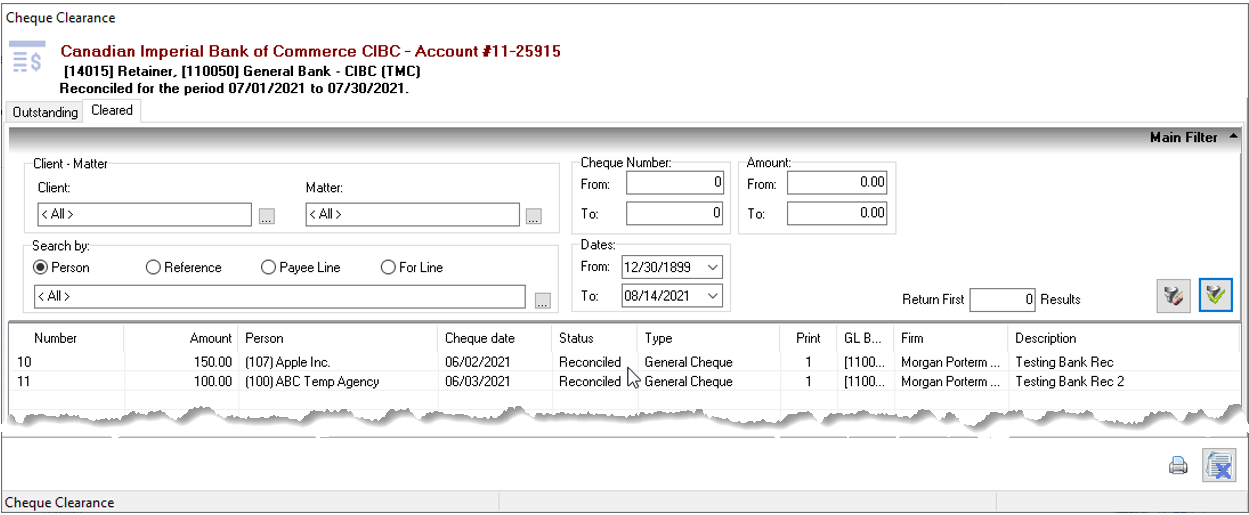
Cleared Cheques
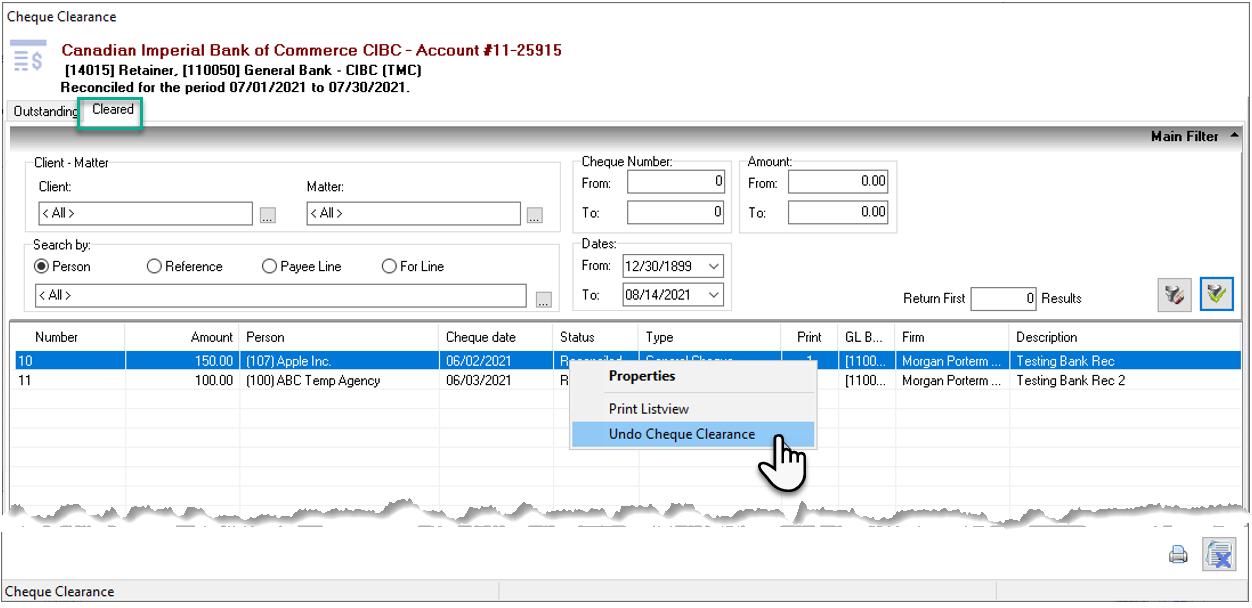
The “Cleared” tab contains the cheques that were cleared during the bank reconciliation process. To reset an outstanding cheque cleared in error, right click and select the “Undo Cheque Clearance” option.
Filter Options
Users can apply filter options to find “Outstanding” or “Cleared” cheques using the filter criteria offered.
Outstanding and Reconciled Cheque Report Options
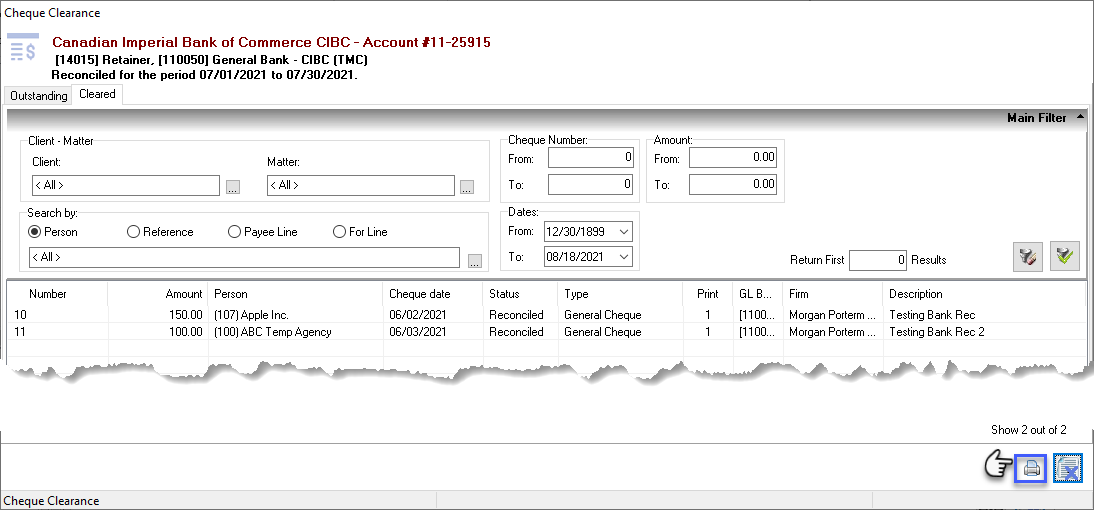
Press on the printer button to launch outstanding or cleared (reconciled) cheque report options.
The report filter will default to the GL bank account correspondong to the physical bank account and the date range for the bank reconciliation period.
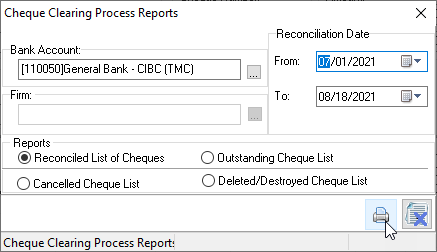
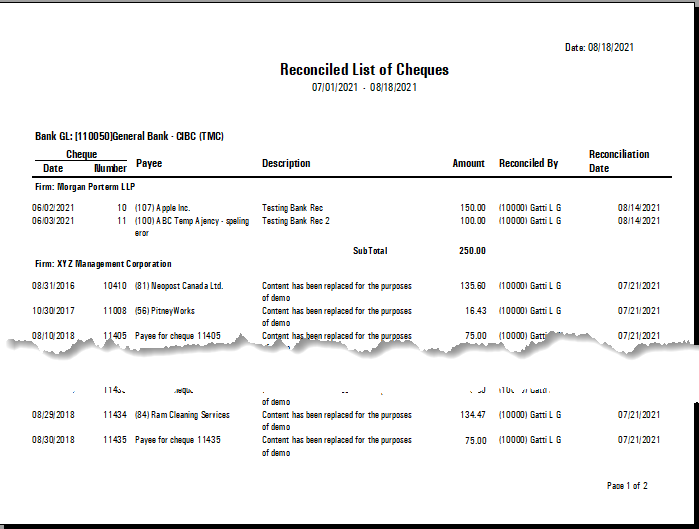
Reconciled List of Cheques Report
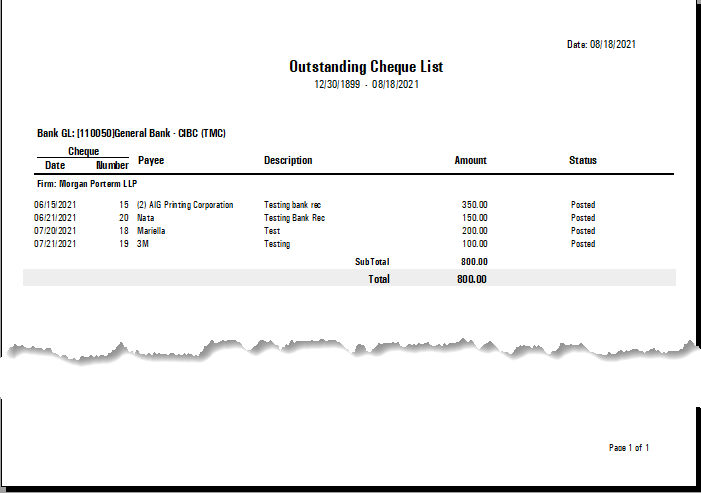
Outstanding Cheque List
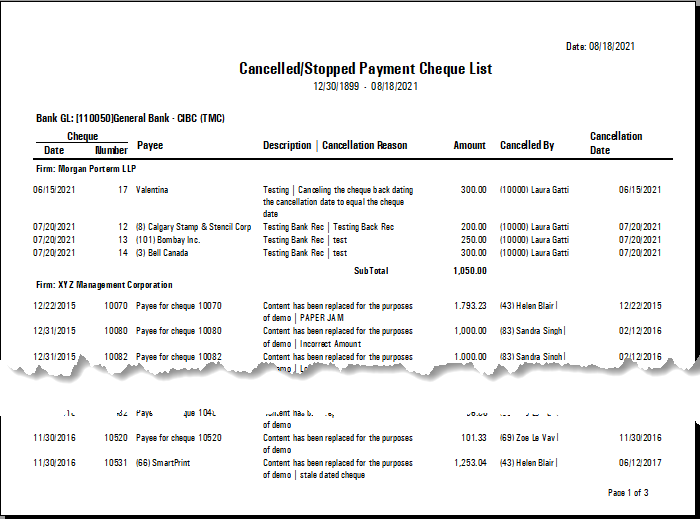
Cancelled Cheque List report
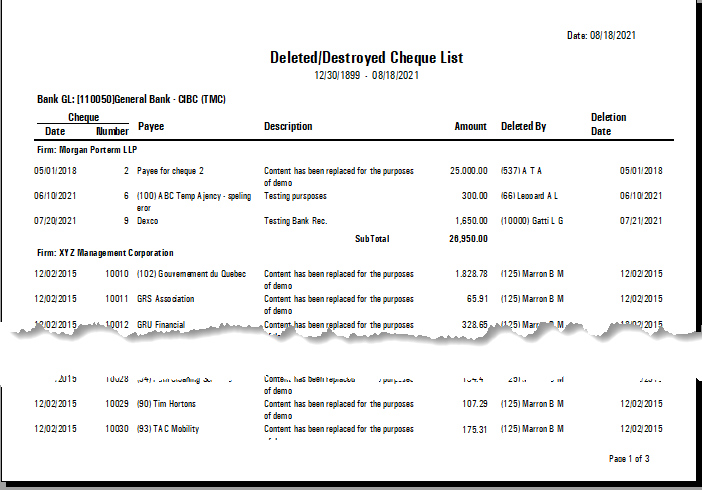
Deleted/Destroyed Cheque List report
GL Adjustments
GL Deposit Adjustments not posted
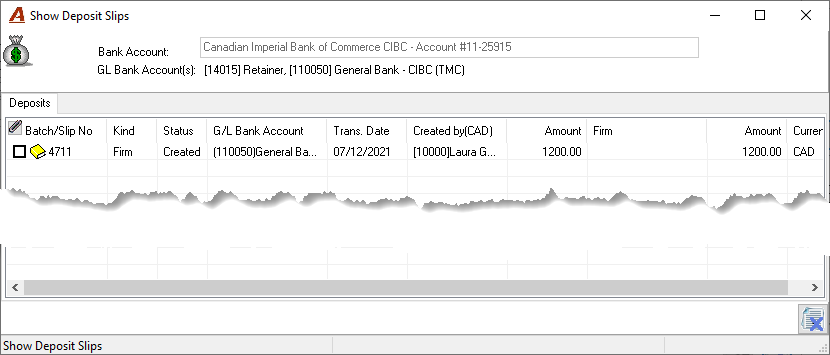
Press on the button to the right of the value shown for GL deposit adjustment to add or post listed adjustments. All adjustments must be posted to commit the bank reconciliation.
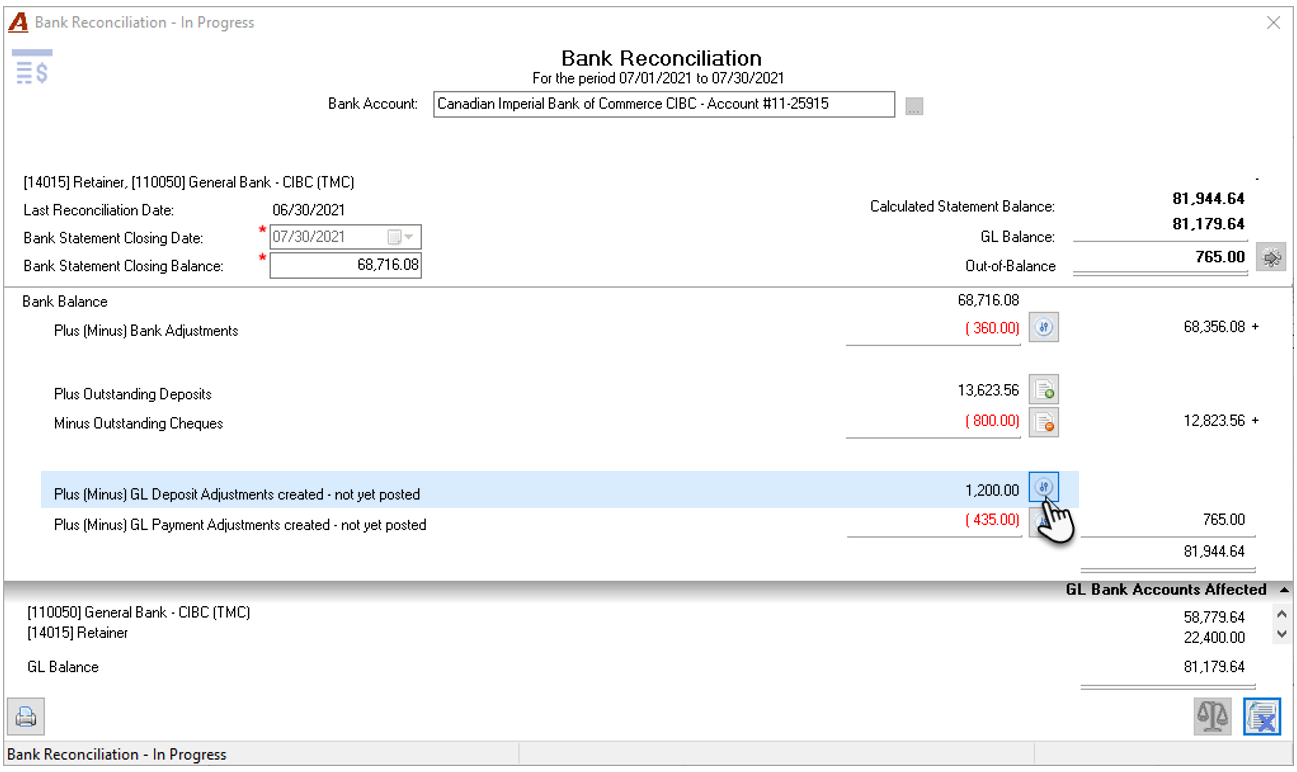
Right click to create a new adjustment or post a listed one.
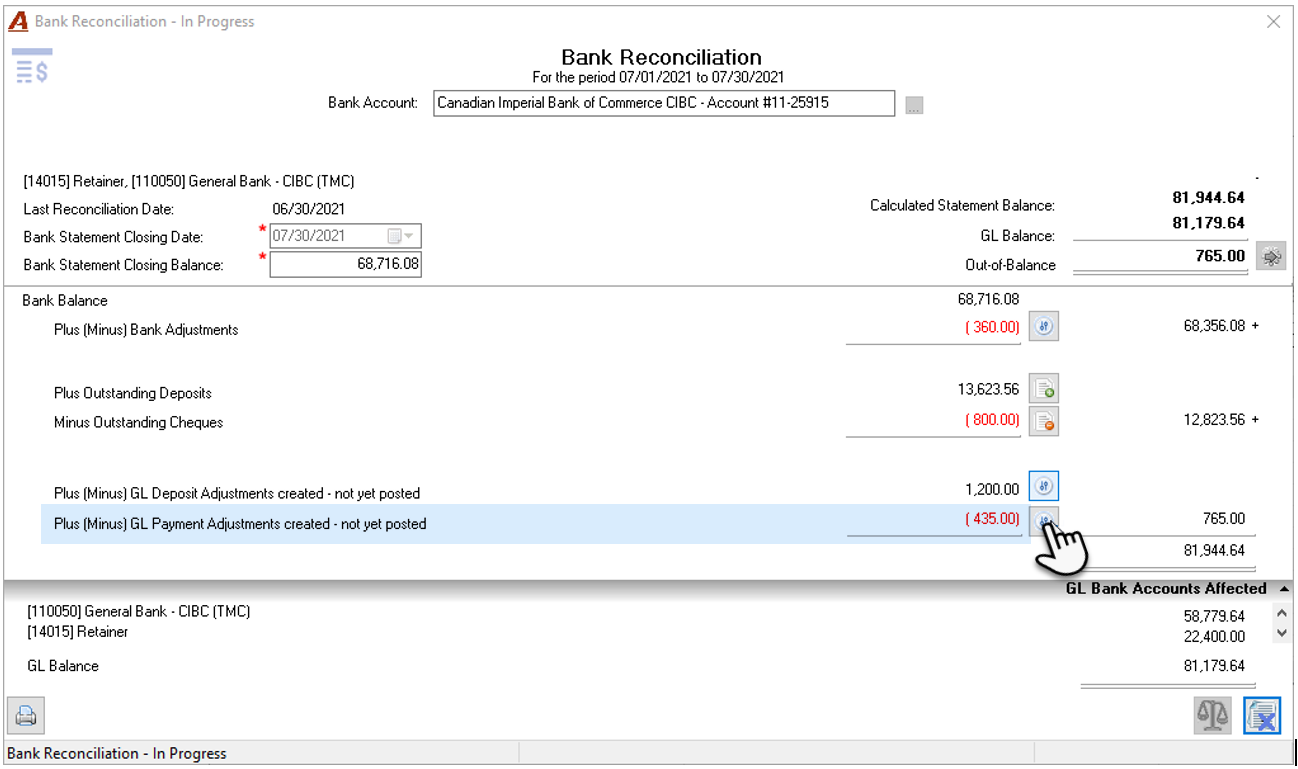
GL Payment Adjustments
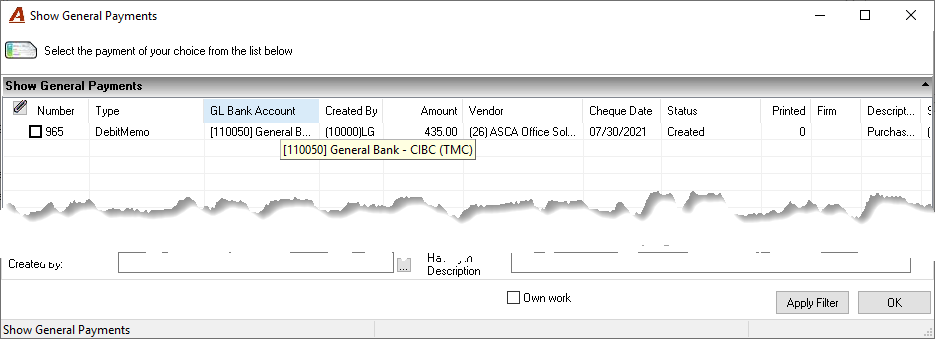
Press on the button to the right of the value shown for GL payment adjustment to add or post listed adjustments. All adjustments must be posted to commit the bank reconciliation.
Right click to create a new adjustment or post a listed one.
Requirement to Post Adjustments to Commit the Bank Reconciliation
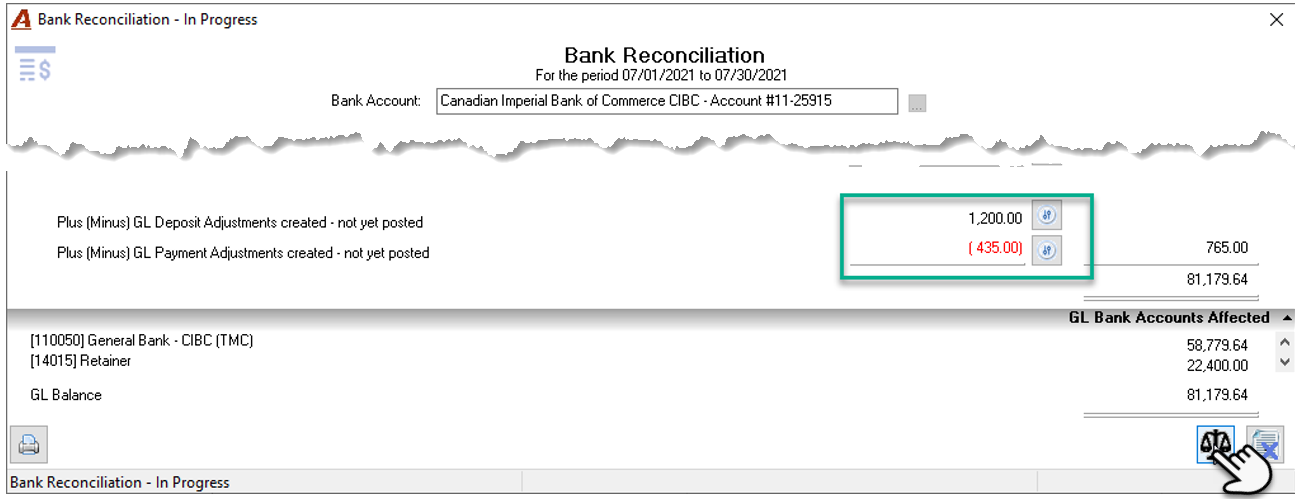
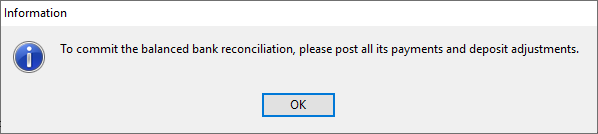
If there are any unposted adjustment at the time the user commits the Bank reconciliation the user will receive the following message
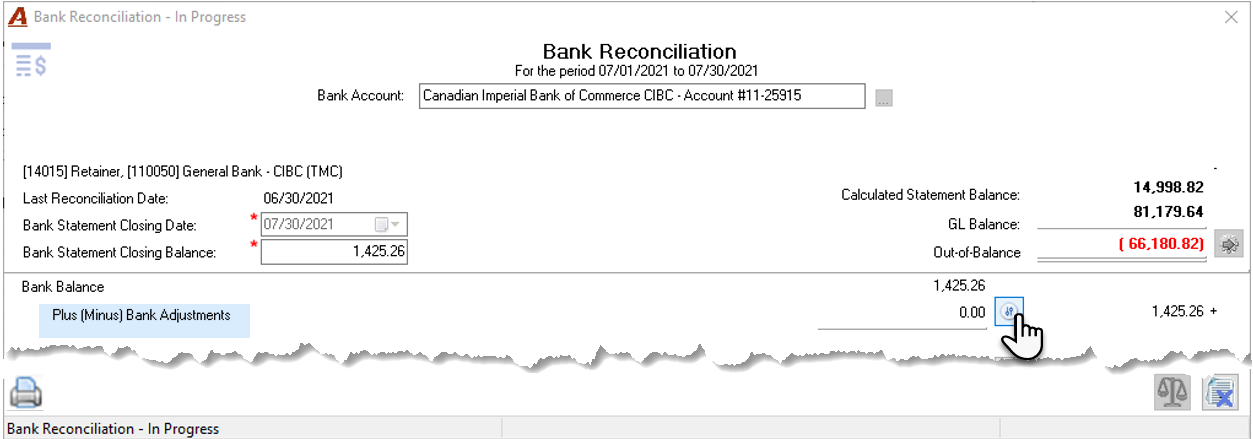
Bank Adjustments
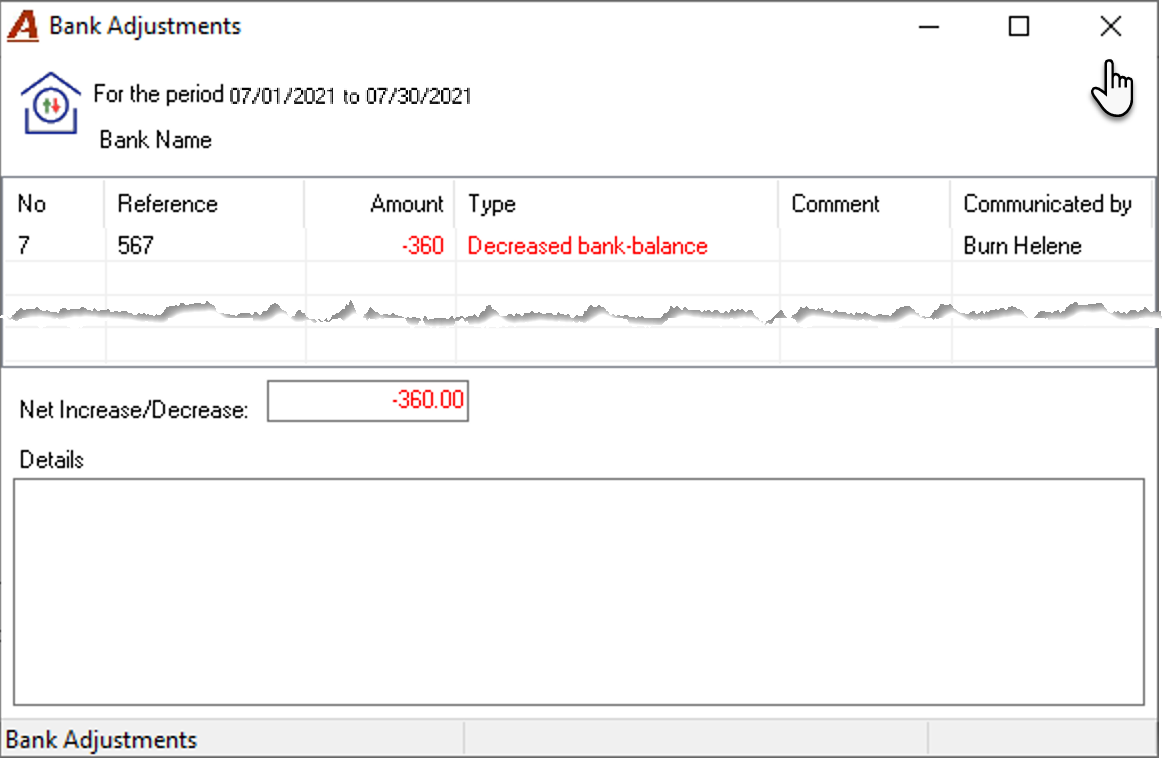
If the bank reconciliation process includes the recording of bank adjustments, press on the button to the right of the bank adjustment measure to launch the bank adjustments form.
Right-click to select new to launch the bank adjustment properties form. Press OK once it is complete to accept the content and return to the bank adjustment list.
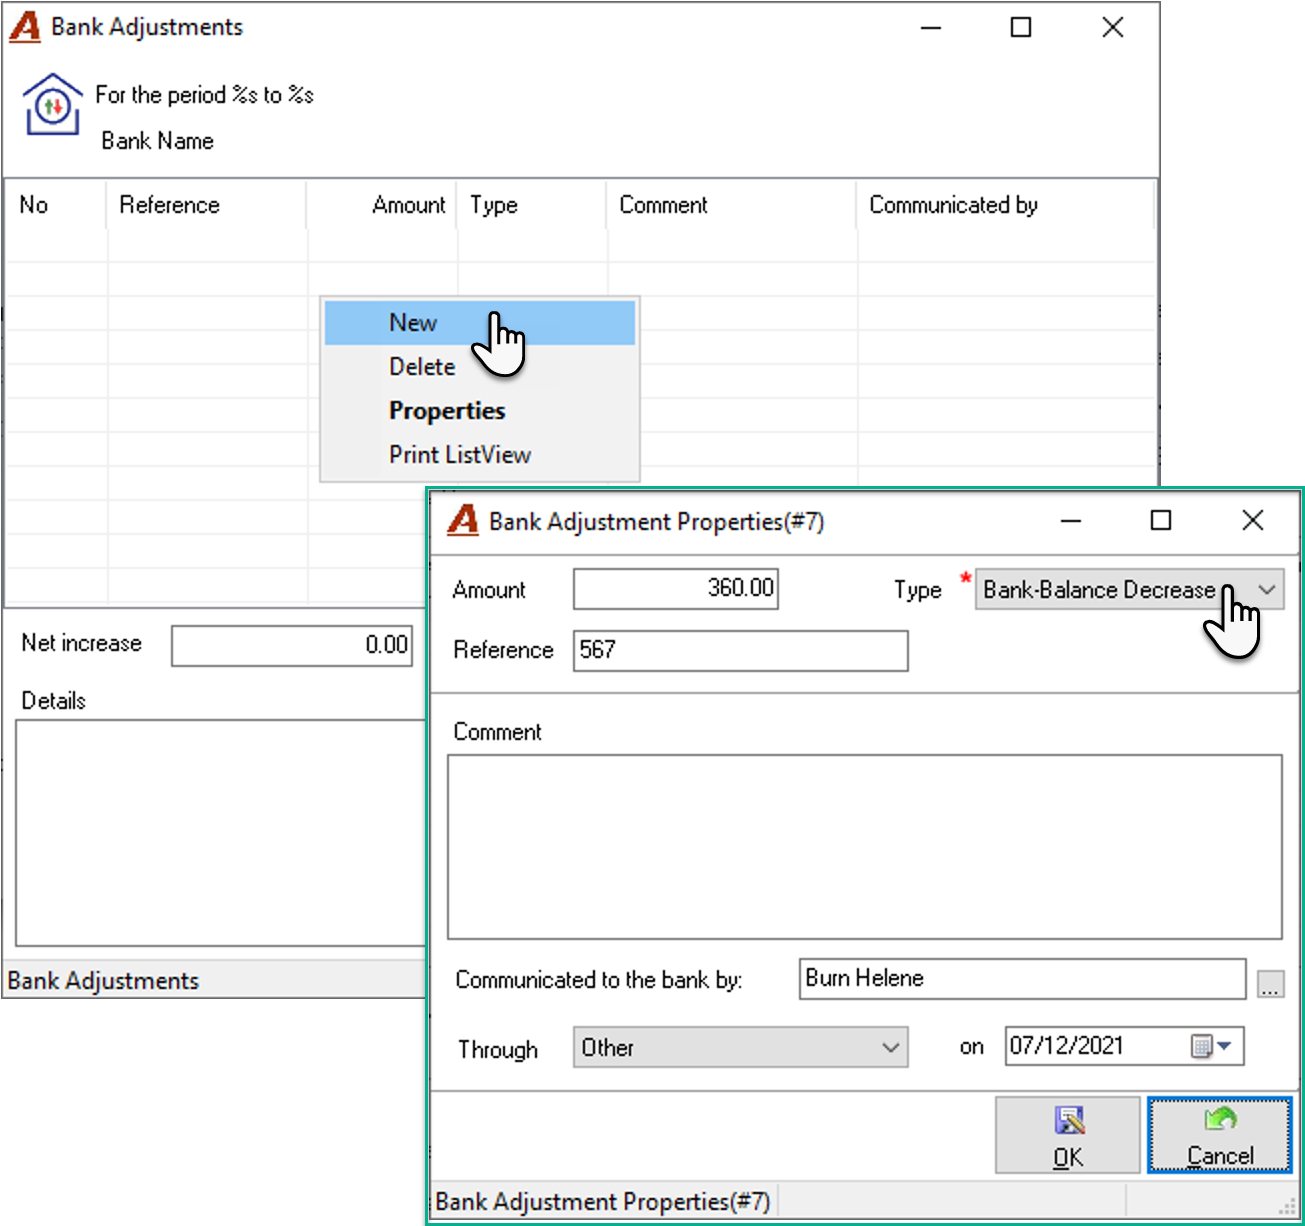
Close the form to return to the bank reconciliation form
The Commit Function
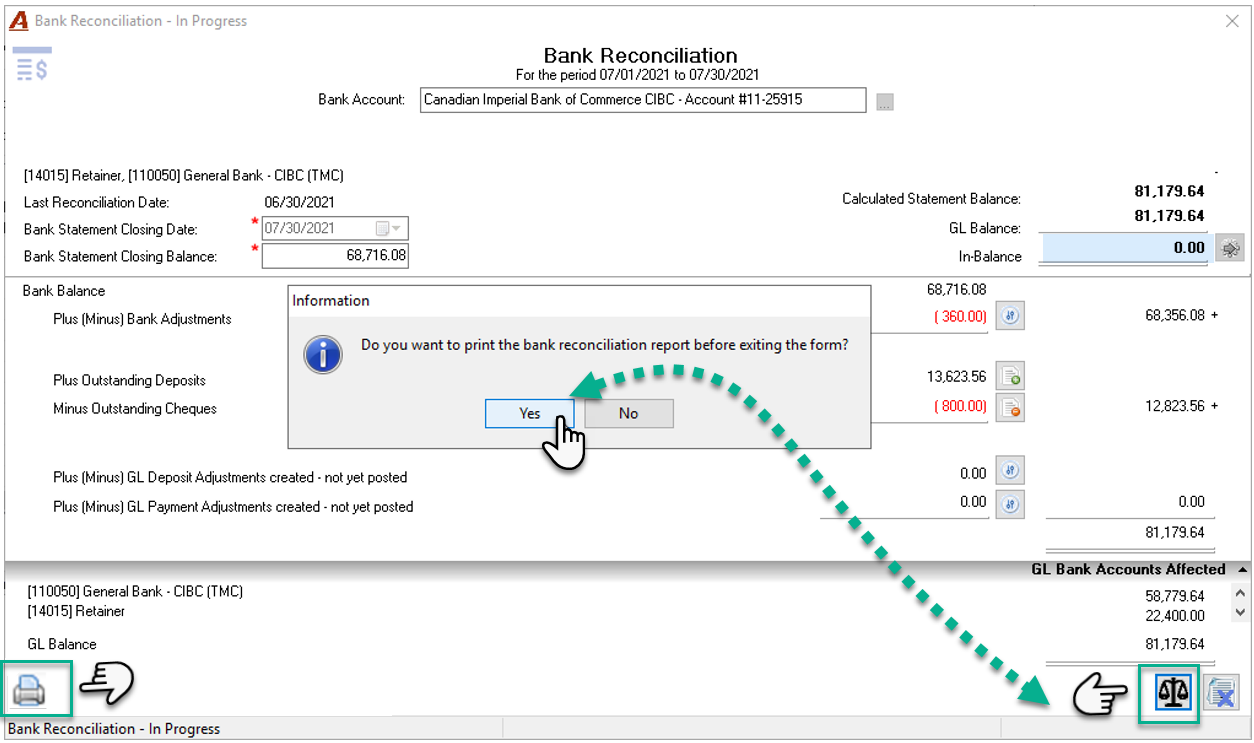
Once the bank reconciliation is in balance - the difference between the calculated statement balance and the GL balance is 0.00; the user can press on the enabled balanced button – bottom right; to commit the balanced bank reconciliation. The user will be prompted to print the bank reconciliation report before exiting the bank reconciliation form.
Committed Bank Reconciliations Report Options
Users can return to a committed bank reconciliation to print the bank reconciliation report – bottom left print button; or to print the list of outstanding or reconciled cheques – print options within the cheque clearance froms. The bank reconciliation report can calso be printed from the right-click contextual menu found within the “Show Bank Reconciliations” form.
Committed Bank Reconciliations Modification Options
|
Scenario |
Description |
Expected behaviour |
|
1 |
If we back date the cancellation of a cheque, or deposit within the date range of a committed bank reconciliation |
The impact of the cancellation of a bank transaction will be reflected in the GL Bank balance stored as well as the list of reconciled or outstanding transactions with the bank reconciliation balance still at 0.00 |
|
2 |
If we back date a debit memo or a cancellation of a debit memo within the date range of a committed bank reconciliation |
We should see an impact to the committed bank reconciliation’s GL balance; however, the bank statement amount will need to be updated through a bank adjustment to balance to 0.00. |
|
3 |
If we back date a cheque within the date range of a committed bank reconciliation |
The impact of the back dated bank transaction will be reflected in the GL Bank balance stored as well as the list of outstanding transactions with the bank reconciliation balance still at 0.00 |
|
4 |
If we back date a deposit within the date range of a committed bank reconciliation |
The impact of this transaction will be reflected in the GL Bank balance stored as well as the list of outstanding transactions with the bank reconciliation balance still at 0.00 |
|
5 |
If we back date a journal entry within the date range of a committed bank reconciliation |
The impact of the journal entry should be reflected in the GL Bank balance stored; however, the bank statement amount will need to be updated through a bank adjustment to balance to 0.00. |
|
6 |
The clearing of outstanding cheques or deposits in a period after the to-date of a bank reconciliation |
Will not affect the outstanding cheque and deposit content of a committed bank reconciliation |
|
7 |
The unreconciling of cleared cheques or deposits in a period after the to-date of a bank reconciliation |
Will not affect the reconciled cheque and deposit content of a committed bank reconciliation |
|
8 |
When a user tries to print a bank reconciliation report that has the status “Committed” with a balance not equal to 0.00 |
Acumin will not generate the report and instead will provide an information message to the user advising that the GL balance was modified with a non-reconcilable item after the bank reconciliation was committed. To re-balance the bank reconciliation and print, the user will have to update the bank statement balance by completing a bank adjustment. |
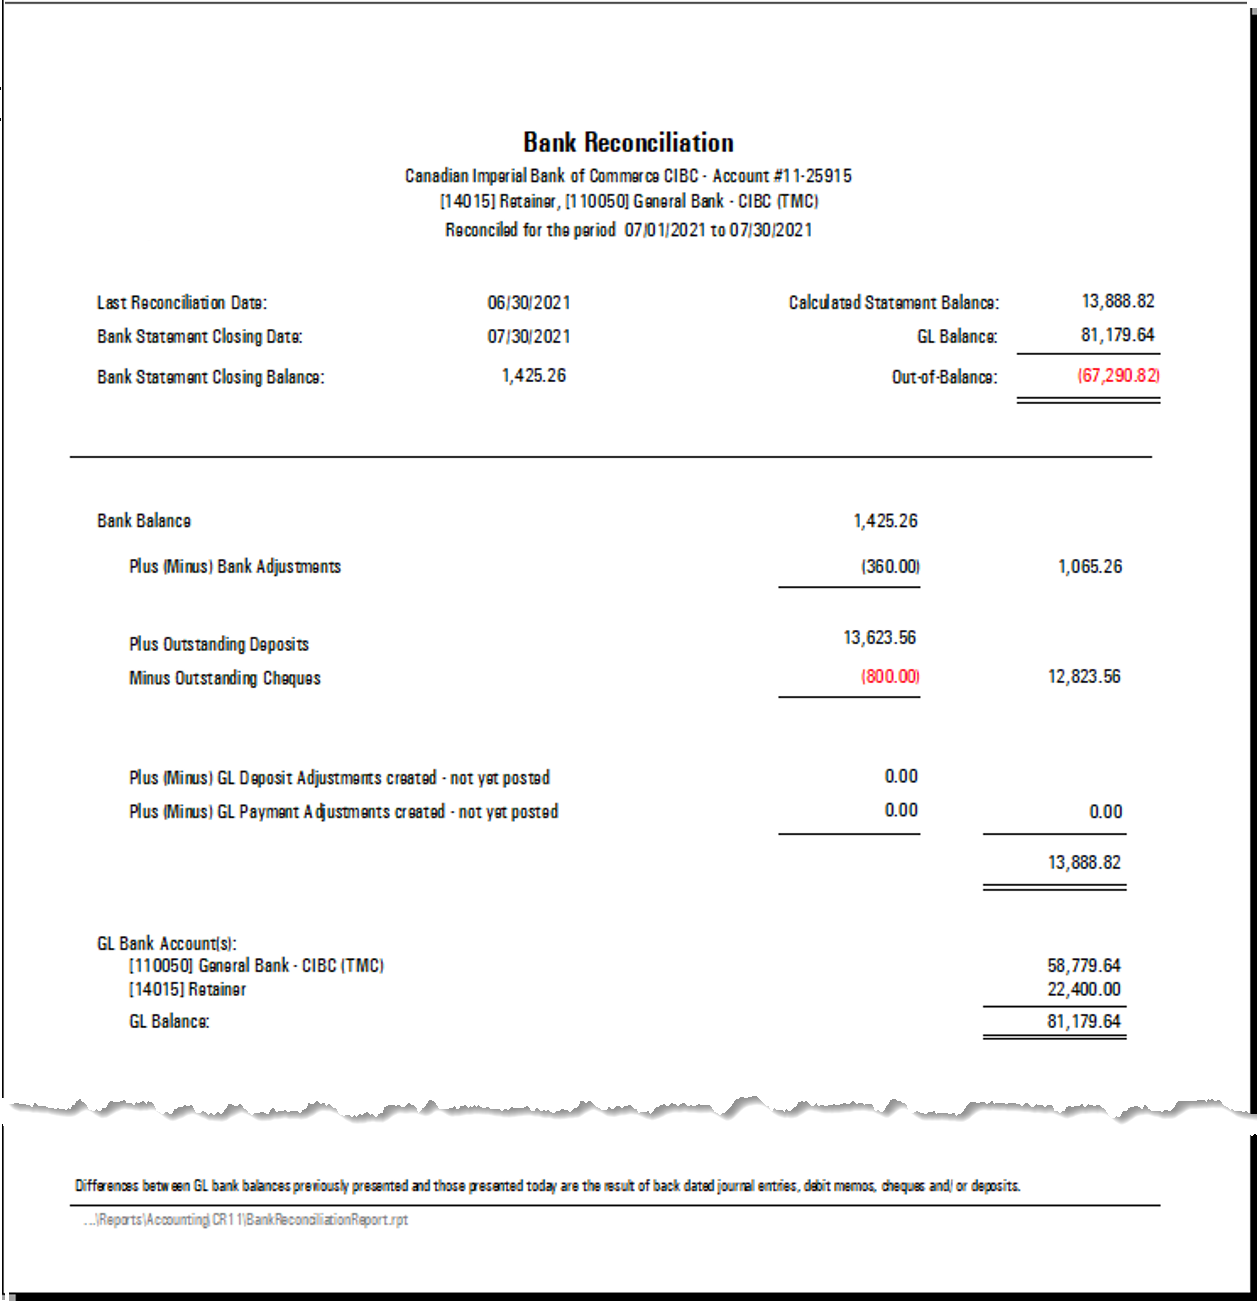
The Bank Reconciliation Report
RELATED DOCUMENT:
Bank Reconciliation Process - Cheque Clearing Process Only - Quick Start
How to print the Cleared Cheque or Deposit List of a Bank Reconciliation