.png)
Overview
The following provides accounting personnel with a brief introduction to Payable functionality and supporting processes, which can be separated between the AP voucher phase and the payment- conclusion phase.
Accounts Payable Process
The Accounts Payable Form – Invoice Entry
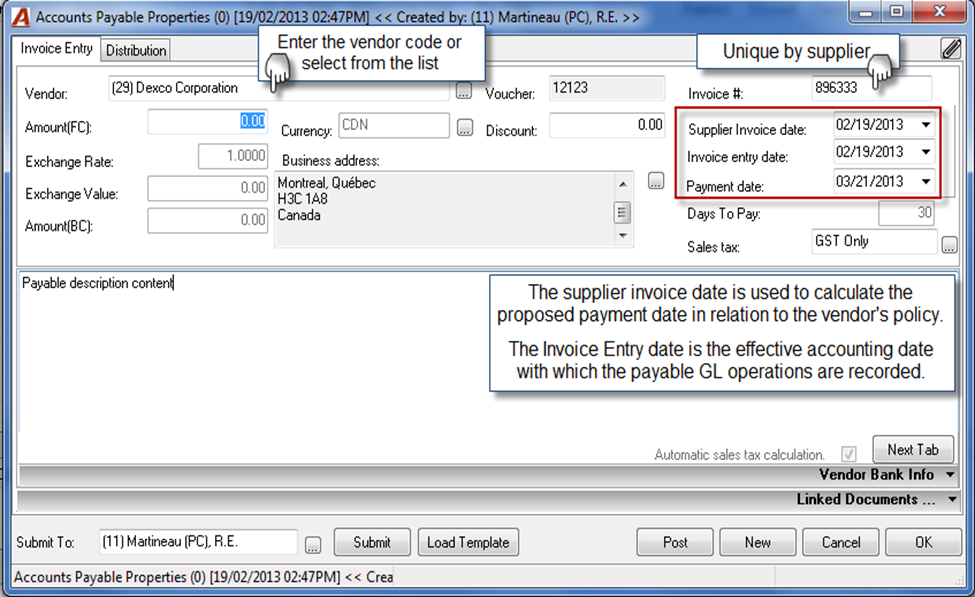
Vendor: Enter the vendor code or select the vendor from the list;
Invoice #: Enter a unique by supplier invoice number
Amount(FC): Enter the total amount of the payable in the currency invoiced by the vendor;
Currency: Will default to the organization’s base currency. If licensed with Foreign Currency, the user can select the currency of the payable invoice;
Supplier Invoice Date: Enter the date on the supplier invoice as this is used to calculate the proposed payment date in consideration of the vendor’s payment policy (i.e. 30 days);
Invoice Entry Date: Typically left as the current date as the latter is used to date the accounts payable GL operations;
Payment Date: Calculated in consideration of the vendor’s payment policy (i.e. 30 days) and the “Supplier Invoice Date”. The user can override the day in which case the “Days to Pay” is re-calculated;
Days to Pay: Defaults to the number of days in the Vendor’s payment policy found within vendor properties. If the user overrides the value, the payment date will be recalculated;
Sales Tax: Defaults to the sales tax scheme found within vendor properties. The user can override the default based on the sales tax included on the supplier invoice.
The Accounts Payable Form - Distribution
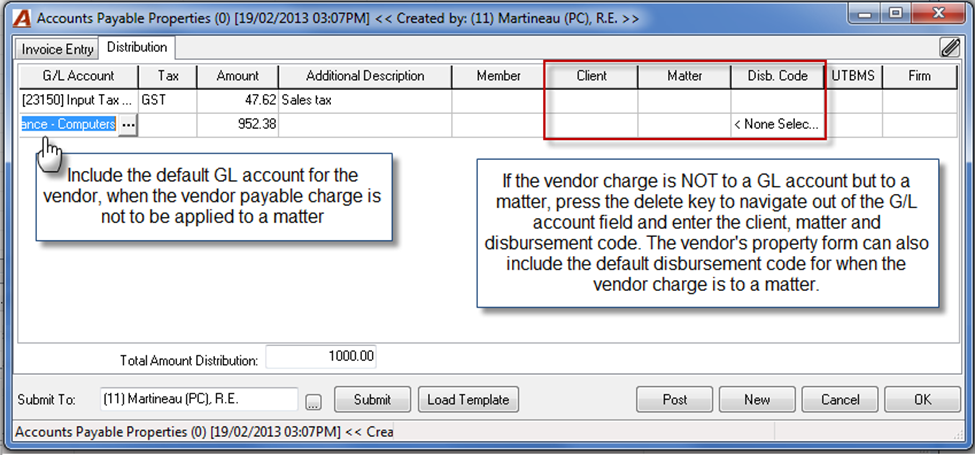
If the “Automatic sales tax calculation” check-box on the “Invoice Entry” tab is checkmarked ON, then the application will auto-calculate the sales tax in consideration of the sales tax scheme selected and list the alter as first distribution line(s).
-
The first row(s) will list the auto-calculated sales tax;
-
If the vendor’s property form has a default GL account when the vendor charge is not to a matter, the latter will list in the G/L account column with the amount net of sales tax (if any);
-
If the charge is partially to the default G/L account tab to navigate to the amount cell and override the amount field as needed;
-
A member code must be entered into the member field. Enter the member that authorized the charge;
-
Tab or arrow down to create a new row. The application will auto-calculate the remaining balance;
-
If the remainder of the charges are to a matter, press delete to navigate out of the G/L account cell;
-
Accept or override the amount field;
-
Complete the member, client and matter fields;
-
If the vendor’s property form has a default disbursement code when the vendor charge is to a matter, the latter will list in the disbursement code column;
-
The firm column displays the firm of the matter or GL account. In multi-firm environments with inter-firm logic this visual is useful to ensure that the charge is being applied to the right firm or to know the firm of the matter;
-
The distribution tab can have many rows with charges to G/L accounts and or matters however the sum of entries must balance to the total payable on the “Invoice Entry” tab in order for the user to be able to post.
Note: As with quick payments, in order to post an accounts payable voucher all of the environment variables, firms and GL accounts in use must be in good standing.
Accounts Payable – Filter Options
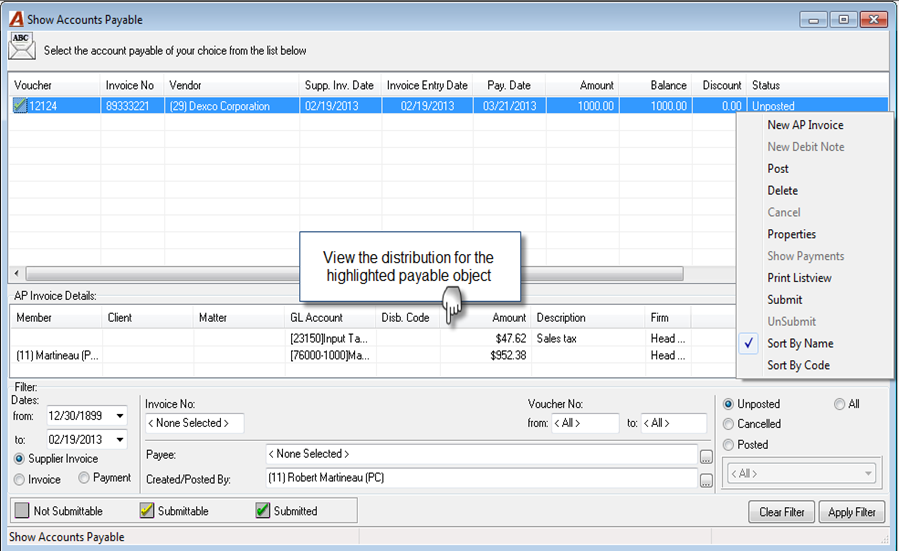
The “Show Accounts Payable” form will launch with the list of un-posted payable invoices in progress, however the authorized user can apply multiple filter options to find and drill through to posted outstanding and fully paid payable invoices and related objects (debit notes and/or payments).
Account Payable Payments
Once the payables are entered, the next step is the production of AP cheques or AP Debit Memos (used to record direct payments or bank transfers).
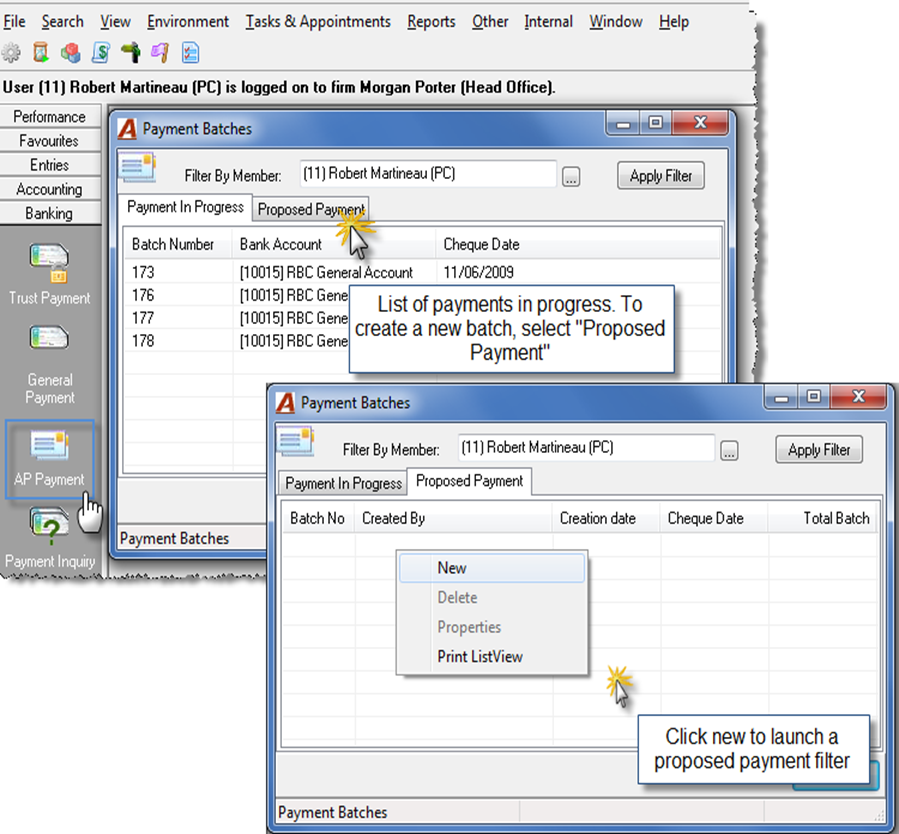
Completing a Payment Batch
-
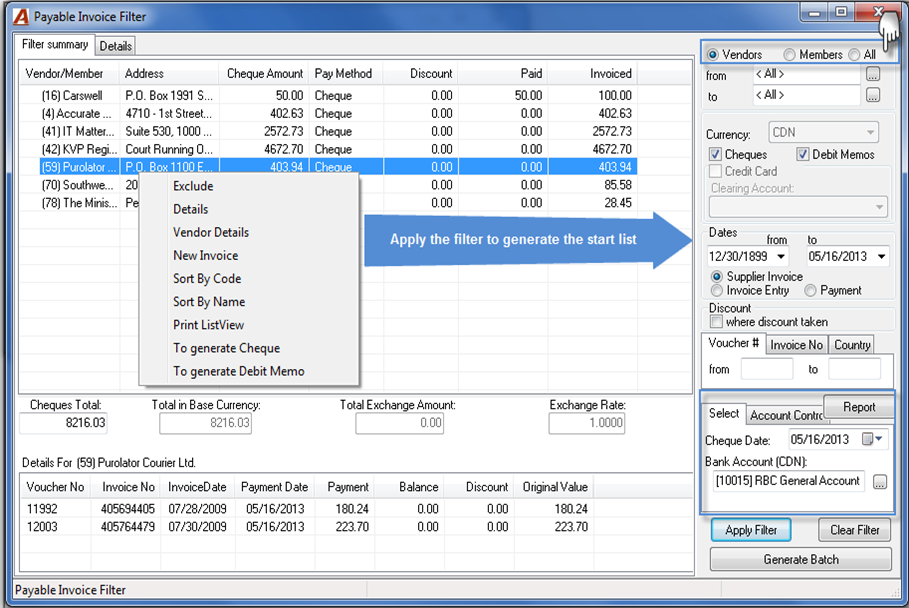
The authorized user can issue AP payments for vendors and members simultaneously by selecting “All”;
-
Use the filter options to generate a starting list. This is a cumulative filter, therefore as a new filter option is applied to the proposed payment the execution of the “Apply Filter” button will add relevant records to the filter summary results;
-
Right-click Contextual Menu options:
-
Exclude high-lighted selections from the proposed payment batch to defer payment;
-
Access the details of the proposed vendor payments (i.e. individual invoices) to remove specific invoices or enter partial payments; o Access the vendor details – the vendor properties form;
-
Highlight a vendor and select “New Invoice” to simultaneously create a new payable invoice and add it to the proposed batch. If a vendor is not selected the user can enter any vendor with the same outcome;
-
Sort by Code or Sort by Name allow the user to change the manner in which the filtered results are sorted;
-
Multiple select and select to generate cheque or to generate debit memo and change the current payment method.
-
-
Access the Account Control sub-tab to view the effect of the proposed payment of the selected-bank-account's current position;
-
Post-date the cheque date if needed;
-
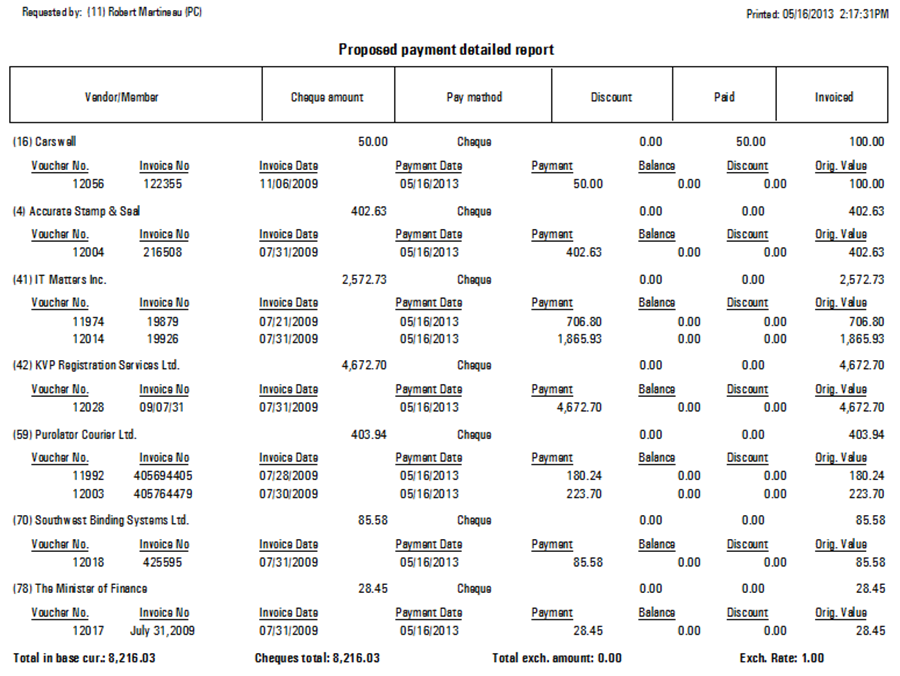
Press the report button to generate the “Proposed Payment Detailed Report”
-
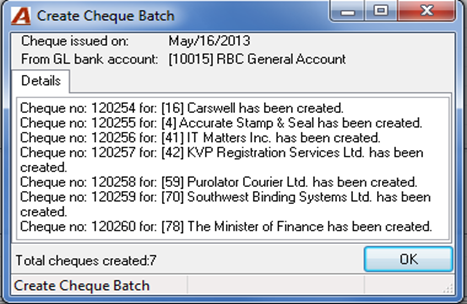
Press on “Generate Batch” to create the AP Payments. On OK the application will launch the list of cheques and/or debit memos for the user to print and post.
Completing the Cheque Batch
-
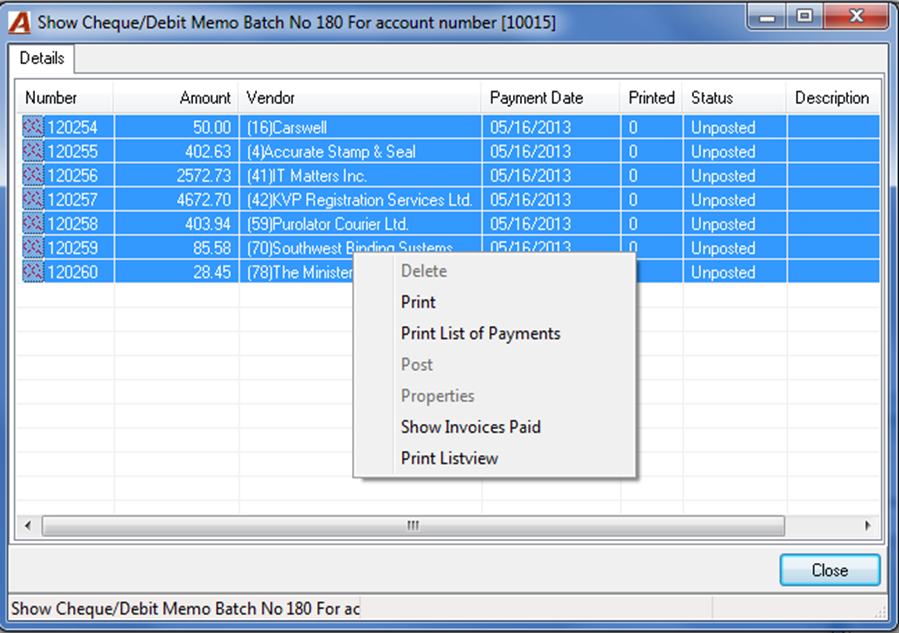
Make a single selection and right-click to access the “delete” option. If the cheque is not printed it will have the status “Void” else “Destroyed”;
-
Multiple select to print the entire batch at once;
-
Print the list of payments to attached to the cheques when preparing the batch for signature;
-
Once the cheques are printed, the authorized user can multiple select them in order to post them;
-
Make an individual selection to access the payment’s properties;
-
Select “Show Invoices Paid” to access the properties of the corresponding payable invoice(s);
Until all the cheques are posted the batch will remain visible and re-accessible from within AP Payments – Payments in Progress List-view. Once the payments are posted, they remain accessible through the “Payment Inquiry” option found within the “Banking” task section of the task bar.
Payment Inquiry
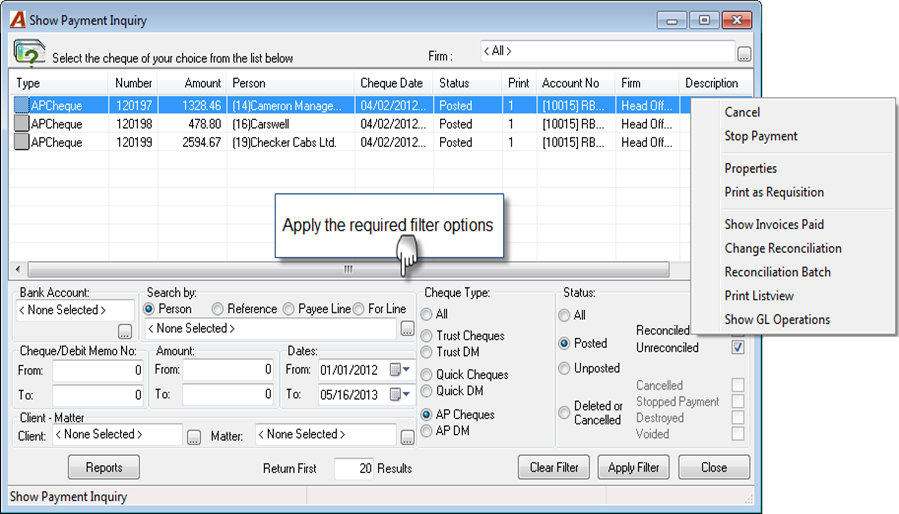
-
Apply the required filter options to narrow the scope of the results;
-
Select a payment and right-click to cancel it generate a stop payment. A stop payment generates the same GL Operations as the cancellation but at the same time it pre-sets the action as a stop payment for a more granular classification.
-
Make an individual selection to access the payment’s properties;
-
Select “Print as Requisition” to generate the payment-object’s information in requisition format;
-
Select “Show Invoices Paid” to access the properties of the corresponding payable invoice(s);
-
Make an individual selection to Change Reconciliation status back to un-reconciled;
-
Select “Reconciliation Batch” to start a cheque clearing batch;
-
Select “Show GL Operations” to access the payment’s GL Operations.
RELATED DOCUMENT:
Vendors - How to create a new vendor with the Vendor Wizard | Acumin Documentation