.png)
Scope and Purpose
The purpose of the personalized reports functionality is to facilitate secured self-access and use of reports by its recipients.
Its scope extends across expediating the creation and assignment of personalized reports in context of selected filter options and security requirements for intended recipients, for ease of use once on the recipient’s list.
Context
Acumin’s report engine is a powerful and flexible reporting tool designed to provide the firm with out-of-the-box key measures across relevant reporting dimensions, for decision makers to gain insight across the enterprise. Offering various degrees of granularity for a multitude of measures and metrics, the reporting engine allows for quick and flexible report outcomes at an operational, tactical, and strategic level providing real-time and near-real-time data-access solutions that ensure the reports are not only timely, but also accurate.
To eliminate the need for users to manage complex reporting dimensions, filters, and options offered for the slicing and dicing of measures and metrics; most reports can be personalized and deployed pre-set with intended context and perspective in context of the end-user’s security requirements. As a result, the end-user will benefit from ease use and self-access from Acumin.hub’s custom tool bar and for some reports, from their Acumin.web session.
Highlights
Overview
The personalized reports’ tool allows authorized users to create and save most reports with pre-set filter decisions and optional content, to eliminate redundancy each time the same decision points for the report are needed. When personalized reports are made accessible to otherwise non authorized users, it simultaneously addresses security and generates intended pre-defined content, while granting a more efficient self-access delivery process for regularly used reports.
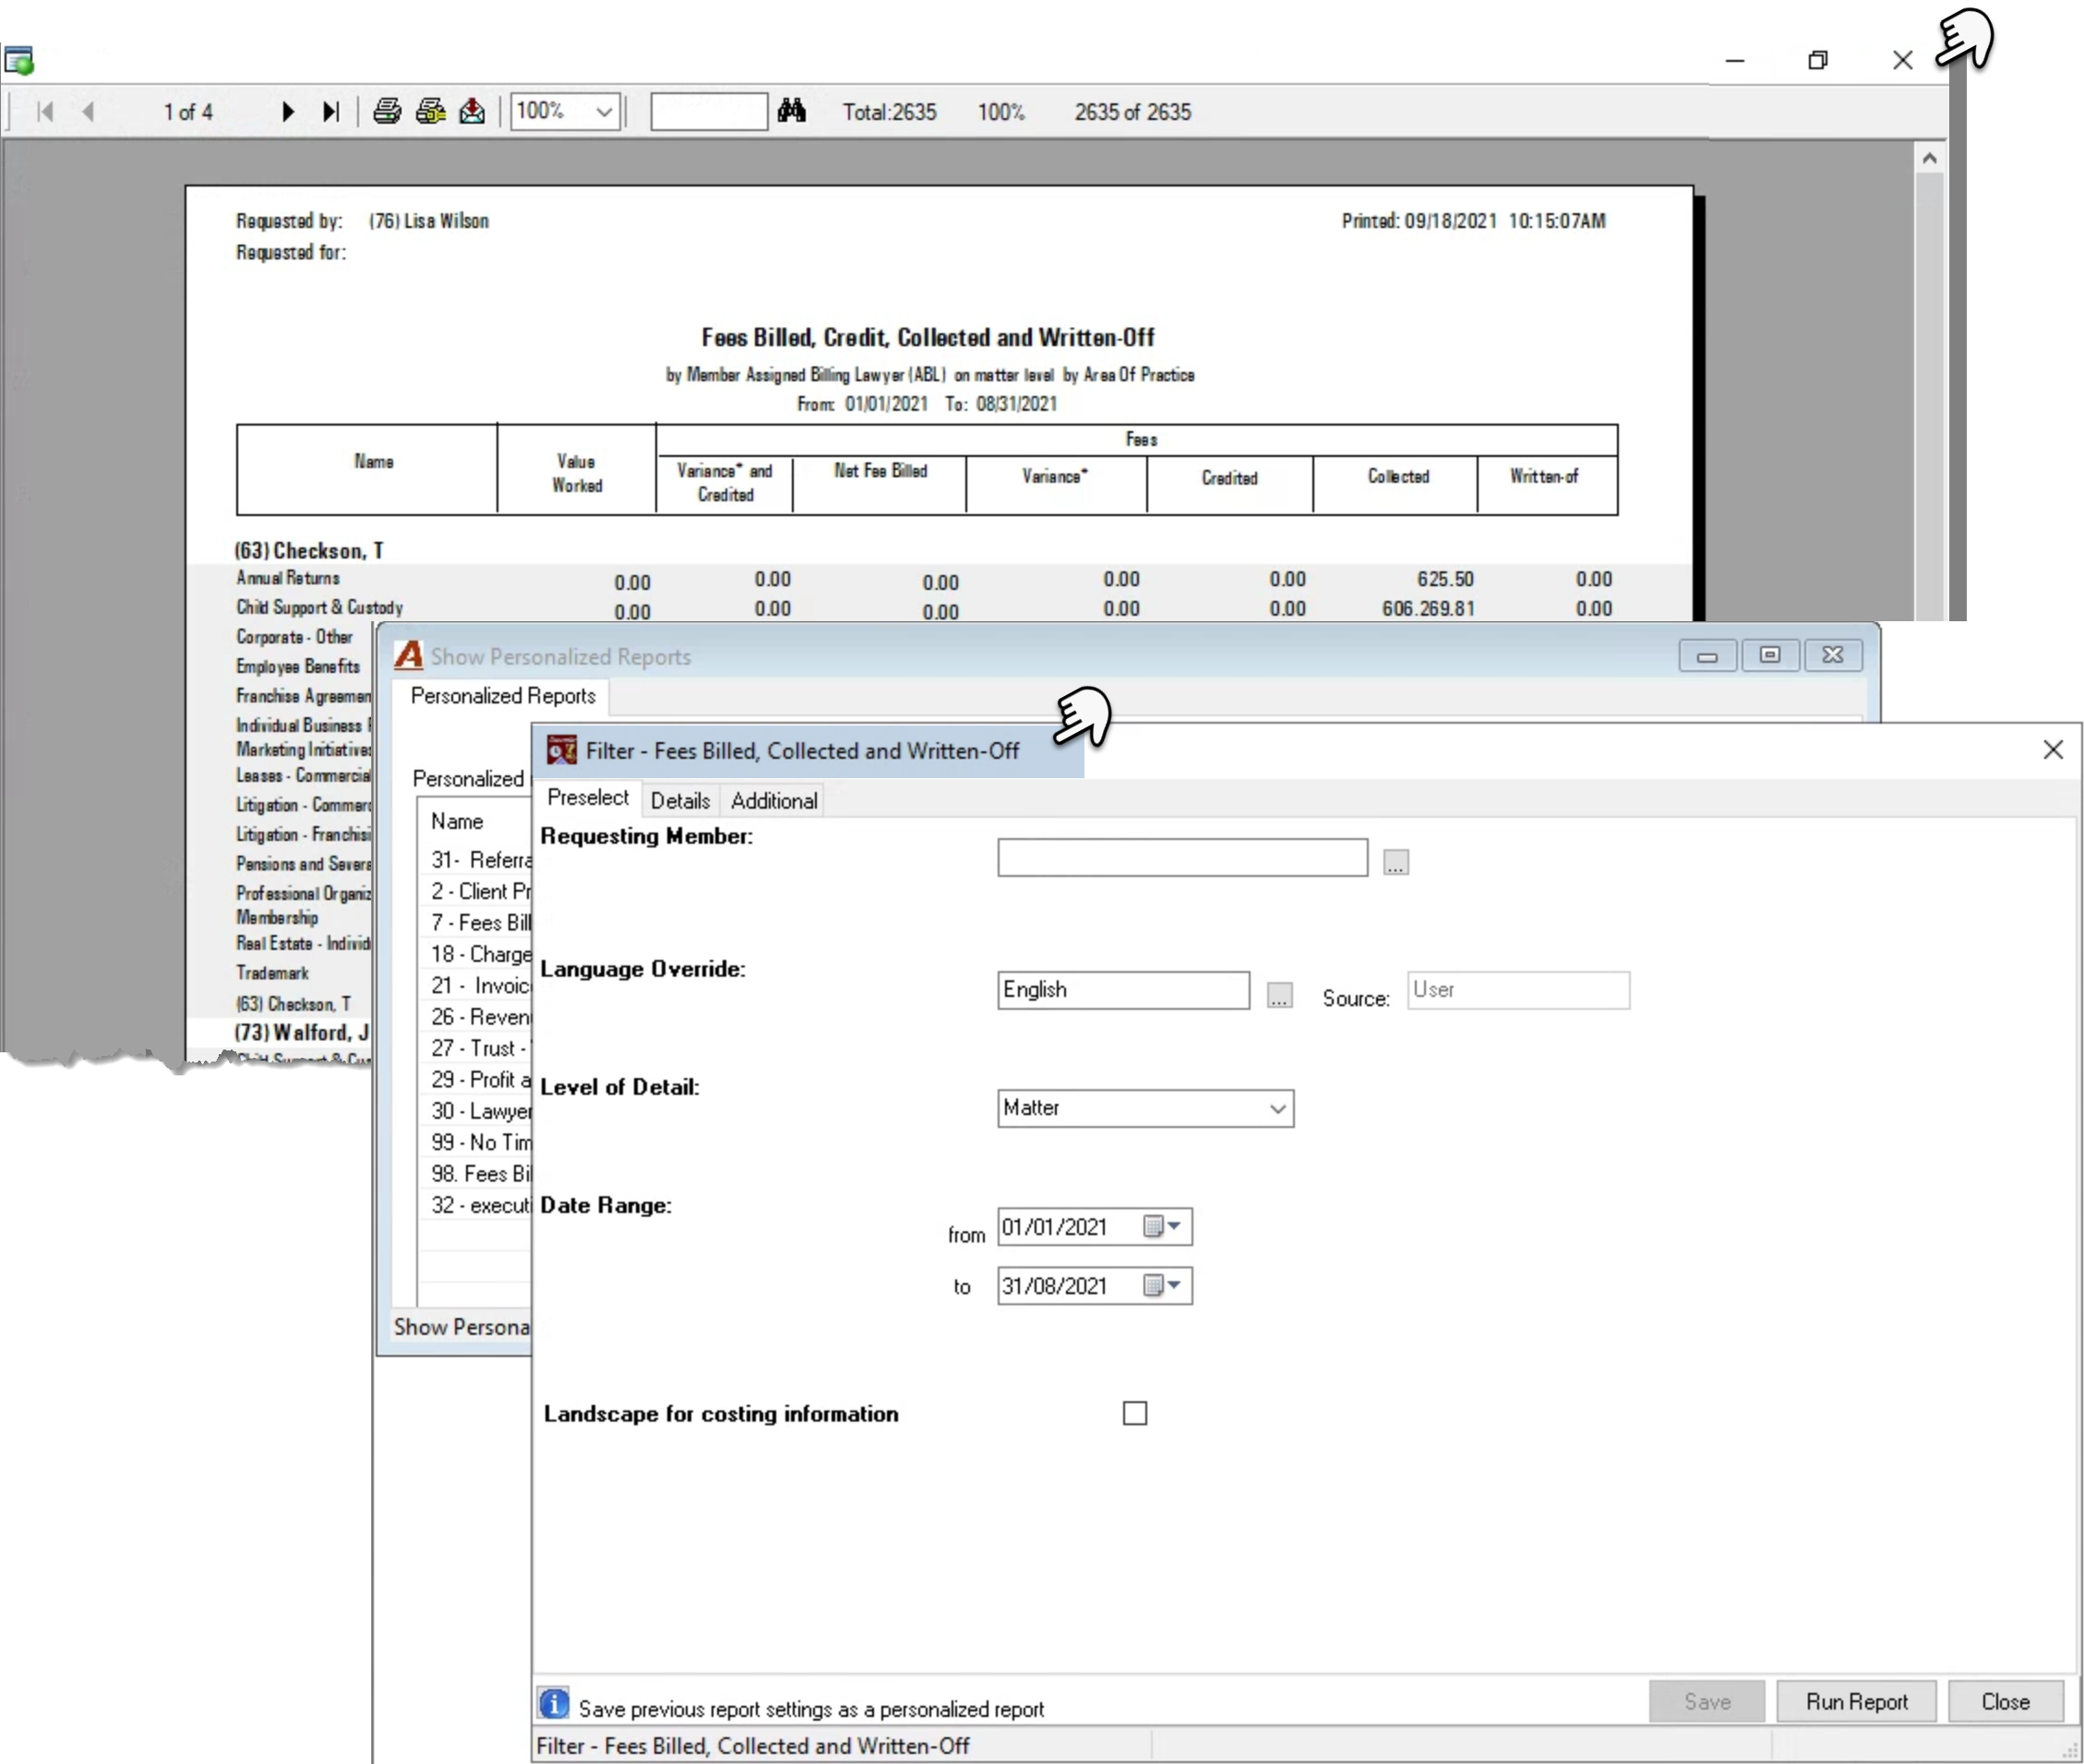
End users are able to access pre-set reports included in their personalized reports’ list easily, without having to manage complex filter options or risk compromising security requirements. For example, it is possible to build the “Fees Billed, Collected and Written-Off” report by assigned billing lawyer so the end-user with limited security will only be able generate the report for himself as assigned billing lawyer, but others with broader security may be able to generate the report for other assigned billing lawyers.
Access can also be extended to “Assistants” using the “Works with Relationship”, which allows the assistants to generate the report for the associated member’s permitted result only.
Filters and Visibility of Results
The ability to create personalized reports extends to most reports using the following filters:
The Multi-Dimensional Filter: Used for most productivity and management report options, this filter offers the member reporting dimension and can be controlled so each end-user sees only their own measures.
Member Activity Summary Filter: Used for multiple member-based, member activity type reports, this filter has the member as the reports’ detail. For this reason, these reports can also be controlled so each end-user sees only their own measures.
Financial Statement Filter: Used for any firm-defined financial statement or schedule, this filter does not include a direct member context. You can expect that the report will present the measures without any consideration for member.
Accounting Filters: Used for most accounting registers and subledgers. You can expect that the report will present the measures without any consideration for member.
Summarised Process
The bullet points that follow summarize the steps to create and use personalize reports:
-
Ensure you have the authority to create and manage personalized reports as well as security for all reports you will be working with.
-
Complete the report filter for the personalized report you will create in consideration of the needs of the intended end-user. At this point the date-range you set is only important to provide confirmation of context and perspective.
-
If the report is to be member specific, leave the member field as <none selected> as this field is controlled by the permissions given to the end-user. Please see details to fulfill this requirement.
-
Execute the report. Confirm context and perspective in consideration of permission decisions you will be making for recipients.
-
Close the report to return to the filter and press save to launch the “Custom Report” form.
-
Enter a name and description and drill through to set the best default date range for the end user so the right date range is calculated every time the user executes the report.
-
Access the permissions tab and right-click to select “New” to add yourself to the list. As you have security for the report, you do not need to complete any additional permissions to manage it in the future
-
Right click to select “Add User Groups” to add many recipients to the list at the same time or use “new” to add individual ones. Unless they are assistants, most of these users should have no additional permissions.
-
Press OK to accept and see the end-users you included on the permissions tab. Confirm the permission needed at this level. Please see details to fulfill this requirement.
Security:
The Creator
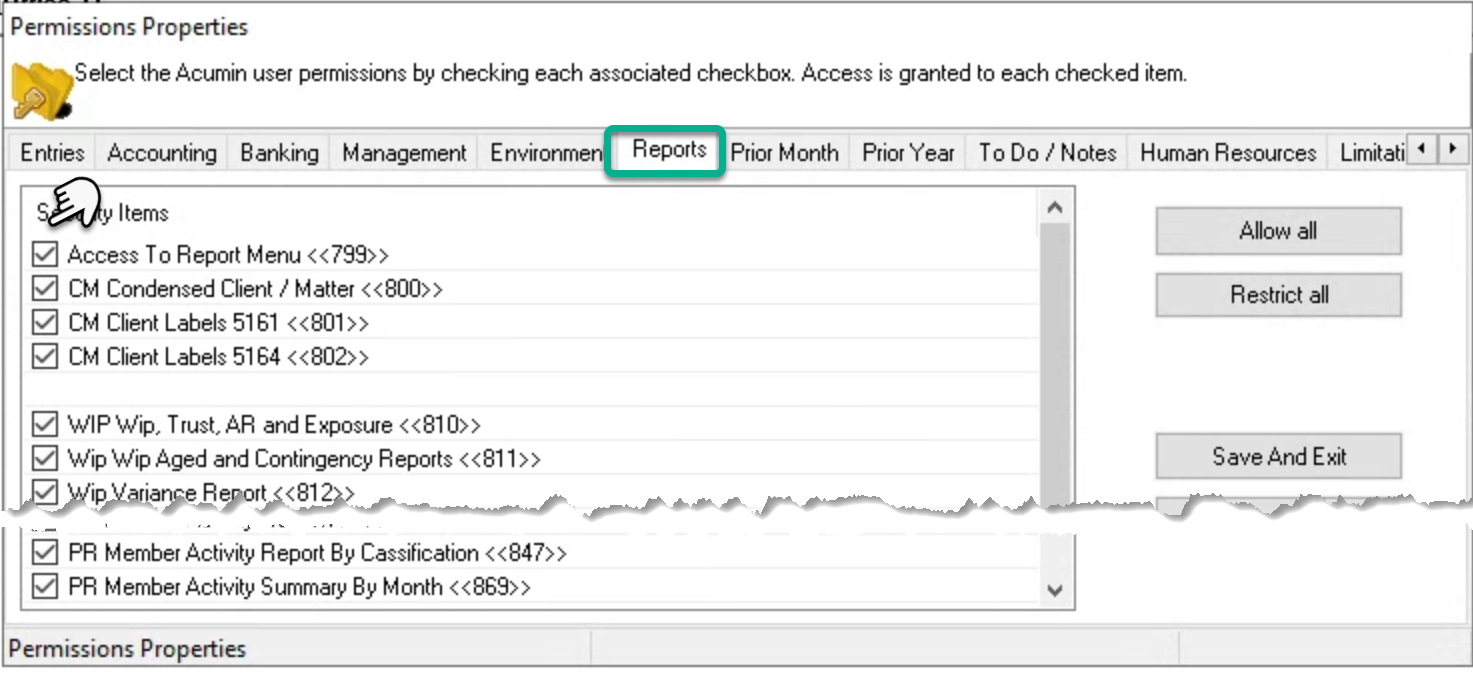
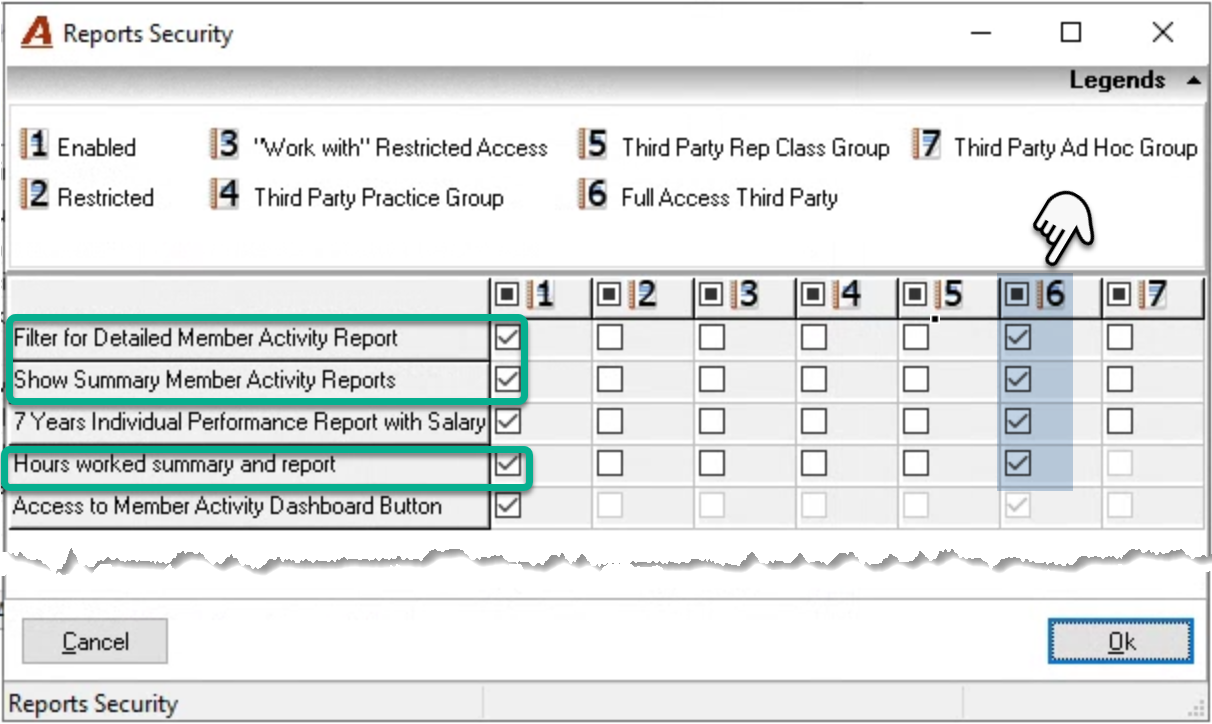
The creator, the person responsible for the management of personalized reports, requires permissions for “Package and Personalized Reports – Creation and Assignment <<880>>”, as well as permission for all reports offered in the permission properties form, and permissions 1 and 6 on the report’s security form for member activity reports.
The “Permissions Properties - Reports” tab and the “Reports Security” form launched from the “Special Report Permissions” button, are accessible from your security group’s properties.
Users
Limited to their Own Measures
Security Group and Individual Security
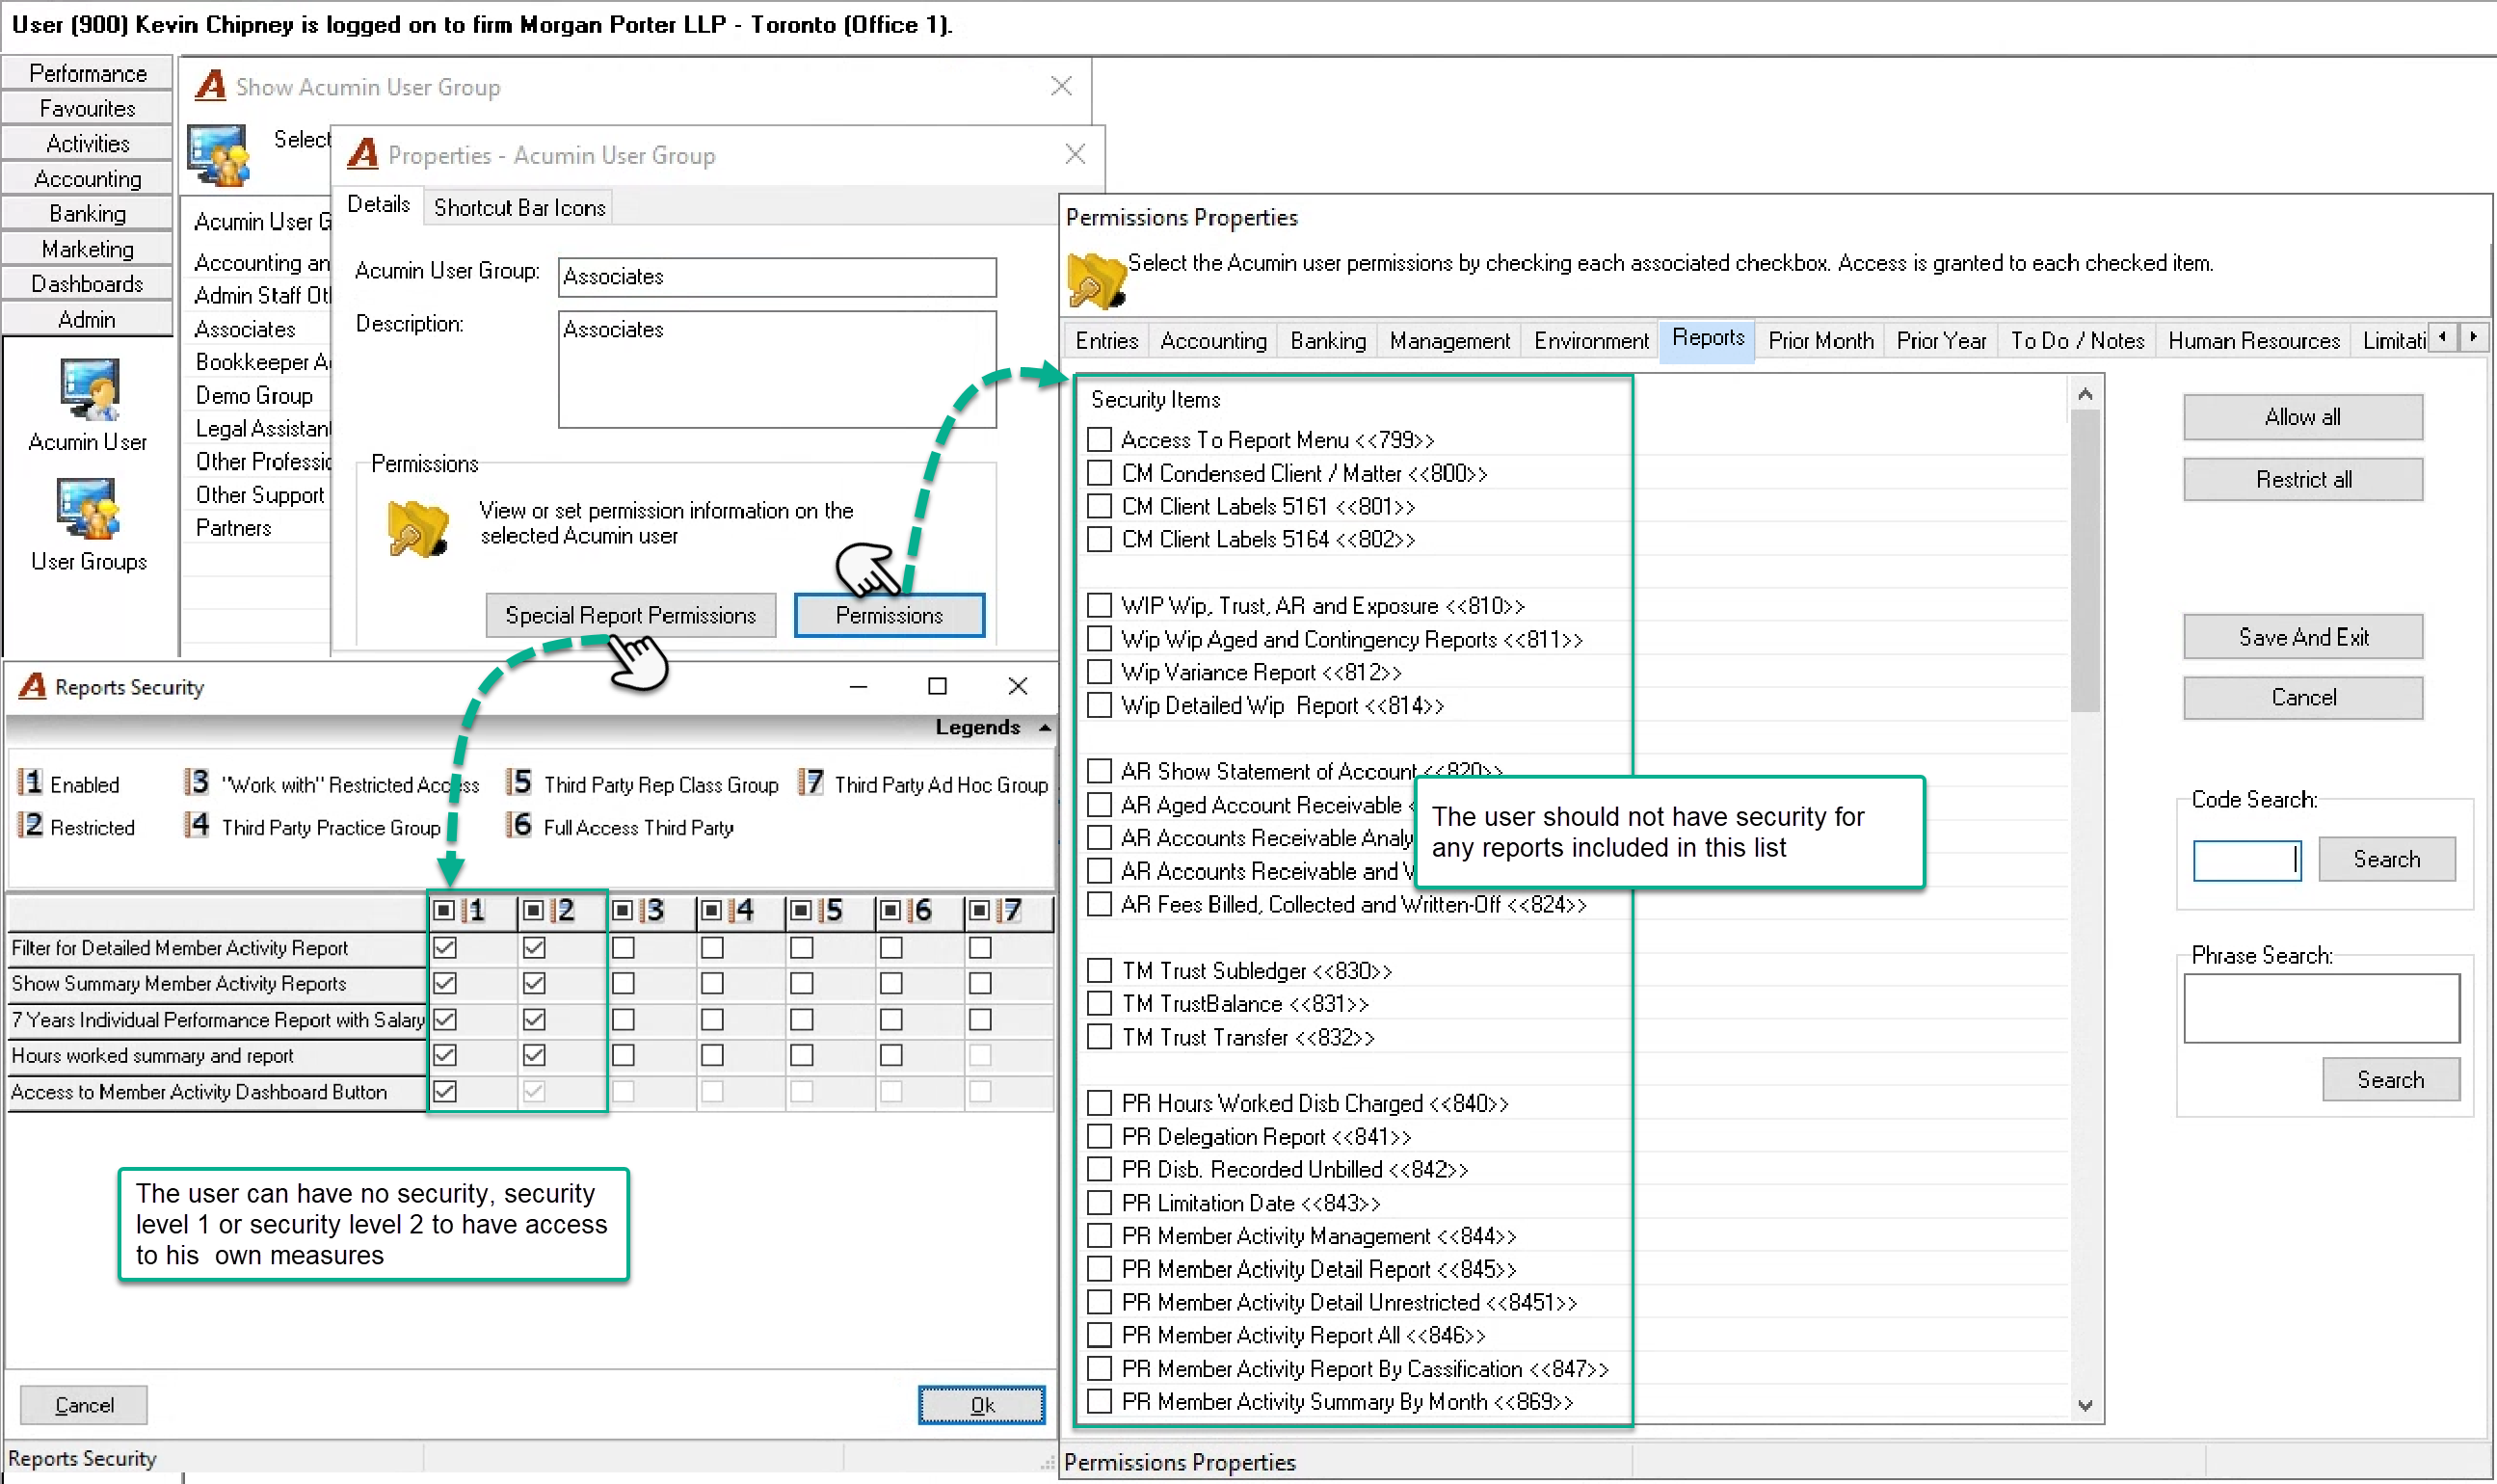
To limit access to filter options other than date and to member-based measures of others, ensure that the affected user’s security group or the user individually, is not granted security:
-
Package and Personalized Reports – Creation and Assignment <<880>>,
-
Any report security options granted through:
-
Permissions Properties – Reports tab. or
-
Reports Security with a value greater than 2.
-
Personalized Security
Security for personalized reports is granted per report, from within the “Custom Report” form - “Permission” tab for the report being personalized.
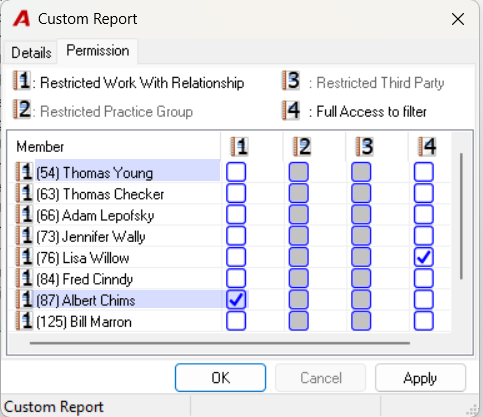
If no security level is assigned, for example (54) Thomas Young, the listed member will have native restricted access to the report, in which case each member only has access to a simplified date filter form along with his or her results when the report includes the member as a reporting dimension.
Typically granted to assistants, (87) Allen Chim, the “Restricted Work with Relationship” allows the bearer access to the same report-results and filter options as those afforded to the member with whom he or she has the works with relationship. For example, if an assistant works-with two members, he or she will have access to report on the measures for those two members.
Pre-set Filter Options with Ability to Change Them
Security Group and Individual Security
To limit access to filter options other than date, ensure that the affected user’s security group or the user individually, is not granted security:
-
Package and Personalized Reports – Creation and Assignment <<880>>,
-
Any report security options granted through:
-
Permissions Properties – Reports tab. or
-
Reports Security with a value greater than 2.
-
Personalized Security
Security for personalized reports is granted per report, from within the “Custom Report” form - “Permission” tab for the report being personalized.
“Full Access to Filter”, (76) Lisa Wilson, provides full report security, therefore it will save the pre-set filter for ease of use, however the bearer does have access to the complete filter and all its reporting dimensions.
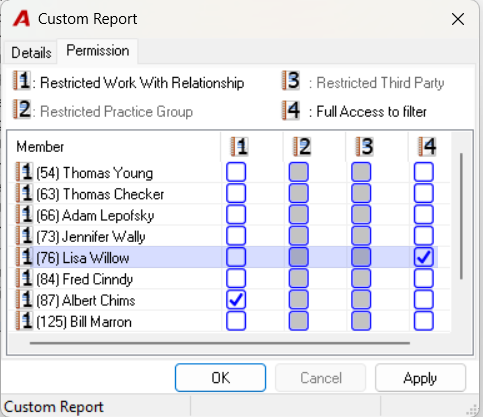
Shown but intended for future use (not yet implemented)
The “Restricted Practice Group” will allow the bearer the ability to produce reports pre-set with member and/or practice group reporting dimensions, with results that includes all members that are in the member’s practice group.
The “Restricted Third-Party Access” will allow the bearer the ability to produce reports pre-set with member and/or practice group reporting dimensions, with results that includes all members and practice groups but without access to the complete filter.
End-Users with Report Security
Users with report security granted through the “Permissions Properties Reports” tab, often create personalized reports for themselves to save the need to manage filter options for recurring use-cases. As the report security will take precedence over the personalized permissions granted, it is not required for users with report security to also have any level of personalized permissions.
Best Practice Consideration:
As creator you may also want to be an end-user for often used reports and their filter options, therefore most creators establish a label convention so their reports list atop the rest that they manage. As the list orders alphabetically in ascending order, it is typical to separate the personal use-case reports from the others by always starting the name with a value that will be lower than the start value for reports created and managed for others.
Impact of Security 880
Regardless of the security level assigned in the Permission tab within the Custom Report form, members with permission “Package and Personalized Reports – Creation and Assignment <<880>>” or “Administrator” rights will see the traditional report filter when running the report, as well as be able to delete and modify the properties of the custom report
Use of an Alternate Database to Explore
To fully understand the level of visibility to end users before making a final commitment, most creators pre-plan and test deployment objectives on one of their non-production databases.
Personalized Reports
Where to Start
Select and execute the first report you will personalize.
Use the filter options to provide context and perspective as required by the end-user.
The date-range you set at this stage, is only important to provide you with confirmation of context and perspective. Users will have a calculated “From-To” date range at the time report is generated, based pre-set options by the creator.
Although the ability to personalize reports extends across most reports for the filters listed in the highlights section, the examples provided are for reports using the multi-dimensional report filter to better highlight the impact of using the member reporting dimension. The other filters also have reports that offer the same functionality with their own context and perspective.
Creation Process
The Member Reporting Dimension
Available and In Use:
If the report is intended for each user to only have access to their own measures in context of the perspective selected (for example as working member or role), checkmark the member reporting dimension and select the perspective but leave the member field as <none selected> as this is controlled by the personalized report permission granted.
Although the member activity type reports do not have the member as the reporting dimension but as detail, the outcome will be the same.
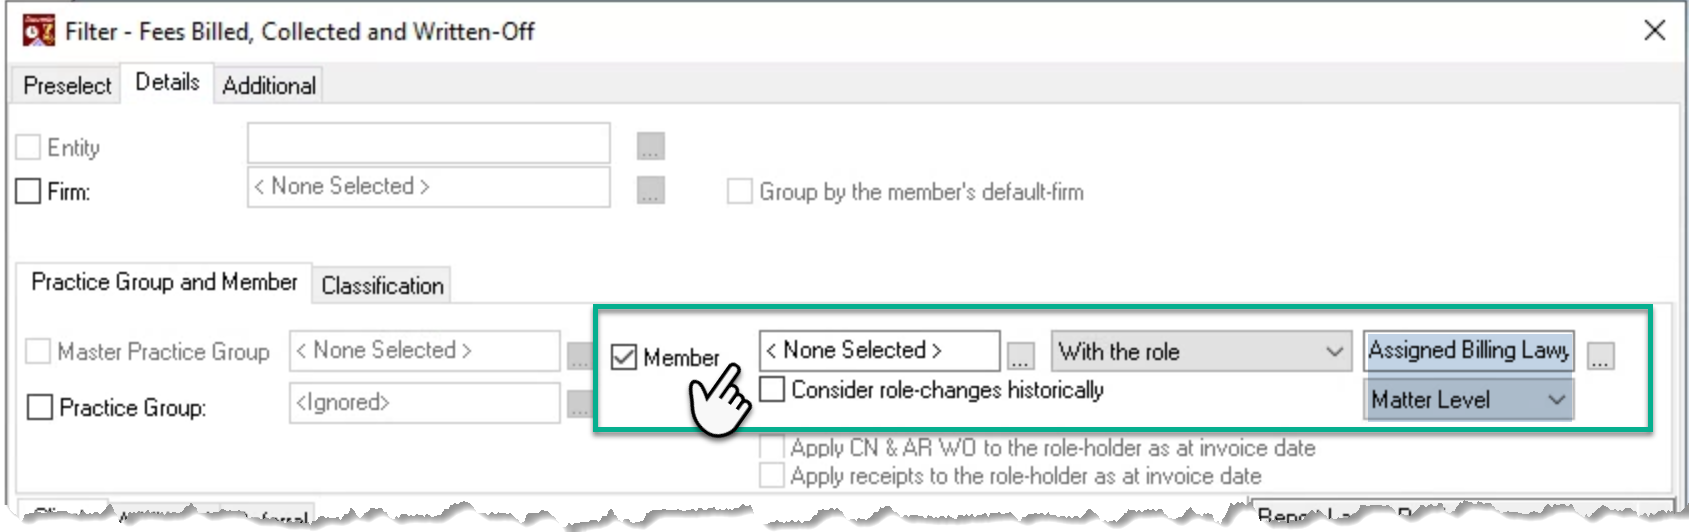
Controlled Result: When the users with no report security or personalized permissions other than none or level 1 produce the report, they will be able to modify the default date range of the report, but they will not be able to change the member content from themselves to someone else.
Available Not in Use or Not Available:
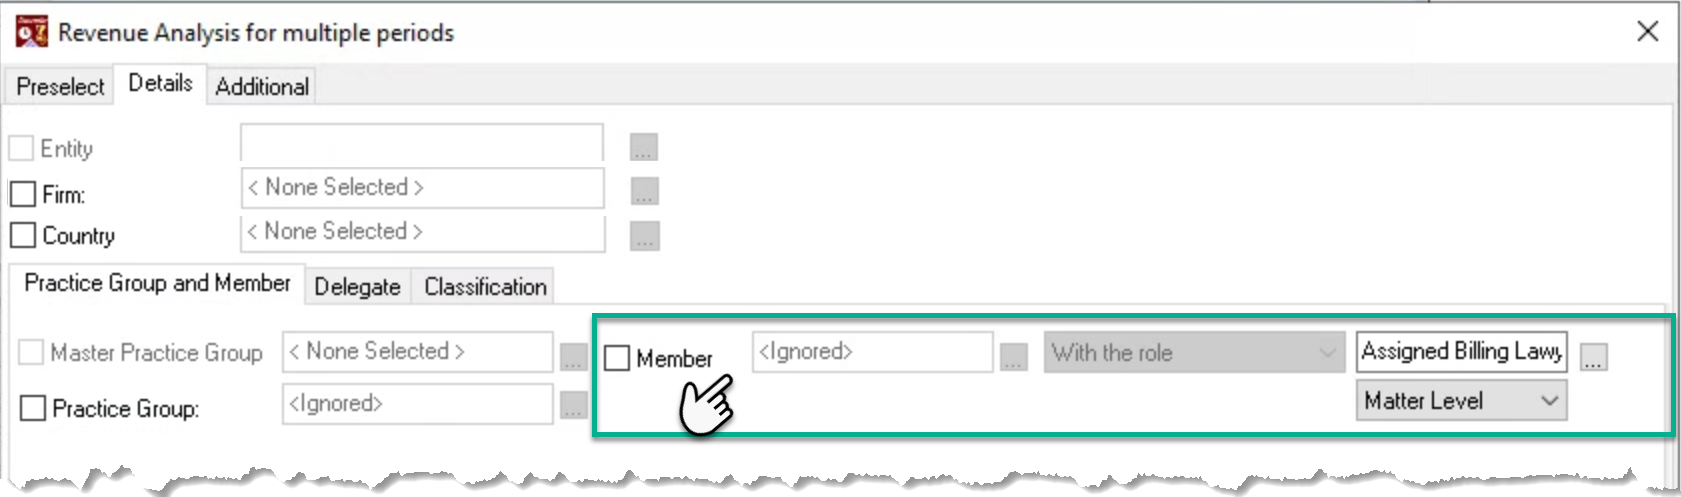
If the report is intended to include measures independent of member, for example summarized by “client group” or “industry”, do not checkmark the member reporting dimension when available.
When the users produce the report, they will see the measures for the whole dimension – for example the “client group” or “industry”, however they will not have access to any other filter options, beyond date range.
You can expect the same outcome for reports where the member dimension is not available, for example a summaried financial statement.
Save
After the report is executed with the required context and perspective, close it, return to the report filter form and press save to launch the personalized report “Custom Report” form, where you will complete the set-up.
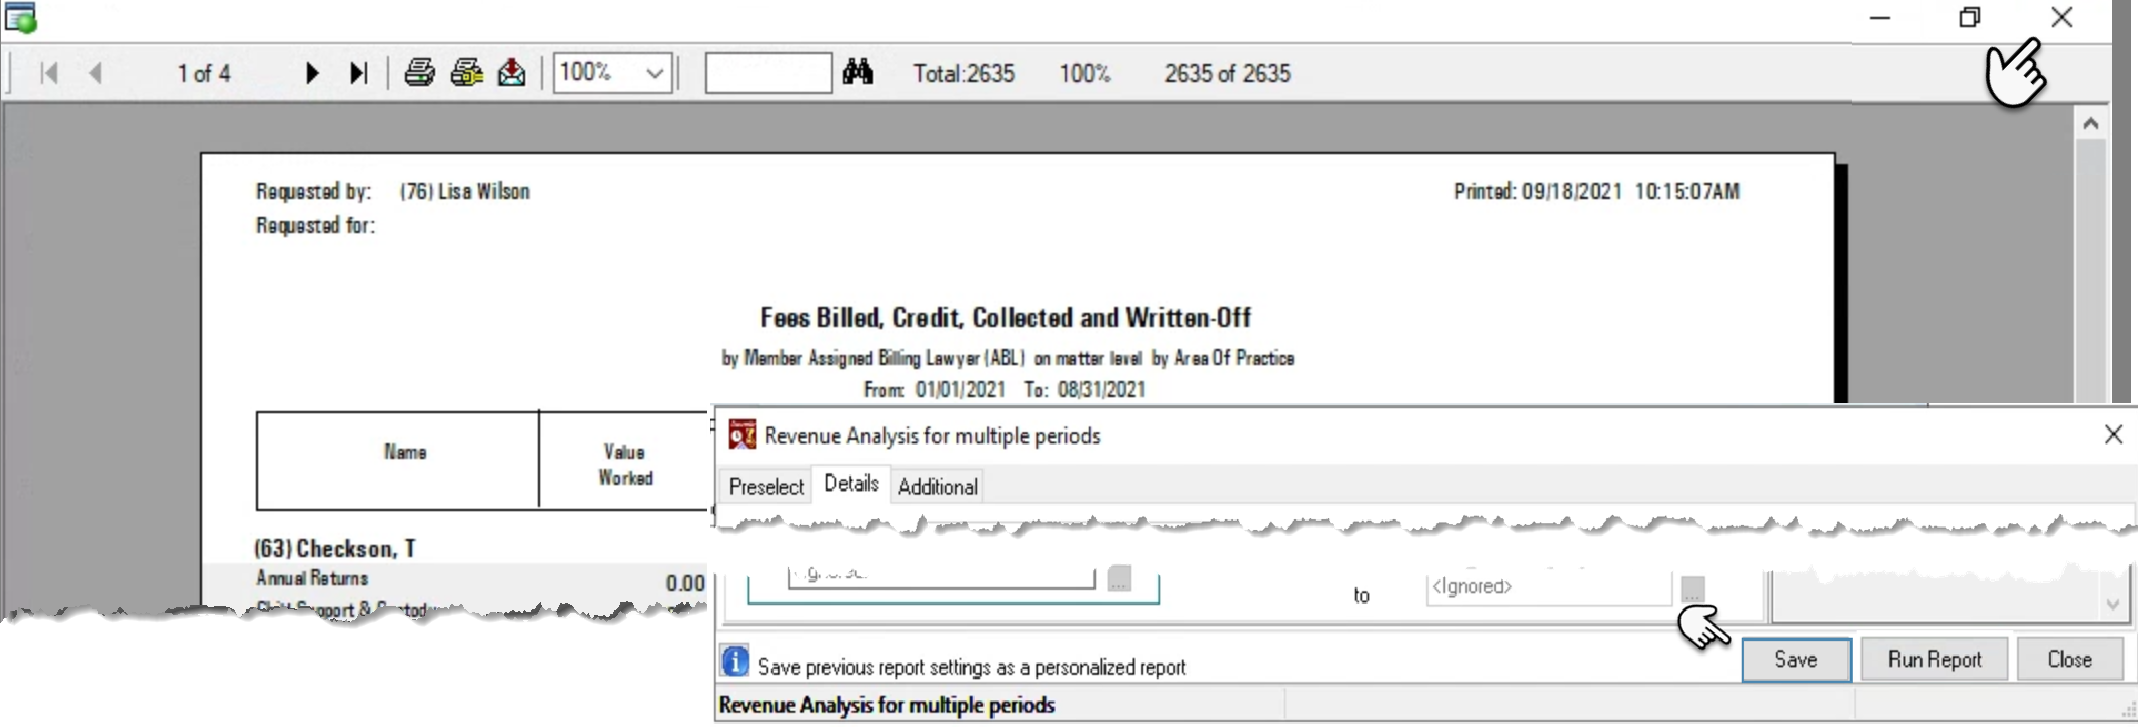
Set-Up – Custom Report Form
Details Tab:
Give the report a name and a description with a label strategy. For example, where all fee-based reports start with “Fees Billed - ….” or a code range 100, 101. Etc.
As creator, consider where you want your personalized reports to show so they are visually separated from the ones you create for others before you finalize your label strategy.
Press on the “Modify the default date range” hyperlink to select the most appropriate default date range for the report so when it is produced by the end user, his or her best-case scenario is launched without the need to modify.
The first three radio button options offer alternatives to the “To-Date” to be calculated if the from date is equal to the first day of the current fiscal year.
The fourth radio button is used to set the “From-Date” as the first day of the current month and the “To-Date” as the last day of the current month
The remaining option applies to reports with double dates
For non-period reports – for example the aged AR – the from date will not be considered.
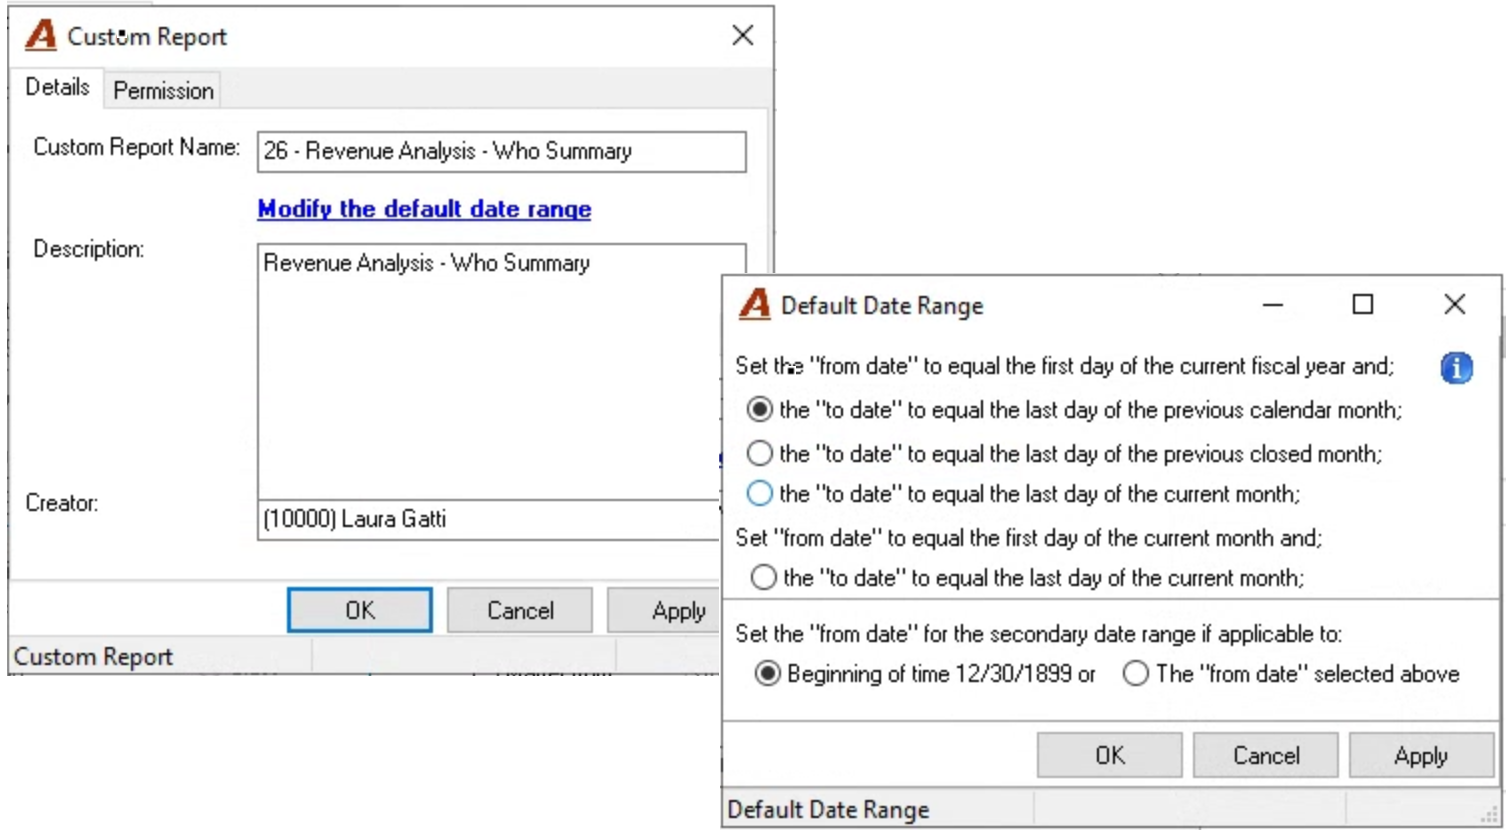
Permission Tab:
The permission tab is used to capture the members that will have access to the personalized reports, as well as to grant a security level to otherwise non-authorized users.
Listed users without a security level, have native restricted access to the report. This means that if the report includes the member as a reporting dimension, members with no security will only have access to his or her results.
Right-click and select:
“New” to add members one at a time.
Use this option to add yourself to the report before you add anyone else if you are responsible to manage the personalized report’s content and end-user assignment. This will ensure you have continued access to the report’s set-up properties to complete tasks like change of filter options to re-save the report, and/or add/remove end-users.
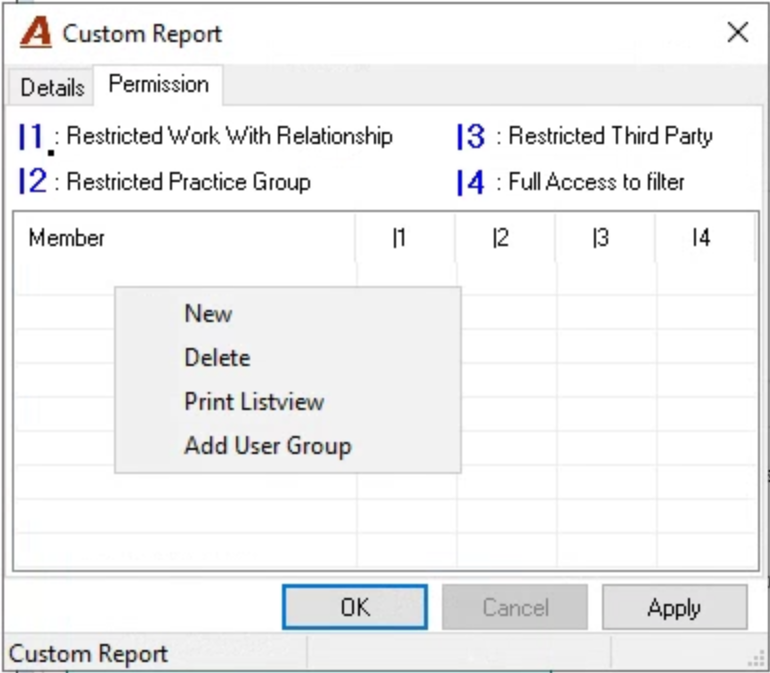
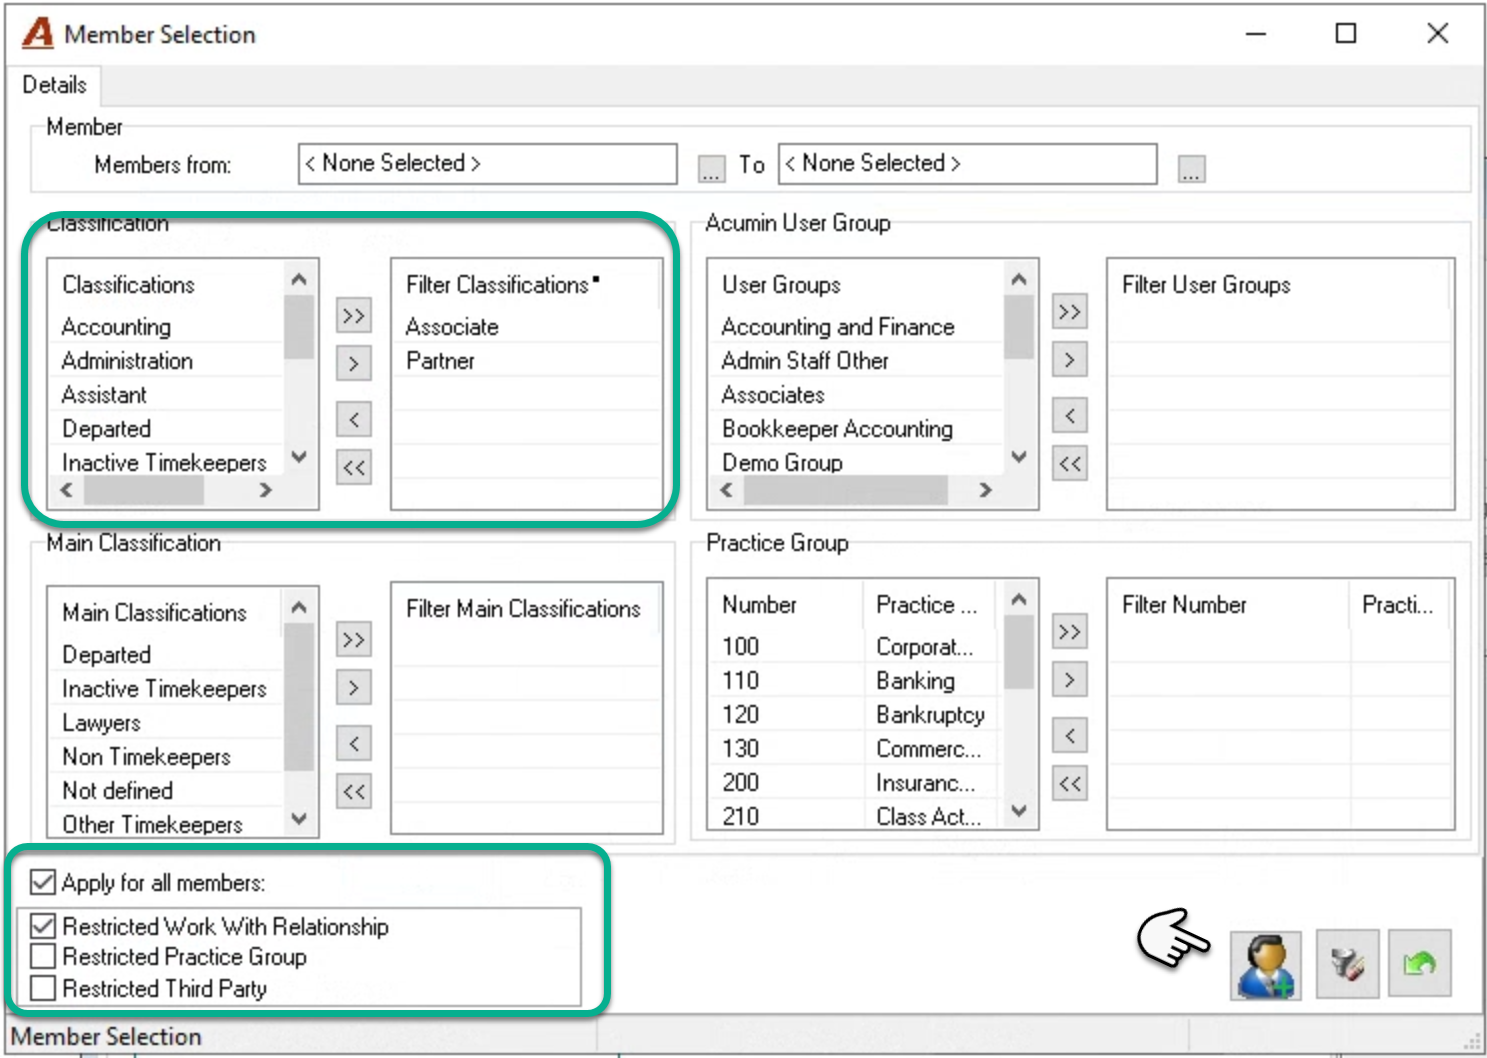
“Add User Group” to launch the “Member Selection” form, from where you will be able to add multiple members as end-users at once. This is a cumulative end-user list builder that adds members to the list based on attributes like reporting classification, Acumin user group, main classification, or practice group. You can also add members based on a member code range.
The Member Selection Form:
Use a member attribute to build your list and apply the required permission – bottom left. For example, use of Classification allows us to build the list so it includes associates and partners as end-users.
Combine more than one attribute to reduce your list. For example, combine the Classification with the practice group to get a list of associates or partners, within the corporate commercial practice group as end-users.
Press on the execute list button – first button, bottom right – to return to the permissions list which will be populated with the members selected and their assigned security.
Make any modifications to content and security, including adding new members through “New” or “Add User Groups” to further build your list. For example, after you combine the Classification with the practice group to get a list of associates or partners, within the corporate commercial practice group as end-users, repeat for the litigation practice group to get associates and partners for both practice groups in your end-user list.
Press OK once you are finished. The report will remain on your list so it can be managed.
Use-Case:
Users without Report Security nor Full Access to Report Filter
Once the report is personalized, users without report security nor full access to the report filter – permission level 4, will be limited to report results as set by the creator.
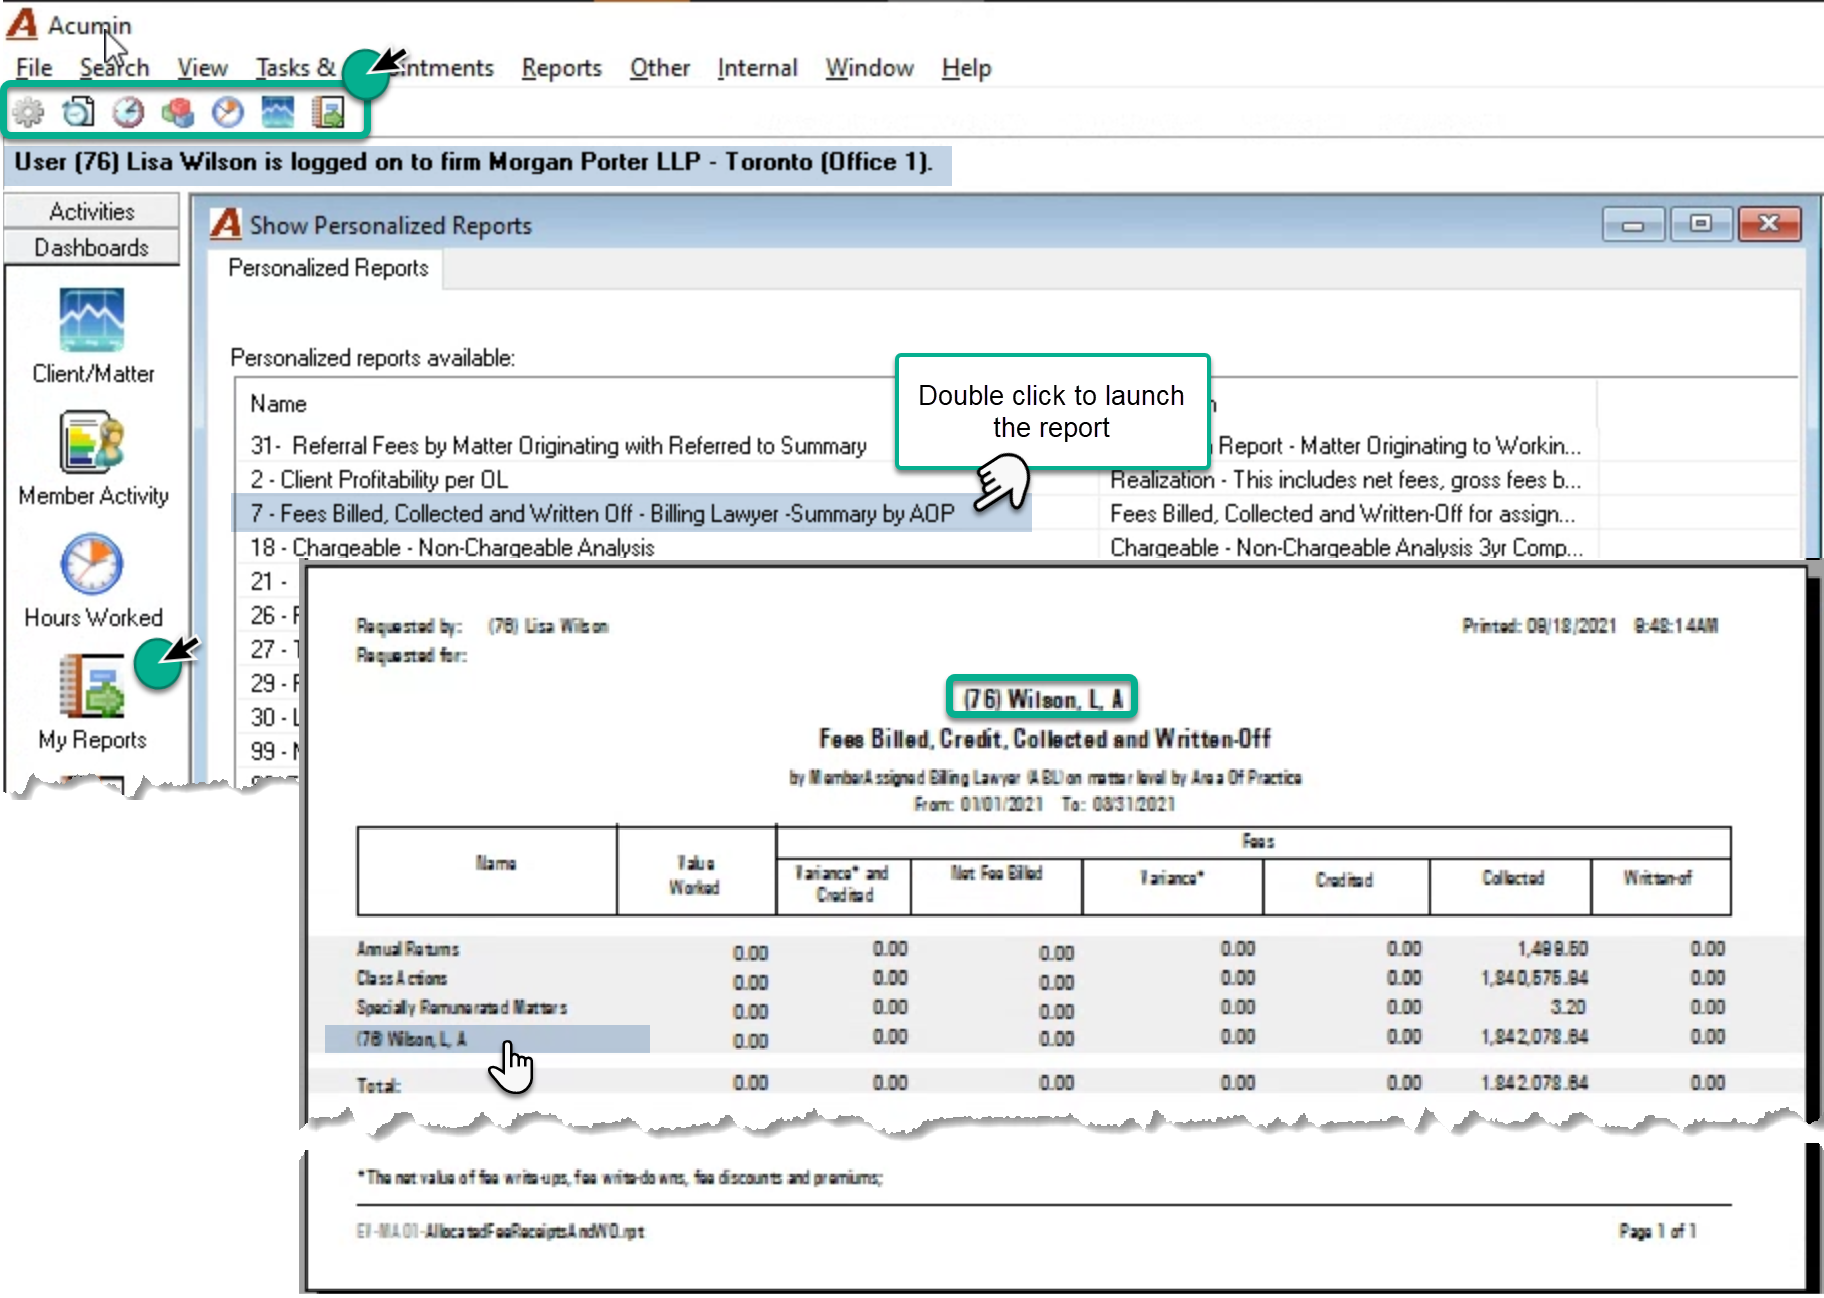
Once logged in, end-users can access their list of personalized reports by pressing the “My Reports” button from the dashboard section of the task bar or from their personalized tool bar, shown above the login information.
Users can double click on the report to launch with the calculated default date range. If the report was built with the member reporting dimension, end-users will only see results for their own measures.
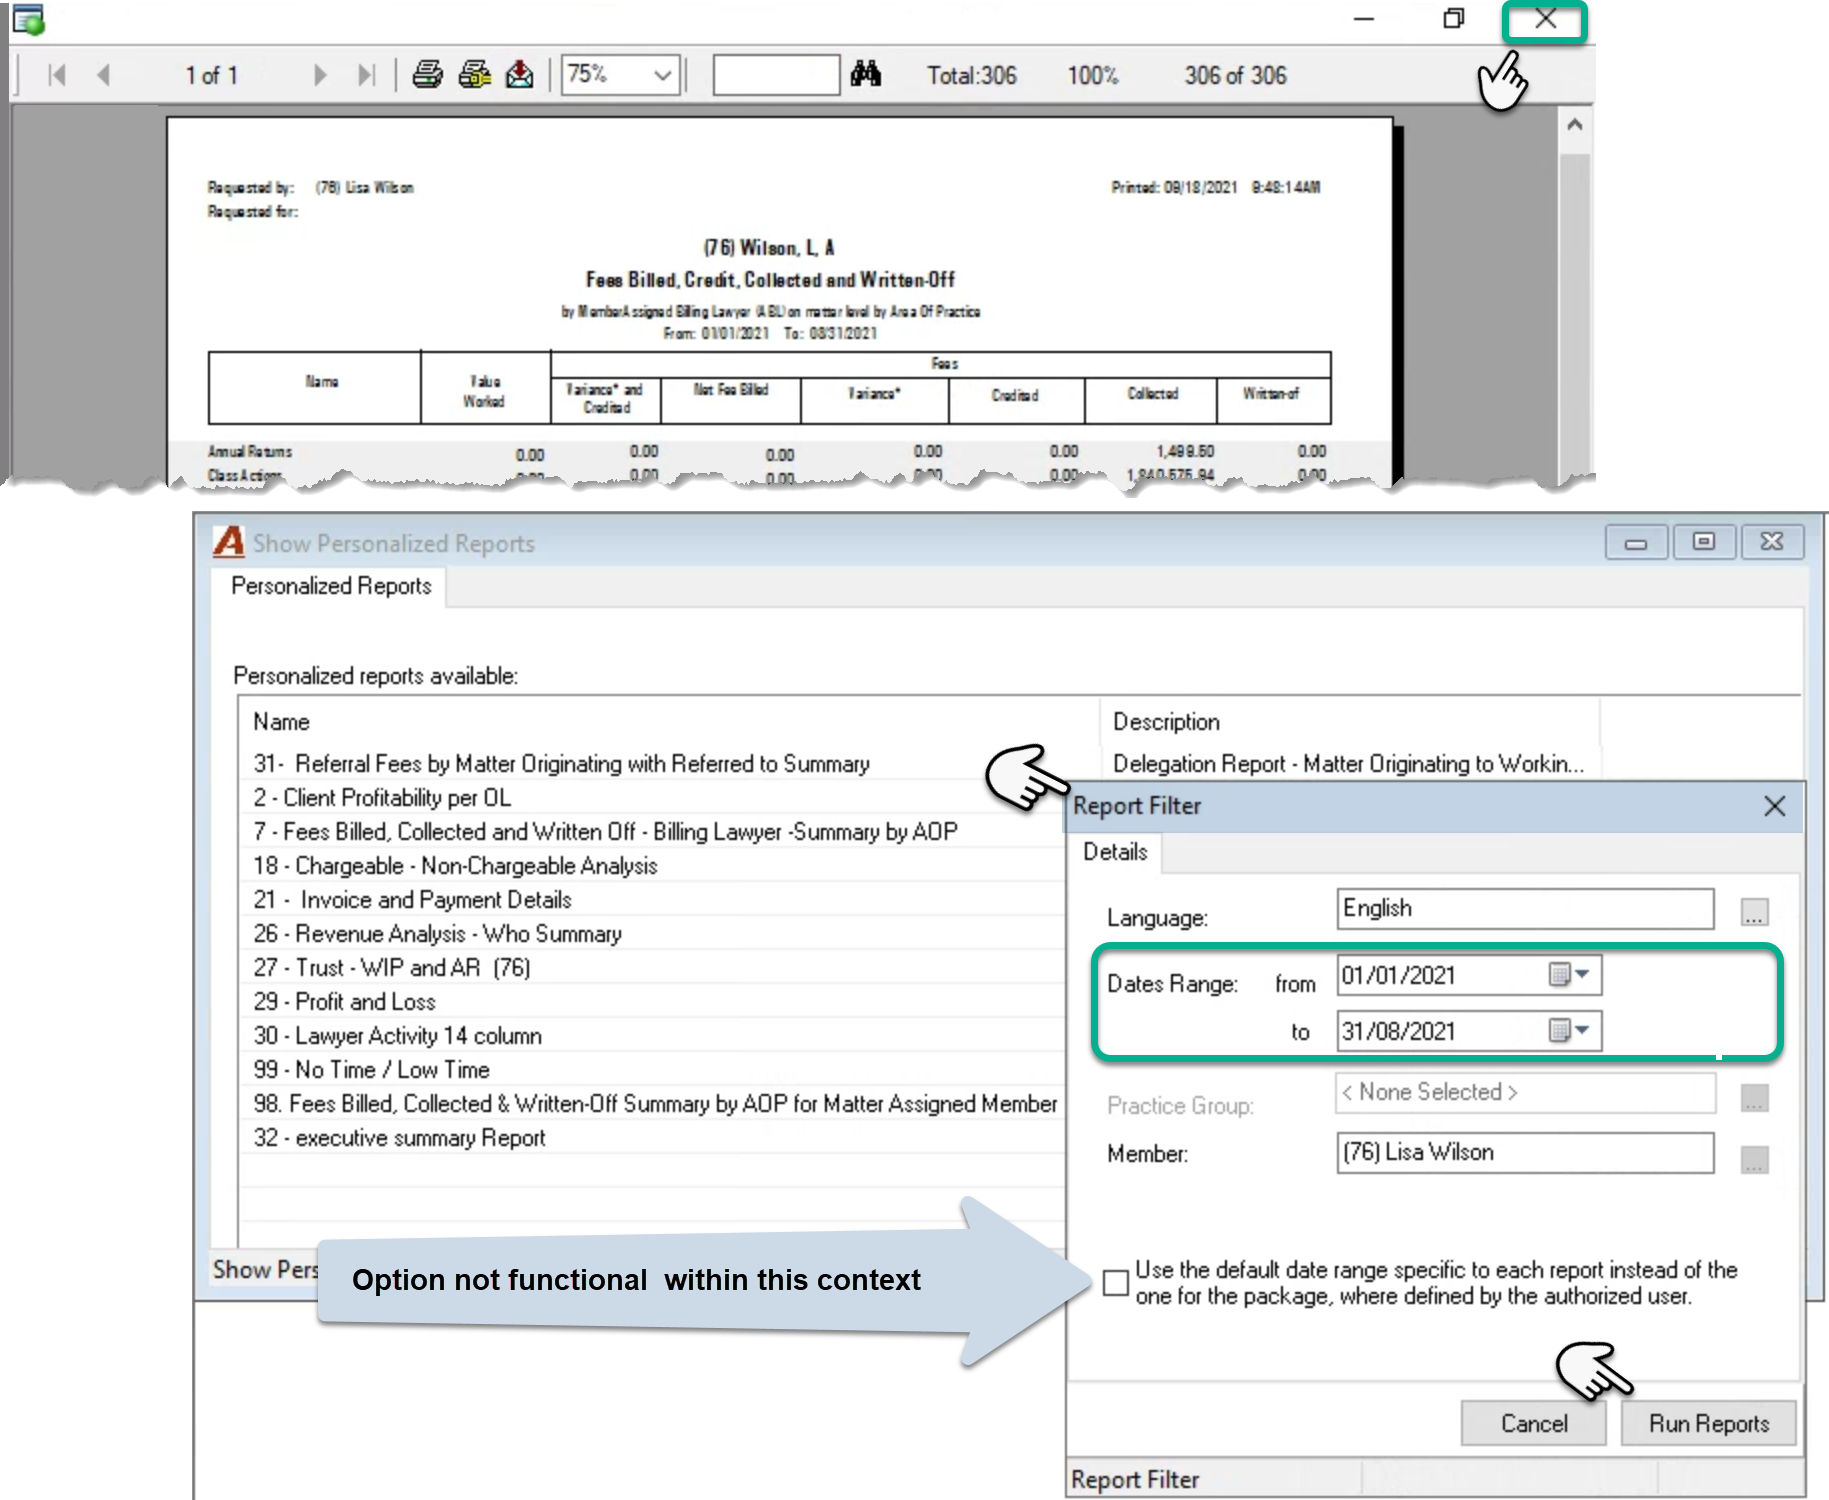
Once the user closes the report, the report’s filter form will be launched in case the user wants to change the default calculated date range. The filter is also available from the right-click contextual menu. Press “Run Report” to see the results based on the new date.
Users with Report Security or Full Access to Report Filter
Once the report is personalized, end-users with report security or full access to the report filter – permission level 4, will default to report results as set by the creator without losing the ability to also access the complete filter and change default positions as needed.
Once logged in, access the list of personalized reports by pressing the “My Reports” button from the task bar dashboard or the personalized tool bar above the login information.
Double click on the report. If the report was built with the member reporting dimension or with the member as detail, you will see results for all members as a default.
Once you close the report, the report’s complete filter form will be launched in case you want to change the filter options selected. Press “Run Report” to see the results based on your new selection.